There seems to be a maximum of 96 points in the text size in PPT. In fact you can have a lot more. Just type a larger number in the Font Size box and press enter.

There seems to be a maximum of 96 points in the text size in PPT. In fact you can have a lot more. Just type a larger number in the Font Size box and press enter.
Het lijkt erop dat 96 pt de maximum tekengrootte is in PPT. Nochtans is dat niet zo, in de lijst tekengrootte kan je elke waarde intypen en enter drukken.
In PPT voor Windows kan je in theorie een waarde instellen tot 4000 pt. In de praktijk zal dat natuurlijk heel wat lager liggen.

When you go to the slide master by clicking View - Slide Master and select the Fonts button in the Background group, you can effectively see which theme font is active.
Starting with a blank presentation, this is the Office theme. In the list of fonts, the Office theme is selected in gray. The Calibri Light font is active for the header and the Calibri font for the body text. This is in the PPT 2019 version, in other later versions these can be different fonts.

Below is an example of a slide with the built-in Office theme font.

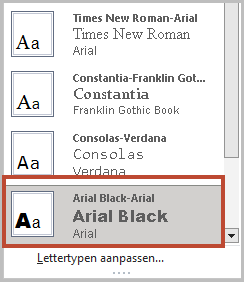
If you choose a different theme font from the list in the slide master, it will have effect on all the underlying slides.
Below you see the same slide where the theme font Arial Black (header) and Arial (body) was chosen.

Changing the theme font is not the same thing as selecting the master placeholders and applying a font.
On the sample slide below I applied Arial Black for the header and Arial Rounded MT Bold for the main text in the master placeholders. The underlying slides are all affected since the master determines the appearance of the placeholder text. Unfortunately, other text from text boxes and graphs and shapes has not.


What if you create a completely new theme font in the slide master as in the example below?
To do this, click on the list arrow next to Fonts and select Customize font at the bottom.


The new theme font now also appears in the list of theme fonts under the Custom section. It is also immediately applied to all underlying slides.

Below is the same example where the Aptos Display font has been applied to the blue rectangle. As you can see, the theme font change had no effect.

If you still want the object to follow the theme font, you can clear the local formatting.
Select the shape and in the Font group of the Home tab, click the Clear All Formatting button.
Now the shape will follow the master theme font.
Wanneer je naar het diamodel navigeert via Beeld - Diamodel en in de groep Achtergrond kiest voor de knop Lettertypen zie je effectief welk themalettertype actief is.
Bij de start van een blanco presentatie is dat het Office thema. In de lijst met lettertypen staat het Office thema grijs geselecteerd. Voor de koptekst is het lettertype Calibri Light actief en voor de hoofdtekst het lettertype Calibri. Dit allemaal in de versie PPT 2019 in andere versies kunnen dat ondertussen andere lettertypen zijn.

Hieronder zie je een voorbeeld van een dia met het standaard ingebouwd Office themalettertype.

Kies je nu in het model een ander standaard themalettertype uit de lijst dat zal dat effect hebben op alle onderliggende dia's.
Hieronder zie je dezelfde dia waar voor het themalettertype Arial Black (koptekst) en Arial (hoofdtekst) is gekozen.
Zoals je kan zien is alle tekst op de dia aangepast. Ook de tekst in getekende vormen, tekstvakken en grafieken.
Merk ook op dat je dit niet ongestraft doet, kijk bijvoorbeeld naar de hoofdtitel die plots over 2 regels loopt!


Wanneer je zelf in het diamodel de tijdelijke aanduidingen selecteert en een eigen lettertype toepast dan is dit niet hetzelfde als een nieuw thema lettertype kiezen.
Op de onderstaande dia heb ik in het diamodel op de tijdelijke aanduidingen als koptekst Arial Black toegepast en als hoofdtekst Arial Rounded MT Bold. De onderliggende dia's worden wel allemaal aangepast aangezien het model het uitzicht van de dia's bepaald maar de andere tekst uit de vormen, tekstvakken en de grafiek helaas niet (zie dia1). Op de tweede dia is er geen probleem.


Wat als je in het diamodel een totaal nieuw themalettertype aanmaakt zoals in onderstaand voorbeeld?
Je klikt daarvoor op het lijstpijltje naast Lettertypen en je kiest onderaan voor Lettertypen aanpassen.

Je kiest je lettertypen, in onderstaand voorbeeld heb ik voor de koptekst Arial Rounded MT Bold ingesteld en voor de hoofdtekst Brittanic Bold. Vervolgens geef je een naam aan het thema en je klikt op Opslaan.

Het nieuwe themalettertype duikt nu ook op in de lijst met themalettertypen onder de rubriek Aangepast. Het wordt meteen ook toegepast op alle onderliggende dia's.


Wat als je bent teruggekeerd naar de dia's en je merkt dat het themalettertype toch niet is toegepast? Dan ligt dat waarschijnlijk aan het feit dat op de dia zelf een wijziging is doorgevoerd. Je hebt bijvoorbeeld een object geselecteerd en manueel in de dia het lettertype aangepast. Aangezien plaatselijke opmaak op de dia prioritair is zal je wijziging van het themalettertype niets uithalen.
Hieronder opnieuw hetzelfde voorbeeld waar op de blauwe rechthoek het lettertype Aptos Display is toegepast. Zoals je ziet heeft de wijziging van themalettertype geen effect gehad.

Als je het object toch het themalettertype wil laten volgen kan je de plaatselijke opmaak wissen.
Selecteer de vorm en klik in de groep Lettertype op de knop Alle opmaak wissen.
