Het is altijd handig om een geprinte versie van artikels bij de hand te hebben. Ik heb voor alle artikelen per jaar een Word document aangemaakt.
Algemene artikelen of aankondigingen zijn niet opgenomen in de documenten.
Ieder artikel krijgt zijn eigen pagina. Een inhoudstafel is beschikbaar en je kan zien welke versies van PPT geschikt zijn om een taak uit te voeren. Sommige artikelen zijn natuurlijk enkel bestemd voor een specifieke PPT versie.
Je kan het document voor het jaar 2012 downloaden via onderstaande link.
Blogartikelen jaar 2012
28 februari 2013

Blog articles in a Word document, year 2012
It is always handy to have a printable copy of interesting articles. I have made Word documents containing all my blog articles over the years.
Some general articles or general announcements have been let out.
Every article has its own page, and there is a table of contents to get quickly at it. You will see the versions of PPT that can be used to perform a task. Of course some articles only apply to a particular version of PowerPoint.
This is the document for the year 2012.
Some general articles or general announcements have been let out.
Every article has its own page, and there is a table of contents to get quickly at it. You will see the versions of PPT that can be used to perform a task. Of course some articles only apply to a particular version of PowerPoint.
This is the document for the year 2012.
22 februari 2013
Selecteren tijdelijke aanduidingen
Selecteren tijdelijke aanduidingen
Om een tijdelijke aanduiding te selecteren klik je meestal op de rand van de aanduiding.
Je kan ook de tabulatortoets gebruiken die objecten één voor één selecteert, maar dan moet je geregeld meerdere keren drukken vooraleer je aanduiding geselecteerd is.
Maar je kan ook gebruik maken van de functietoets F2, handig als je cursor zich al in de tijdelijke aanduiding bevindt.

Selecting placeholders
Selecting placeholders
Another alternative is to press the tab key on your keyboard which selects one object at a time, but that may take several keystrokes.
To select a placeholder one can also press F2, quite handy when your cursor is already in the placeholder.
16 februari 2013
Verdwijnende muisaanwijzer
Verdwijnende muisaanwijzer
In PowerPoint verdwijnt de muisaanwijzer automatisch na enkele seconden. Door even met de muis te bewegen komt die wel terug.
Om te vermijden dat de muisaanwijzer verdwijnt druk je de combinatie CTRL+A.
Opgelet, dit is éénmalig, voor de volgende presentatie moet je opnieuw de combinatie indrukken.
14 februari 2013
Disappearing mouse pointer
Disappearing mouse pointer
In PowerPoint you have certainly observed that the mouse pointer vanishes after a few seconds during a presentation. Moving your mouse brings it back. This can be annoying especially if you have to click triggered objects and such.
To prevent the mouse pointer from vanishing, press Ctrl+A.
Be aware that this a presentation only setting. You will have to use the combination with each new presentation.
01 februari 2013
Toon de klok tijdens presentatie
Er zijn omstandigheden waar het tonen van een klok tijdens een presentatie gerechtvaardigd is. Persoonlijk ben ik tegen, het tonen van de klok kan (onnodig) extra druk leggen op de presentator.
Als je een lopende digitale klok nodig hebt bekijk dan deze add-in op de volgende link:
http://www.tushar-mehta.com/powerpoint/ppt_timer/index.htm
Als je een analoge klok nodig hebt dat kan je dit truukje toepassen (dat ik heb geleerd van John Wilson - MVP).
Gebruik de gadget met de analoge klok in Windows Vista, Windows 7.
Opmerking!
Vanaf Windows 8 heeft Microsoft de gadgets verwijderd, wegens veiligheidsoverwegingen.
Als je de procedure hieronder toch wil volgen voor Windows 8, 8.1 of Windows 10 kan je altijd beroep doen op een desktop gadgets installeerprogramma. Eens je dat hebt gedaan krijg je de oude gadgets van Windows 7 terug.
Op je bureaublad rechts klikken op de gadget met de klok, kies voor Altijd op de voorgrond. Sleep de klok op de gewenste plaats.

Eventueel kan je de doorzichtigheid ook aanpassen zodat de klok niet zo opvallend in beeld komt.


Tijdens je presentatie kan je met de muis over de klok navigeren om deze zichtbaar te maken.
Als je een lopende digitale klok nodig hebt bekijk dan deze add-in op de volgende link:
http://www.tushar-mehta.com/powerpoint/ppt_timer/index.htm
Als je een analoge klok nodig hebt dat kan je dit truukje toepassen (dat ik heb geleerd van John Wilson - MVP).
Gebruik de gadget met de analoge klok in Windows Vista, Windows 7.
Opmerking!
Vanaf Windows 8 heeft Microsoft de gadgets verwijderd, wegens veiligheidsoverwegingen.
Als je de procedure hieronder toch wil volgen voor Windows 8, 8.1 of Windows 10 kan je altijd beroep doen op een desktop gadgets installeerprogramma. Eens je dat hebt gedaan krijg je de oude gadgets van Windows 7 terug.
Op je bureaublad rechts klikken op de gadget met de klok, kies voor Altijd op de voorgrond. Sleep de klok op de gewenste plaats.
Eventueel kan je de doorzichtigheid ook aanpassen zodat de klok niet zo opvallend in beeld komt.
Tijdens je presentatie kan je met de muis over de klok navigeren om deze zichtbaar te maken.
30 januari 2013
Show the clock while presenting
There are situations where showing a clock during your presentation might be useful. Personally I am against it, as it can put additional (unneccesary) pressure on the presenter.
If you need a digital clock have a look at this add-in:http://www.tushar-mehta.com/powerpoint/ppt_timer/index.htm
If you want an analog clock, here's a neat little trick I learned from John Wilson MVP.
Use the analog clock that is present in Windows Vista, Windows 7 or Windows 8.
On your desktop, right-click the analog clock and choose to detach the clock from the sidebar. Place your clock by dragging it in the correct position. Right-click it and choose Always on top

Start your presentation, your analog clock will be on top. If you want it to be less dominant, right-click it and set the opacity to a lower percentage.


24 januari 2013
Opnieuw instellen lettertype diamodel bij gewijzigde opmaak in dia
Opnieuw instellen lettertype diamodel bij gewijzigde opmaak in dia
Bij het instellen van het lettertype in je diamodel passen alle dia-indelingen zich automatisch aan. Wanneer je dan op een individuele dia-indeling het lettertype aanpast is er geen weg meer terug. Nieuwe wijzigingen aan het diamodel hebben geen effect meer op je gewijzigde dia-indeling.Wat moet je doen wanneer je het ingestelde lettertype van het diamodel wil herstellen?
Selecteer de dia-indeling en selecteer de tijdelijke aanduiding(en) die je wil herstellen. Klik in het lint Start in de groep Lettertype op de knop Alle opmaak wissen. Alle plaatselijke wijzigingen zouden nu moeten verdwijnen en het diamodel volgt opnieuw het diamodel.


Als alternatief kan je ook gebruik maken van de toetsenbordcombinatie CTRL+spatiebalk.
21 januari 2013
Reset font changes on a slide layout to the font on the master
Reset font changes on a slide layout to the font on the master
Once you set the font in your master the changes trickle down to your slide layouts. If you change the font of a placeholder(s) in a slide layout afterwards, there is no way back. Changing the font of a placeholder in the Slide master will not alter the font on the slide layout.What if you want to restore the font of the slide layout to the one used in the slide master?
Select the slide layout and then select the placeholder(s) you want to reset. Go to the Home tab, Font group, click the Remove formatting button. Now the font should be restored to the one of the Slide master.


As an alternative you can select and press Ctrl+spacebar which will do the same.
17 januari 2013
Remove background from clipart (part two)
Remove background from clipart (part two)
For the second method we will use the Remove background function.
Insert your clipart the usual way, select the clipart, copy it and paste back using Paste special. Select the Picture png option.


You will see that the Remove background button is no longer greyed out. Click on it and remove any part you want.

In this example I only want to remove the background so I can click the Keep changes button immediately.

15 januari 2013
Achtergrond van illustratie verwijderen (deel 2)
Bij de tweede methode maken we gebruik van de functie Achtergrond verwijderen.
Je voegt de illustratie toe op de gebruikelijke manier. Vervolgens selecteer je de afbeelding, je kopieert ze en plakt ze vervolgens via Plakken speciaal terug in je presentatie als een png afbeelding.


Wanneer je nu de afbeelding selecteert zie je dat de knop Achtergrond verwijderen niet meer grijs staat. Klik erop, je kan nu delen verwijderen.

In dit voorbeeld wil je alleen de achtergrond verwijderen dus kan je meteen klikken op de knop Wijzigingen behouden.

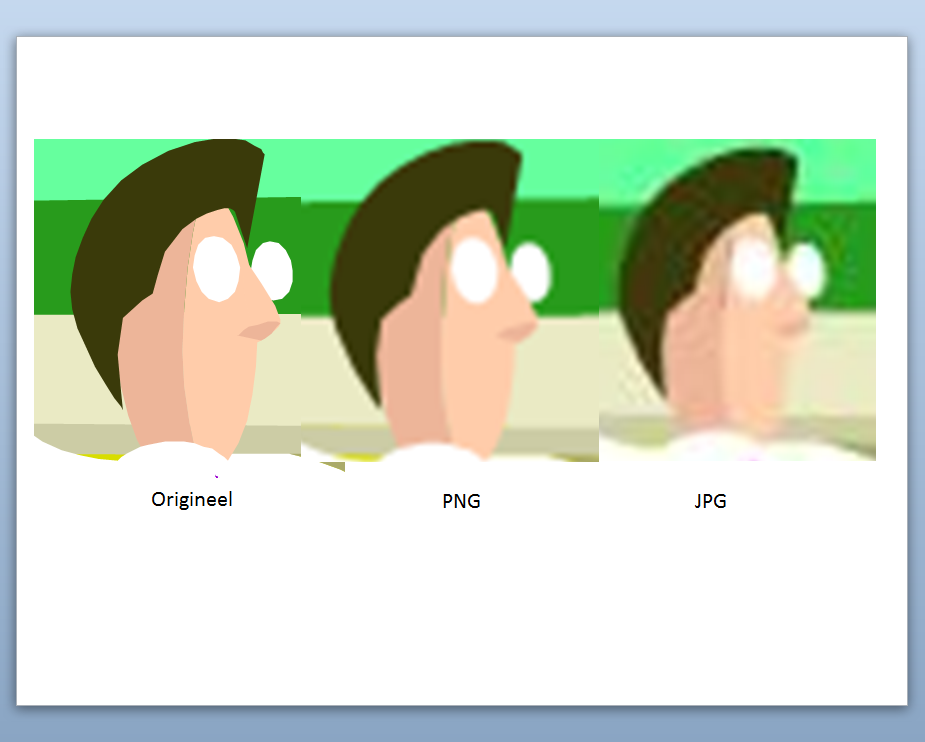
Merk op dat de kwaliteit niet meer dezelfde is als bij het origineel. Dat merk je heel goed wanneer je de illustratie groter maakt. Om dit duidelijk te maken heb ik hieronder ingezoomd op een gedeelte van de afbeelding. Links staat het origineel, in het midden de png en rechts de jpg. Het bestandstype PNG lijkt mij dus de aangewezen keuze.

Je voegt de illustratie toe op de gebruikelijke manier. Vervolgens selecteer je de afbeelding, je kopieert ze en plakt ze vervolgens via Plakken speciaal terug in je presentatie als een png afbeelding.
Wanneer je nu de afbeelding selecteert zie je dat de knop Achtergrond verwijderen niet meer grijs staat. Klik erop, je kan nu delen verwijderen.
In dit voorbeeld wil je alleen de achtergrond verwijderen dus kan je meteen klikken op de knop Wijzigingen behouden.
Merk op dat de kwaliteit niet meer dezelfde is als bij het origineel. Dat merk je heel goed wanneer je de illustratie groter maakt. Om dit duidelijk te maken heb ik hieronder ingezoomd op een gedeelte van de afbeelding. Links staat het origineel, in het midden de png en rechts de jpg. Het bestandstype PNG lijkt mij dus de aangewezen keuze.
Abonneren op:
Posts (Atom)