zaterdag 31 december 2011

Tekst rond een object laten vloeien (2)

Tekst rond een object laten vloeien (2)

De oplossing voor ons probleem is te vinden in Microsoft Word, daar kan je tekst rondom een object laten vloeien. Voeg dus je afbeelding toe in Word, kies onder Hulpmiddelen voor afbeeldingen voor tabblad Opmaak, knop Tekstterugloop, selecteer de optie Contour, klik naast je afbeelding en typ de tekst.

Vervolgens selecteer je het geheel en kopieer je het naar PowerPoint.
Daar kies je voor de knop Plakken en Plakken speciaal.

In het dialoogvenster kies je vervolgens voor Microsoft Word-document object.


Het object wordt geplaatst in de PPT-dia:

Eens het object aanwezig kan je via een dubbelklik op de rand of door rechts te klikken op het object en te kiezen voor Documentobject en Bewerken.


Dan kan je naar hartenlust editeren:


Klik buiten het object om het terug in de dia te plaatsen.

vrijdag 30 december 2011

Let text flow around object (1)

Let text flow around object (1)

In a previous blog I showed you how you could curve text around a circle. For that purpose you could create a textbox containing one or several words. But to let a textbox containing several lines of text follow the contours of an image for example, PowerPoint does not offer an in-built function.

Here's a sample slide where this seems to have succeeded. No, the author of the presentation did not make several textboxes and positioned them carefully relative to one another to give the impression that the contours of the picture had been followed.

So how do we do this then? I will explain this in a next entry.

woensdag 28 december 2011

Tekst rond een object laten vloeien (1)

Tekst rond een object laten vloeien (1)

In een vorige bijdrage heb ik laten zien hoe je tekst de contour van een cirkel kan laten volgen. Dit kan met een tekstvak bestaande uit een woord of maximaal enkele woorden.

Om een tekstvak bestaande uit meerdere regels rondom een object te laten vloeien is er geen mogelijkheid voorzien in PowerPoint.

Hieronder een voorbeeld van een dia waar dit toch lijkt gelukt te zijn. Toch is hier geen gebruik gemaakt van meerdere tekstvakken die zorgvuldig zijn gepositioneerd om de indruk te geven dat de contour van de afbeelding is gevolgd.

Hoe we dit gaan aanpakken komt aan bod in een volgende bijdrage.

dinsdag 27 december 2011

Tekst rond een cirkel plaatsen, animatie (2)

Voor het aanmaken van tekst rondom een cirkel zie vorig artikel Tekst rond een cirkel plaatsen (1)

We willen de twee tekstvakken animeren.

Het bovenste tekstvak willen we laten verschijnen letter per letter, dit moet herhaald worden tot we klikken om de dia te beƫindigen. Het onderste tekstvak mag pas geanimeerd worden 10 seconden na het eerste tekstvak. De animatie moet ook herhaald worden tot er geklikt wordt voor het einde van de dia. We zullen hetzelfde effect gebruiken maar deze keer geanimeerd woord per woord.

Bovenste tekstvak:
  1. Selecteer het tekstvak.
  2. Lint Animaties, klik op Animatie toevoegen, onder Nadruk kies je voor Kwastkleur.
  3. In het dialoogvenster Kwastkleur, Effect tabblad, kies naast Kleur een gepaste kleur, en naast Tekst van animatie voorzien kies je voor Per letter. Stel de vertraging tussen de letters in op
    20 %.
  4. Op het tabblad Tijdsinstellingen, naast Start kies je voor Met vorige, naast Herhalen kies je in de lijst voor Tot einde van de dia.


Onderste tekstvak
  1. Selecteer het tekstvak.
  2. Lint Animaties, klik op Animatie toevoegen, onder Nadruk kies je voor Kwastkleur.
  3. In het dialoogvenster Kwastkleur, Effect tabblad, kies naast Kleur een gepaste kleur, en naast Tekst van animatie voorzien kies je voor Per woord. Stel de vertraging tussen de woorden in op
    10 %.
  4. Op het tabblad Tijdsinstellingen, naast Start kies je voor na vorige, naast Herhalen kies je in de lijst voor Tot einde van de dia.
  5. In het animatiedeelvenster sleep je nu het blokje voor de tweede animatie naar rechts (via geavanceerd tijdschema) tot je de starttijd van 10 seconden bereikt. Of je kiest op het tabblad Tijdsinstelling in het vak vertraging voor 10 sec.


maandag 26 december 2011

Let text flow around circle, animation (2)

See my previous article on how to let text flow around a circle: Let text flow around circle (1)

Now let's animate the curved text.

We want the top text to change colour letter by letter, and repeat that till we click and end the animation. The bottom text must start to animate 10 seconds after the top text and has to repeat also to the end of the slide. We will use the same effect but this time repeat word by word.

Top text:
  1. Select the textbox
  2. Animation tab, click Add animation button, under Emphasis effects choose Brush color.
  3. In the brush color dialog, Effect tab, choose the appropriate color next to Color, and next to Animate text choose animate by letter, set the delay to 20 % between letters.
  4. On the timing tab, next to Start choose with previous, next to Repeat choose till end of slide.
Bottom text
  1. Select the textbox
  2. Animation tab, click Add animation button, under Emphasis effects choose Brush color.
  3. In the brush color dialog, Effect tab, choose the appropriate color next to Color, and next to Animate text choose animate by word, set the delay to 10 % between words.
  4. On the timing tab, next to Start choose after previous, next to Repeat choose till end of slide.
  5. Now, in the animation pane drag the second entry to the right till you reach the starting time of 10 seconds.

zaterdag 24 december 2011

Tekst rond een cirkel plaatsen (1)

Veronderstel dat je een dia wil aanmaken met een uitnodiging voor een feestje. De dia zou er uiteindelijk zo moeten uitzien:
Stap 1
Teken je cirkel en pas een transparantie van 50-70% % toe. Laat de rand verdwijnen. Typ de tekst in de geselecteerde cirkel, pas een geschikte WordArt stijl toe.


Stap 2
Voeg nu je foto in en plaats hem op de achtergrond. Pas er het artistiek effect 'Fotokopie' op toe en als afbeeldingseffect, vloeiende rand van 25 pt.


Stap 3
Plaats het bovenste tekstvak op je cirkel. Pas de tekengrootte aan. Laat hem de curve van de cirkel volgen via knop Teksteffecten uit de groep Stijlen voor WordArt. Kies voor Transformeren en kies onder Pad volgen voor Boog omhoog. Herhaal dat voor het tekstvak onderaan, hier pas je natuurlijk Boog omlaag toe. De tekenafstand wordt ingesteld op zeer los.


Eens de tekstvakken geplaatst pas je ze aan. Selecteer de vorm, sleep met de bijstellingsgreep tot de gewenste boog is bereikt.


Voor het onderste tekstvak pas je eerst aan met de bijstellingsgreep, dan pas je het tekstvak in de hoogte en de breedte aan met de handgrepen zodat die perfect de cirkel volgt.

Hieronder een tweede voorbeeld met tekst die de volledige cirkel omsluit.

Plaats een tekstvak dat breder is dan de cirkel, typ je tekst in het vak en kies in de groep Stijlen voor WordArt voor de knop Teksteffecten, selecteer Transformeren en dan onder Pad volgen voor cirkel.

Tekstvak maken en tekst intypen

Teksteffect cirkel toepassen
Tekstvak verhogen met de handgreep
Verhoog de tekengrootte van de tekst tot die volledig de omtrek volgt. Maak gebruik van de roteerknop om de tekst precies te laten beginnen waar je dat wil.


Je kan eventueel de cirkel en het tekstvak nog groeperen zodat het geheel gemakkelijk kan aangepast worden qua grootte.

De animatie behandelen wij in een volgende bijdrage.


donderdag 22 december 2011

Let text flow around circle (1)

Let us assume you want to make an animated slide with an invitation to a party. You want text to curve around a circle.

The slide in its finished state should look like something like this:

Step 1
Create your circle, give it a transparent background of 50-70 %. Put in the text you want and format it with a suitable WordArt style.


Step 2
Insert your picture, move it to the background and apply and artistic effect (I have used the photocopy effect here) and apply a soft edge of 25 points.


Step 3
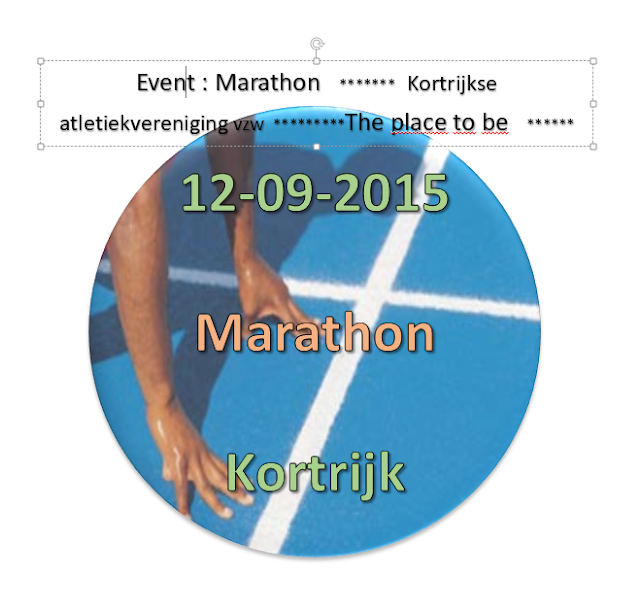
Insert the textbox that should be above the circle, format it to the size you want. 

Now curve it so that it follows the shape of the circle. In the WordArt styles group click the Text effects button and choose Transform, under follow path use the Arc up and Arc down options to curve your text. Repeat the process for the text box at the bottom.
Adjust character spacing to very loose.


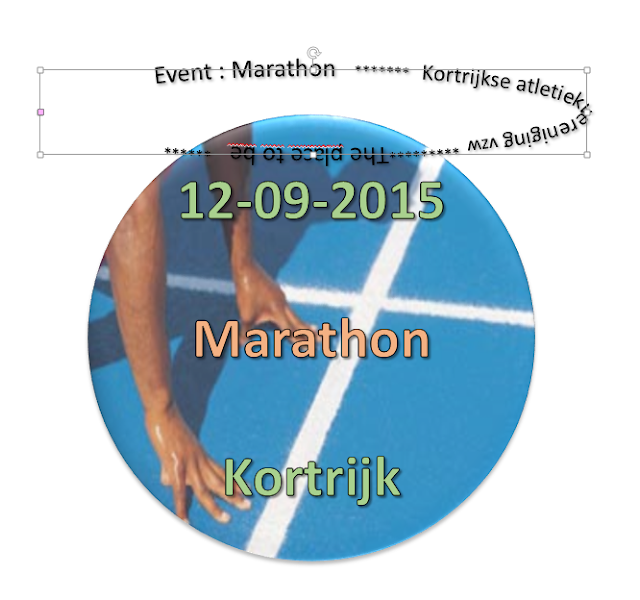
When the text boxes are in place adjust them. Select the box and drag the diamond shaped handle to adjust the bow.

For the bottom box, first adjust the bow using the handle then adjust the text box in height and with so that it fits perfectly around the circle.

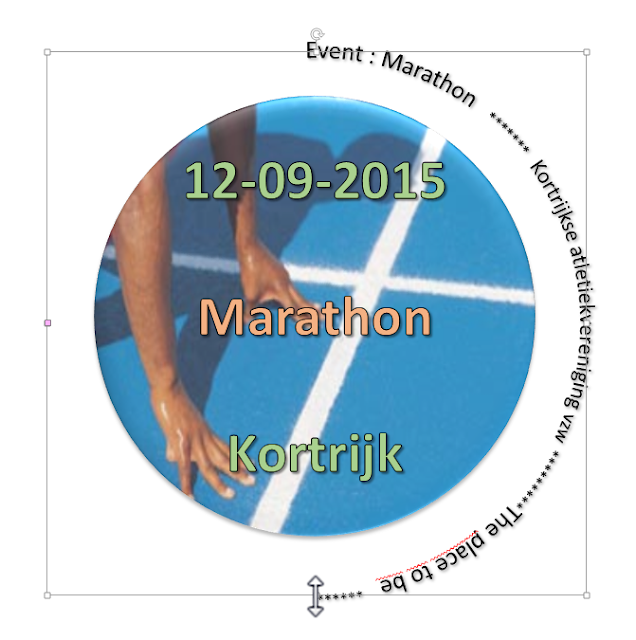
Below a second sample. Text surrounds the entire circle. You will need to adjust with the handles and the rotation button to get the result you want.

Insert a textbox that should be wider than the circle. Type your text.

Now curve it so that it follows the shape of the circle. In the WordArt styles group click the Text effects button and choose Transform, under follow path use the Circle option to curve your text.


Create textbox and type text

Apply text effect circle
Adjust the height using the handle

Now increase the font size so that the text follows the complete circle. Make use of the rotation button to adjust the text and its placement in the circle.


We will do the animation in a next entry.