donderdag 20 juni 2019

Reveal a picture step by step with animation - PPT 2013-2019

1) Reveal using an exit animation on shapes

Insert your picture on the slide.

Draw a shape (rectangle in the example) and copy the rectangle to cover the whole of the picture.


Select the shapes in the order you want them to appear (shift+click). Add the exit animation 'Disappear' using the Animation tab and the Add animation button.

In the animation pane all the rectangles (except the first one) have an animation that
starts with previous. Select the second animation and drag the bar in the advanced timeline to add a delay of x seconds. Repeat that process for the following animations.


To make this a little easier zoom out on the advanced timeline, click on the list arrow next to seconds and choose zoom out.

Or drag the animation pane to the bottom of the screen so that it appears in a horizontal position.


After the first click each rectangle disappears with a delay till all the rectangles have gone.


2) Reveal using an emphasis effect on shapes

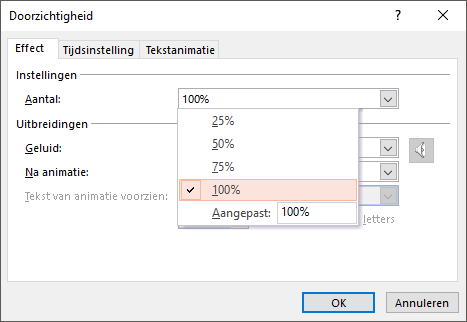
The procedure is identical to the one described above.

Select the shapes in the order you want them to appear (shift+click). Add the emphasis animation 'Transparency' using the Animation tab and the Add animation button. Right click the selection and on the Effects tab of the dialog increase the default transparency percentage from 50% to 100%.

In the animation pane all the rectangles (except the first one) have an animation that
starts with previous. Select the second animation and drag the bar in the advanced timeline to add a delay of x seconds. Repeat that process for the following animations.


In the video you will see that there is no visible difference between the first video and this one.


3) Reveal temporarily by adding an exit animation followed by an entrance animation on shapes.

If you want to let people guess what/who the picture represents and make it a bit more difficult you can let the shapes disappear then reappear after a small delay.

Select the shapes in the order you want them to appear (shift+click). Add the exit animation 'Disappear' using the Animation tab and the Add animation button, choose On click next to the start option.

Leave the selection active, immediately apply the entrance effect 'Appear' and click the with previous option next to start.

Drag the entrance animation just beneath the correct exit animation.


Now select all the entrance animations (ctrl+klik) and increase the timing next to delay.


See the result in this video:


4) Reveal temporarily by adding an emphasis animation on shapes 

Select the shapes in the order you want them to appear (shift+click). Add the emphasis animation 'Transparency' using the Animation tab and the Add animation button. Right click the selection and choose Effect options, on the Effects tab increase the default transparency percentage from 50% to 100%.

Now click on the Timing tab in the dialog and next to start select On click. Next to Duration choose Until next click. No need to add a delay this time, the appearance and disappearance depends solely on you clicking.


5) Reveal step by step and yet show the entire picture before all the animations have finished.

You can add an extra bonus to method 3 and 4 by adding the possibility to show the entire picture at will during the slide show. To do so you need to apply and exit animation to all the rectangles activated by a trigger.

After dragging the entrance animations to reach the right position. Select all the rectangles again and add the exit animation 'disappear'. In the animation pane all the animations are animated with previous. Leave the selection active and click next to the Trigger button and select On click of then choose the shape you want to use as a trigger. In the example below I have chosen rectangle 1.


zaterdag 15 juni 2019

Een foto stap voor stap onthullen via animatie - PPT 2013-2019

1) Foto onthullen via eindanimatie op vormen

Plaats je foto op de dia.

Teken een vorm (hier rechthoek) en kopieer die een aantal keer tot de volledige dia bedekt is.


Selecteer de rechthoeken in de volgorde zoals je ze wilt laten verdwijnen (shift+klik), voeg via het tabblad animatie de eindanimatie 'Verdwijnen' toe.

In het animatiedeelvenster zie je nu dat alle rechthoeken behalve de eerste met vorige worden geanimeerd. Selecteer de tweede animatie en volgende animaties een voor een en sleep met het blokje zodat een vertraging optreedt van x seconden. Herhaal dat proces tot alle rechthoeken aan de beurt zijn gekomen.


Om dat proces wat eenvoudiger te maken kan je uitzoomen op de lijst met animaties door onderaan te klikken op het lijstpijltje naast seconden en te kiezen voor 'Uitzoomen'.


Je kan het animatiedeelvenster ook verslepen naar de onderkant van je scherm zodat die horizontaal komt te staan.

Na één klik verdwijnen de vormen één na één tot de volledige foto zichtbaar is.


2) Foto onthullen via nadrukanimatie op vormen

De werkwijze is dezelfde als hierboven.

Selecteer de rechthoeken in de volgorde zoals je ze wilt laten verdwijnen (shift+klik), voeg via het tabblad Animatie en de knop Animatie toevoegen de nadrukanimatie 'Doorzichtigheid' toe. Standaard staat de doorzichtigheid op 50 %, selecteer alle effecten, rechtsklik op de selectie en verhoog via het tabblad Effect tot 100% doorzichtigheid.


In het animatiedeelvenster zie je nu dat alle rechthoeken behalve de eerste met vorige worden geanimeerd. Selecteer de tweede animatie en volgende animaties en sleep met het blokje zodat een vertraging optreedt van x seconden. Herhaal dat proces voor de andere rechthoeken.


In de video zie je dat er visueel geen onderscheid valt te maken als je als nadrukeffect doorzichtigheid gebruikt.


3) Foto tijdelijk onthullen via eind- en beginanimatie op vormen

Wanneer je iemand wil laten raden wat/wie de foto voorstelt maar het ietsje moeilijker wil maken dan kan je de rechthoeken even laten verdwijnen en vervolgens opnieuw laten verschijnen.

Selecteer de rechthoeken in de volgorde zoals je ze wilt laten verdwijnen (shift+klik).
Voeg via het tabblad animatie de eindanimatie 'Verdwijnen' toe, klik bovenaan naast start op 'Bij klikken'.

Laat de rechthoeken geselecteerd en voeg via de knop Animatie toevoegen de beginanimatie 'Verschijnen' toe. Klik naast start op 'Met vorige'.


Sleep nu het begineffect onder het juiste eindeffect.


Selecteer alle begineffecten (ctrl+klik) en stel bovenaan naast 'vertraging' het gewenst aantal seconden in.


4) Foto tijdelijk onthullen via nadrukanimatie op vormen 

De bedoeling is dat je hier de foto wel onthuld maar na iedere klik het effect weer ongedaan maakt. Ideaal om de toeschouwer te laten raden wat de foto juist voorstelt.

Selecteer de rechthoeken in de volgorde zoals je ze wilt laten verdwijnen (shift+klik), voeg via het tabblad animatie en de knop animatie toevoegen de nadrukanimatie 'Doorzichtigheid' toe. Standaard staat de doorzichtigheid op 50 %, selecteer alle effecten, rechtsklik op de selectie kies Effectopties en verhoog via het tabblad Effect tot 100% doorzichtigheid.

Klik nu op het tabblad Tijdsinstelling, kies naast starten voor het lijstpijltje en selecteer Bij klikken, naast duur kies je voor 'Tot volgende klik'. Een vertraging instellen is hier dus niet nodig. Het tempo bepaal je zelf door te klikken.


5) Foto onthullen met mogelijkheid de volledige foto te tonen vooraleer alle animaties zijn uitgevoerd.

Je kan aan mogelijkheid 3 en 4 een extra optie toevoegen door de foto eerder volledig te onthullen bv. na het tonen van enkele onderdelen. Dat doe je via het toevoegen van een trigger die alle rechthoeken in één bewerking laat verdwijnen.

Nadat je de begineffecten op de juiste plaats hebt gesleept, selecteer je alle rechthoeken opnieuw.

Voeg via de knop Animatie toevoegen de eindanimatie 'Verdwijnen' toe. In het animatiedeelvenster zie je nu dat alle rechthoeken behalve de eerste 'met vorige' worden geanimeerd. Laat de selectie onaangeroerd en klik in het lint naast de knop Trigger op het lijstpijltje en kies naast bij klikken op voor de rechthoek die je wenst te gebruiken om alle rechthoeken te laten verdwijnen.