woensdag 30 mei 2018

Rotate shape with picture background - PPT 2013

When you rotate a shape there can be a problem. For example you rotate a shape with a background picture. The picture rotates with the shape. That is not always what you want to happen.

See the pentagon below, it is filled with a picture that rotates with the shape. In this case I rotated the shape 90° to the right.


If you do not want this to happen you can easily fix this. Right-click the shape, click Format picture, choose the Fill and line button in the Format picture task pane. Then remove the check next to Rotate with shape.


vrijdag 18 mei 2018

Turn a dingbat character into editable shapes in PPT 2013

Often I need certain clipart that is not available in PPT. Or I need some picture that I can't draw myself because it is too difficult. My drawing talents are limited.

In that case we can use the Merge Shapes function to get what we want.

Say I want to insert an old-fashioned Red Cross ambulance in my presentation. Not so easy, so we will work around it by converting a dingbat from the Webdings font in PPT.

Here are the steps:
  1. Insert a textbox and click Insert - Symbol - select the Webdings font - and add the ambulance character.
  2. Increase the font size of the character so that it reaches the right size.
  3. Draw a rectangle on top of the ambulance.
  4. Put the rectangle in the background using the Send backward button on the Format tab of the Drawing tools.
  5. Now select the rectangle and then the textbox. On the Format tab, in the Insert Shapes group click the Merge Shapes button and select Fragment.
  6. Put the cursor on the edge of the shape and drag it away. All of the shapes are selectable.
  7. Add an appropriate fill to the different shapes.


Second example, I want to insert an umbrella in my presentation.

Here are the steps:
  1. Insert a textbox and click Insert Symbol - select the Segoe El Emoji font - and add the umbrella character.
  2. Increase the font size of the character so that it reaches the right size.
  3. Draw a rectangle above the umbrella.
  4. Put the rectangle in the background using the Send backward button on the Format tab of the Drawing tools.
  5. Now select the rectangle and then the textbox. On the Format tab, in the Insert Shapes group click the Merge Shapes button and select Intersect.
  6. Draw a white rectangle above the umbrella and put it in the background using the Send backward button.
  7. Now select the rectangle and then the textbox. On the Format tab, in the Insert Shapes group click the Merge Shapes button and select Fragment.
  8. Remove the white rectangle.
  9. Put the cursor on the edge of the shape and drag it away. You are left with a simple umbrella, all of the shapes are editable.
  10. Add an appropriate fill to the different shapes. Group if necessary.

vrijdag 4 mei 2018

Een symbool (dingbat) omvormen tot editeerbare vormen in PPT 2013

Het gebeurt heel vaak dat ik in PPT een vorm nodig heb die simpelweg niet bestaat in PPT. Of ik heb een afbeelding nodig die ik niet zelf kan tekenen omdat het te moeilijk is. Mijn tekentalenten zijn heel beperkt.

In zo'n gevallen kan je de Shapes samenvoegen functie gebruiken om te verkrijgen wat je wenst.

Veronderstel dat ik een ouderwetse Rode Kruis ambulance zou willen gebruiken in mijn presentatie. Niet zo gemakkelijk om zelf te tekenen dus ga ik een omweg gebruiken. Met name een dingbat karakter uit een bijgevoegd lettertype in PPT converteren naar editeerbare vormen.

Hierna volgen de benodigde stappen:
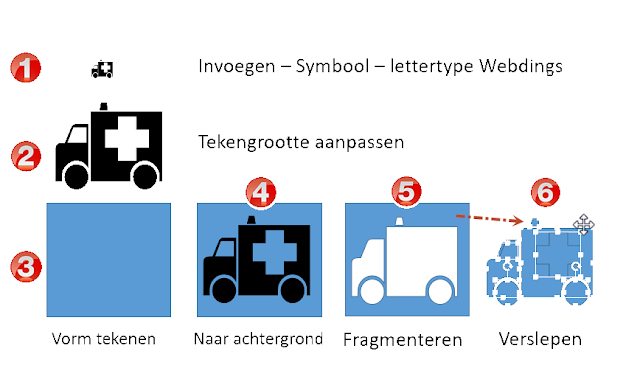
  1. Voeg een tekstvak in en klik op Invoegen - Symbool, selecteer het lettertype Webdings in de lijst en voeg het karakter met de ambulance toe.
  2. Verhoog de tekengrootte van het karakter tot je de juiste omvang hebt bereikt.
  3. Teken een rechthoek bovenop het tekstvak.
  4. Plaats de rechthoek op de achtergrond door gebruik te maken van de knop Naar achter uit het tabblad Opmaak van de contextuele tab Hulpmiddelen voor tekenen.
  5. Selecteer nu de rechthoek en het tekstvak. Klik op tabblad Opmaak en kies in de groep Vormen invoegen voor de knop Shapes samenvoegen, klik op Fragmenteren.
  6. Plaats de cursor op de buitenrand van het object en sleep het weg. Alle vormen zijn nu apart editeerbaar.
  7. Voeg een geschikte vulling toe via de knop Opvullen van vorm. Groepeer indien nodig.


Een tweede voorbeeld, stel dat je een paraplu wil gebruiken in je presentatie.

Hier volgen de benodigde stappen:
  1. Voeg een teksvak toe en klik op Invoegen - Symbool, selecteer het lettertype Segoe El Emoji in de lijst en voeg het karakter met de paraplu toe.
  2. Verhoog de tekengrootte van het karakter tot je de juiste omvang hebt bereikt.
  3. Teken een rechthoek bovenop het tekstvak.
  4. Plaats de rechthoek op de achtergrond door gebruik te maken van de knop Naar achter uit het tabblad Opmaak van de contextuele tab Hulpmiddelen voor tekenen.
  5. Selecteer nu de rechthoek en het tekstvak. Klik op tabblad Opmaak en kies in de groep Vormen invoegen voor de knop Shapes samenvoegen, klik op Snijden.
  6. Teken een witte rechthoek bovenop de vorm en zet hem in de achtergrond via de knop Naar achter.
  7. Selecteer nu de rechthoek en het tekstvak. Klik op tabblad Opmaak en kies in de groep Vormen invoegen voor de knop Shapes samenvoegen, klik op Fragmenteren..
  8. Verwijder de witte rechthoek.
  9. Plaats de cursor op de buitenrand van het object en sleep het weg. Er rest nu alleen nog een simpele paraplu; alle vormen zijn apart editeerbaar.
  10. Voeg een geschikte vulling toe via de knop Opvullen van vorm. Groepeer de vormen als dat noodzakelijk is.