woensdag 26 april 2017

Give letters the background of a picture - PPT 2013

Here is an example of a picture with a textbox on top of it. I want to preserve only the letters but with the background of the picture.


Add the picture to your slide using Insert - Picture - navigate to your picture select it and click Insert.

Add a textbox on top of the picture. Click Insert - Textbox - drag a suitable size. Adjust the font and the size. In this example I made a size 166 pt and added bold.

First select your picture then the textbox using Shift+click. Under Drawing Tools click the Format tab. In the Add shapes group click the Merge Shapes button and choose Intersect.


This is the result:


woensdag 12 april 2017

Letters de achtergrond van een afbeelding geven - PPT 2013

Hoe kan je letters de achtergrond van een afbeelding bezorgen?

Hieronder een voorbeeld van een tekstvak en een afbeelding, de bedoeling is van alleen de letters over te houden maar dan wel met als achtergrond de gebruikte afbeelding.


Voeg de afbeelding toe aan je dia via Invoegen - Afbeelding - navigeer naar je afbeelding, selecteer ze en klik Invoegen.

Voeg een tekstvak toe aan je dia via Invoegen - Tekstvak - Sleep de gewenste grootte. Pas het lettertype en de tekengrootte aan, voor dit voorbeeld heb ik de tekengrootte aangepast tot 166 pt en vet ingesteld.

Selecteer eerst je afbeelding en vervolgens met Shift+klik je tekstvak. Ga naar Hulpmiddelen voor tekenen en activeer het tabblad Opmaak. In de groep Vormen invoegen kies je de knop Samenvoegen shapes en kies Snijden.


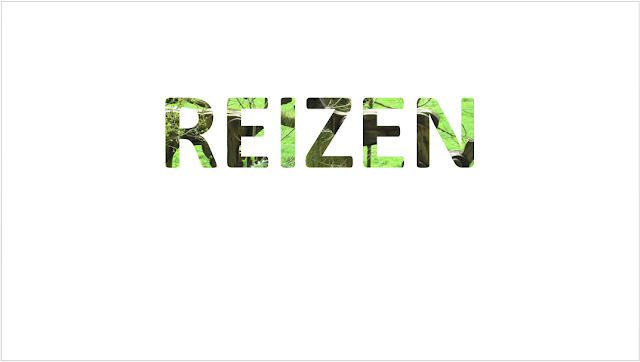
Dit is het resultaat:


zaterdag 1 april 2017

Break links from Excel in PPT 2013

Excel data are often linked for internal use. That way you can always have the latest data available. But if you have to send the presentation to an external user it is necessary to break the links.

If you want to see how many links are included in your presentation go to File - Info - on the right hand side you will see all the properties of the presentation, at the bottom there is a link 'Edit links to files'. That link allows you to edit all of the linked files.


In the dialog box that follows you can see a list of all the linked files in the presentation. If you select a link the original path and type of object will be shown at the bottom of the dialog. In our case this was a chart from Excel.


Links from Excel can point to a complete workbook, graph or range of cells. Other links can be present in the example above there is a link to a Word document.

To break the link to any item just click on the Break Link button. The link to the chart will remain in the list but will get the NULL property. This is a term in computer language that refers to a missing or unknown value in the file.


Now, if you right click the chart in the presentation the Edit data item will be greyed. You can still format the chart in PowerPoint but the data are no longer available.

If you break the link to a workbook or range of cells the object will turn into a picture which can't be edited anymore. When you select the object you will see the contextual tab Picture tools appear.

Be sure to save your presentation under a different name if you still want to update to the latest data.