donderdag 23 juli 2020

Example of animation paths in PPT 2019

While writing my previous post on using the Morph transition to create an anagram I stumbled upon some old presentation samples on using animation paths. In fact this blog started with such samples. But probably I did not use some of them or I forgot to publish. So I am doing it now.

My posts where bilingual then and quite simple. It is a bit a trip down memory lane, here's a link to my very first post of this blog on the same subject.

Animation paths

There are a number of those articles on using motion paths on pictures, shapes etc... As the samples are quite old they were still in 4:3 format, I converted them to the new 16:9 format by going to the Design tab and using the Slide size button in the Customize group.


Then I clicked the Widescreen 16:9 option, and choose the Maximize option.


This is the first one that did not get published.

When you open it, zoom out so you can see the pictures which are all outside of the visible slide area. The motion paths bring the large picture to the middle of the slide while applying the emphasis effect grow/shrink. Then with each click a picture is brought in using an animation path. You can download it here:

Animation paths with pictures (6)

The second sample has 4 pictures on top of one another. Each picture appears with a click and is immediately moved outside the window with an animation path. After the last click the last picture disappears and we are left with the background of the presentation which consist of a picture. You can download it here:

Animation paths with pictures (7)


zondag 19 juli 2020

Voorbeeld van animatiepaden in PPT 2019

Tijdens het schrijven van mijn vorige post over de Morph diaovergang stuitte ik op een aantal oude voorbeeldpresentaties over animatiepaden. Deze blog is ooit gestart met een aantal voorbeelden over dat onderwerp. Waarschijnlijk ben ik die presentaties uit het oog verloren of heb ik ze vergeten te publiceren. Hoog tijd om dat nu alsnog te doen.

Mijn artikels waren toen nog tweetalig en nogal primitief. Pure nostalgie dus, hieronder een link naar mijn allereerste artikel over hetzelfde onderwerp.

Animatiepaden

Er zijn een flink aantal artikels over animatiepaden met tekst, vormen en afbeeldingen. Aangezien de voorbeelden nog in de klassieke verhouding 4:3 waren heb ik die omgezet naar de nieuwe standaard 16:9. Dat kan je doen via het tabblad Ontwerpen en de knop Diagrootte in de groep Aanpassen.


Je kiest dan voor Breedbeeld 16:9. Vervolgens kies je voor Maximaliseren zodat de inhoud zich maximaal aanpast aan het nieuwe formaat.


Dit is de eerste presentatie die niet werd gepubliceerd.

Bij het openen van de presentatie zoom je best uit, je zal zien dat alle foto's zich buiten de zichtbare zone van de dia bevinden. Een animatiepad brengt de grootste foto naar het midden van de dia gecombineerd met de nadrukanimatie Vergroten/verkleinen. Dan kan je met een volgende klik een aantal andere foto's binnenbrengen via animatiepaden. Je kan de presentatie hier downloaden:

Animatiepaden met afbeeldingen (6)

Het tweede voorbeeld bevat 4 gestapelde foto's. Iedere foto verschijnt met een klik en wordt met een animatiepad vervolgens automatisch verplaatst tot buiten het scherm. Na de laatste klik verdwijnt de laatste foto en je komt terecht op de achtergrond van de presentatie die ook bestaat uit een foto. Je kan de presentatie hier downloaden:

Animatiepaden met afbeeldingen (7)

donderdag 16 juli 2020

Save a presentation as a series of pictures in PPT 2019

If you have to send a presentation to some recipients and you do not want to let them change the contents in any way you can save the presentation as a PowerPoint pictures presentation.
Of course you will lose all animation or audio and video that was added.

You can add some explanation to each picture slide in de notes pane at the bottom of the PowerPoint window.

Go to File and choose Export.


Then click on Change File type (1) and choose PowerPoint pictures presentation (pptx.) (2), finally click the Save as (3) button.


Give the file a new name and click Save.


In the following warning message you are warned that a copy of the presentation has been saved, click OK.

The user can now decide to print the presentation using the Notes pages option or view the presentation without being able to modify it.


This is how a slide looks when you open the picture presentation:


Remark!
You can, of course, save the presentation directly in the save as dialog, just click on the list arrow next to save as type and choose PowerPoint picture presentation (.pptx). Make sure you give the presentation another name before you click the Save button.

zondag 12 juli 2020

Presentatie opslaan als een reeks van afbeeldingen in PPT 2019

Wat als je een presentatie aan een aantal mensen moet doorsturen en je wil niet dat er aan de inhoud van de dia's wordt gesleuteld?
In zo'n gevallen kan je overwegen om de presentatie op te slaan als een reeks van afbeeldingsdia's.
Het spreekt vanzelf dat alle animatie of toegevoegde audio en video verloren gaan.

Uitleg bij de dia's kan je dan toevoegen in het notitievenster onderaan het scherm. De ontvanger van de presentatie kan deze natuurlijk ook printen met de toegevoegde notitiepagina's.

Klik op Bestand en kies Exporteren.


Kies vervolgens voor Bestandstype wijzigen (1) en selecteer PowerPoint afbeeldingspresentatie (.pptx) (2) en klik op de knop Opslaan als (3).


In het dialoogvenster opslaan als, geef je de nieuwe naam in en je klikt op de knop Opslaan:


In het dialoogvenster dat volgt klik je op OK.


Open de afbeeldingspresentatie opnieuw en klik onderaan in het notitievenster om de nodige uitleg toe te voegen.


De gebruiker kan via het printmenu kiezen voor het printen van de notitiepagina's. Hij/zij kan de presentatie ook bekijken maar er niets aan wijzigen.


De dia ziet er zo uit wanneer je de afbeeldingspresentatie opent, de afbeelding heb ik hier wat verkleind, normaal beslaat ze de volledige oppervlakte van de dia:


Opmerking!
Je kan natuurlijk ook rechtstreeks in het dialoogvenster Opslaan als kiezen voor PowerPoint afbeeldingspresentatie (.pptx) in de lijst Opslaan als. Geef dan vooral een nieuwe naam op vooraleer je op de knop Opslaan klikt.


vrijdag 3 juli 2020

Morph a table in PPT 2019

Tables can only be animated as a whole in PPT. You can get round it in a few ways. Have a look at my series on the subject consisting of five articles. Here's the link to the first article of the series. You can find the technique used for the example table below in my second article. Animate table part 2

When you use Morph you do not need any animation. The table below is the same as in my articles on animating tables. The purpose is to morph it row by row. If you want to try it yourself download the file here.

If you look in the selection pane (ALT+F10) you can see that it is a table.
First select the table, click copy and then Paste special as an enhanced metafile. Remove the original table.

In the selection pane the table has turned into a picture.
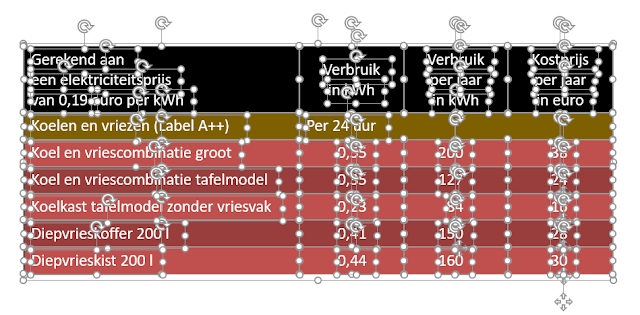
Next you need to split the table into separate parts. Under Picture tools click the Format tab, in the Align group click the Group button and choose Ungroup. When the dialog appears click Yes to convert the picture into shapes.

In the selection pane you can see all the individual parts of the table. There are a number of lines and an Autoshape surrounding the table. Select them in the selection pane using Ctrl+click and press delete when you are done. This will make your task easier when we need to regroup later.


The selection pane now looks like this.

The remaining group now needs to be ungrouped again to leave us with individual objects. The result looks like this:

Now copy the first slide as many times as needed, right-click the slide and choose Duplicate slide. On each slide select and remove the superfluous rows. Below you can see the selected rows on slide two.


On each slide select only the last row and group. Make sure you only select the filled rectangles and not the rectangles containing text. To illustrate what I mean I have moved the rectangles in the example below.
Repeat the procedure for every last row on every slide.

As a last step select slides 2-6 and apply the Morph transition using the Transition tab and the Morph button.

See the result in the video below:


In the next video you can see the result when only the rectangles with text are selected in the second but last row. In the Effect options choose the Characters option.