Posts tonen met het label navigation bar. Alle posts tonen

01 oktober 2016

Use navigation bar in slide show (update)

A few years ago I wrote the following articles on how to use the navigation bar in PPT 2010.
Use navigation bar in your slide show in PPT 2010 (1)
Use navigation bar in your slide show in PPT 2010 (2)

In version 2013 a few things have changed.


The navigation bar now consists of 6 buttons. The first one lets you show the previous slide, the second one the following slide. When you click on the pen you can make annotations on the screen during the presentation.

Click on Laser Pointer and move the mouse, a red circle appears which you can move by dragging the mouse. This allows you to point to certain important areas on your slide.

When you choose Pen, start drawing by dragging with your left mouse button, be aware that the drawing will be rudimentary. You can't draw perfect straight lines or circles.
Finally you have the Highlighter. You can adjust the colour of the ink at the bottom of the menu and if need be use the Eraser to remove your annotations.


If you want to stop making annotations press the Escape key. Press Escape again and a choice will be offered to keep or remove the annotations.

If you choose to keep the annotations you can later select one and edit using the contextual tab Inking tools.
Once you activate the pen, you can use it on several slides, to navigate to the next slide you can use your keyboard (press N, PageDown, down arrow), or use the next button on your navigation bar in the left corner.

Using the fourth button lets you bring up the whole slide deck and jump to any slide in your presentation by clicking on it. If you do not want to change the slide just click the arrow on the top left of your screen.
See all slides


The fifth button lets you zoom in on a part of the slide and pan around if you want.


Finally there is the More options button.

The Last viewed option lets you return to the last viewed slide quickly, useful when you hyperlinked to another slide and want to return where you left off.

The Custom show option there allows you to jump to a custom made show which contains only the slides you want to show in a chosen order suitable for a particular public. You must make the custom shows beforehand using the Custom Slide Show button on the Slide show tab.

The Show Presenter View allows you to see your next slide and your notes while you are presenting without the public noticing anything. See my previous articles on the subject:
Presenter view (1)
Presenter view (2)

The Screen option allows you to make the screen white or black by pressing the W or B keys on your keyboard. This can be useful if one needs to focus the attention of the audience on something outside your presentation. You can of course hide the annotations and show the Windows taskbar if needed.


The Arrow Options allow you to influence the behaviour of the mouse pointer.

The Help option shows a summary of all keyboard shortcuts that are useful to navigate during the slide show.

The options Go to and Go to section have disappeared and replaced with The see all slides button (see above). If you have a presentation with sections you can choose the sections there.


16 maart 2013

Use navigation bar in your presentation (2)

Use navigation bar in your presentation (2)


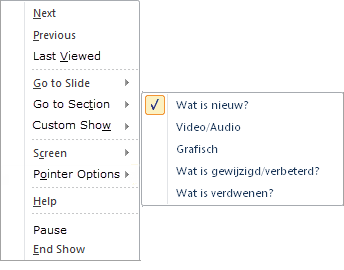
In my previous blog entry I discussed the possibilities of annotation. Next to that there are also some options you can reach using the third button on the navigation bar. You can also reach that menu by right clicking on your screen.


The next and previous options are obvious, with Last viewed you can return to the last viewed slide quickly, useful when you hyperlinked to another slide and want to return where you left off.

The Go to slide option lets you jump in your presentation making use of the Title placeholders you put on the slide.
Go to Section lets you jump to a different part of your presentation, providing you made the sections of course. You can find the section button on the Home tab.


Then there is custom show, that allows you to jump to a custom made show which contains only the slides you want to show in a chosen order suitable for a particular public. Again you must make the custom shows beforehand using the Custom Slide Show button on the Slide show tab.


09 maart 2013

Use navigation bar in your presentation (1)

Use navigation bar in your presentation (1)

Ever noticed the navigation bar in bottom left corner of your screen during a presentation. Not many people know about it or use it for that matter. If you move your mouse to the bottom of the screen it will appear.

Navigation bar
There are four buttons there, the first brings you to the previous slide, the last to the next slide. The second one is used to make annotions on your slide during the show.


Choose the pen, and start drawing on your slide, be aware that it will look rather clumsy, there are no possibilities to restrain and make lines perfectly straight or to draw a perfect circle for instance. You can choose the Ink color and use the eraser tool if necessary.

If you want to emphasize an item use the highlighter. Here's a sample of a slide where the pen and highlighter have been used.


Once you stop the presentation you will be offered to keep or to delete the annotations.

If you decide to keep them there will be a contextual tab in the ribbon allowing you to edit your annotations.


Once you activate the pen, you can use it on several slides, to navigate to the next slide you can use your keyboard (press N, PageDown, down arrow), or use the next button on your navigation bar in the left corner.
To stop using the pen/highlighter, just press Escape.
Or click the pen button and choose Arrow.