In those cases you can always draw a shape yourself to use what you want. For versions PPT 2003 and PPT 2007, see my article:
Use part of a picture as a new picture
Step 1
Place the picture you want to use in the background of the slide
Right-click on your slide, Choose Format background.Step 2
Use the drawing tool Free form and draw a shape surrounding the part of the photo you want to use.
The cursor turns into a plus sign, move and click till you have completed the contours of part of the picture. This may require a lot of clicking as you can see in the below sample. To make things clear I changed the border width and colour so you can see. By default the border is blue and quite thin. That border will be removed later.After closing the shape by clicking on the starting point you get the following result, the shape covers the background with a solid fill:
Step 3
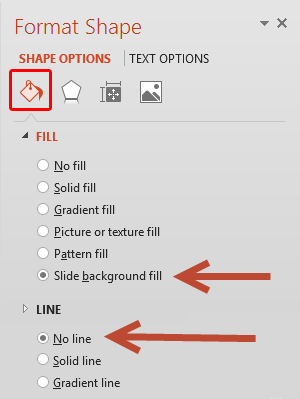
Make the shape follow the background of the slide.
Right-click on the shape and choose Format Shape.The shape is now transparent and you can see the background picture coming through.
Remember on the example picture you can only see this cleary because the border is red and thicker.
Do not move the shape, or you will simply see another part of the picture which is not what you want.
Proceed to step 4


Geen opmerkingen:
Een reactie posten