Posts tonen met het label drawing. Alle posts tonen

12 februari 2016

Use part of a photo in PowerPoint 2013 (3), drawing tools

What if using shapes combine or crop just do not give the result you want when using part of a picture. (see articles: Use part of a picture (part 1); and Use part of a picture (part 2)

In those cases you can always draw a shape yourself to use what you want. For versions PPT 2003 and PPT 2007, see my article:
Use part of a picture as a new picture

In the photo below I only want to use the buildings, not the beach or the sky above.


Step 1

Place the picture you want to use in the background of the slide

Right-click on your slide, Choose Format background.


Activate the radio button Picture or texture fill, select your photo by clicking on the File button:

Step 2

Use the drawing tool Free form and draw a shape surrounding the part of the photo you want to use.

The cursor turns into a plus sign, move and click till you have completed the contours of part of the picture. This may require a lot of clicking as you can see in the below sample. To make things clear I changed the border width and colour so you can see. By default the border is blue and quite thin. That border will be removed later.


After closing the shape by clicking on the starting point you get the following result, the shape covers the background with a solid fill:

Step 3

Make the shape follow the background of the slide.

Right-click on the shape and choose Format Shape.


Select the radio button Slide background fill under Fill and No line under line:


The shape is now transparent and you can see the background picture coming through.


Remember on the example picture you can only see this cleary because the border is red and thicker.
Do not move the shape, or you will simply see another part of the picture which is not what you want.
Proceed to step 4

Step 4
Save the picture

Right click the shape, choose Save as picture, save it and you are done.


10 juni 2015

Make a drawing based on an existing picture (part 2)

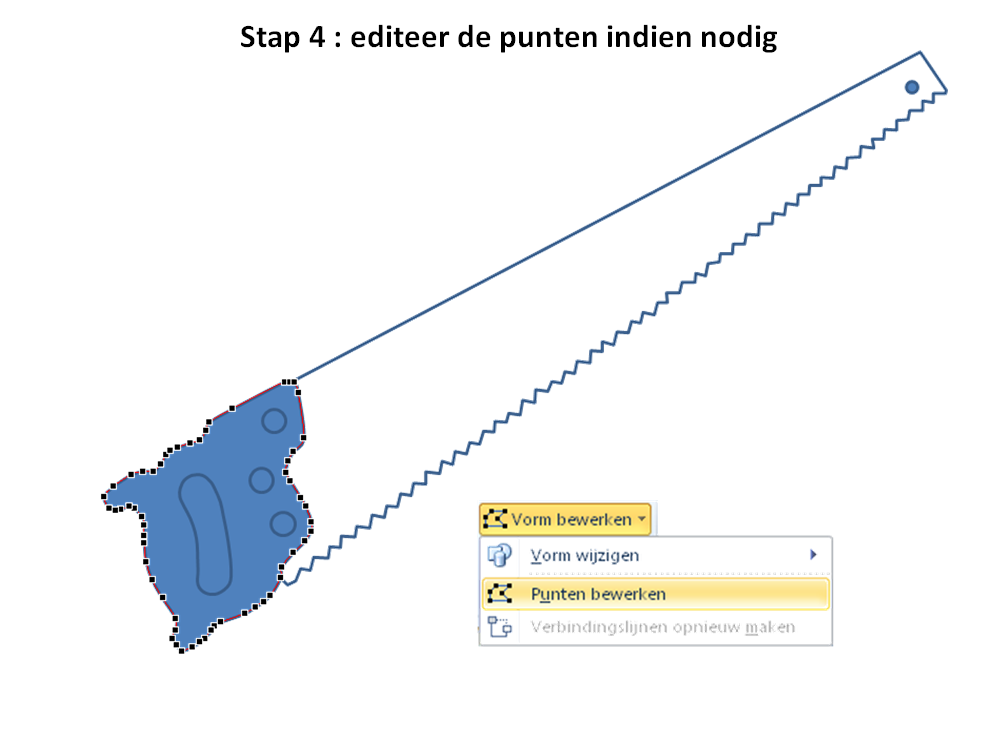
In my previous article I showed you how to make a drawing based on on existing picture. To make it look more professional we will need to edit the saw.


To make the outline even more perfect you can edit the points on the shape. Right click on the shape, in the quick menu choose Edit points. Or click on the Format tab under Drawing tools, in the Insert Shape group click on the Edit Shape button. You can add points, remove them, move etc...


To show you how I did this I inserted the following video. I have used PowerPoint 2010 in the video, but you can do this in PowerPoint 2013 as easily. It's in Dutch but you will get the gist of it. In the video you will see that I am using a custom tab in the ribbon to combine shapes. Read more on the subject in one of my previous blog articles.
Make your own callout

You can watch the video here:

Finalize drawing

As a last step you just need to group your shapes. To do that select them all and under Drawing tools, Format tab, click the Group button. Once grouped, use the green rotating point to get your saw in a horizontal position.


02 juni 2015

Een tekening maken gebaseerd op een bestaande afbeelding (deel 2)

In een vorige bijdrage heb je gezien hoe je een afbeelding kan gebruiken om een nieuwe tekening te maken. Aangezien het resultaat nog niet helemaal professioneel oogt gaan we dit nog wat aanpassen.

Om de omtrek nog wat perfecter te maken kan je de aangebrachte punten nog editeren. Klik met je rechtermuisknop op je vorm, kies uit het snelmenu Punten bewerken. Of klik met de vorm geselecteerd op Opmaak - in de groep Vorm invoegen kies je voor de knop Vorm bewerken en vervolgens voor Punten bewerken. Je kan punten verwijderen, verplaatsen enz...


Hoe je dit aanpakt kan je bekijken in de volgende video, hou er rekening mee dat het voorbeeld is gemaakt in PowerPoint 2010, maar het kan evengoed worden toegepast in PowerPoint 2013. In de video maak ik gebruik van een zelf gecreƫerd tabblad op het lint om twee vormen samen te voegen. Zie ook mijn vorige reeks over het aanmaken van eigen tekstbalonnen voor meer uitleg daarover.
Eigen tekstbalonnen maken

Als laatste stap rest ons alleen om alle objecten te selecteren en onder Hulpmiddelen voor tekenen te kiezen voor de knop Groeperen. Vervolgens kan je met de roteerknop de zaag in de juiste richting krijgen.

Bekijk de video hieronder:


25 mei 2015

Make a drawing based on an existing picture (part 1)

Not everyone has the necessary drawing skills or talent to draw. Luckily you can use PowerPoints tools to make an attractive object.

To do that you can use an existing picture as a starting point. Here's an example, I want to draw an old fashioned handsaw.

Here are the steps you need to take.

Find a suitable picture on the internet and copy it to your slide.

Use the drawing tools curve and free form to trace the outline of the objects. Click Insert - Shape - Curve/Freeform. Once you select a tool your cursor will change into a plus sign, click to have an anchor point, move the mouse and click again, repeat the process and end by clicking at your starting point. No need to do it with 100 % accuracy, later on you still can change the drawing points if needed.

Our handsaw requires 5 shapes. For shape one and two you need the curve drawing tool. For shape 3 and 4 you need the circle. For shape 5 you need the freeform tool.

When you are finished remove the underlying picture, just select and delete it.

You already have a reasonable picture. In part two we will refine and spruce up the drawing further.

20 mei 2015

Een tekening maken gebaseerd op een bestaande afbeelding (deel 1)

Tekentalenten zijn min of meer aangeboren. Als je niet het nodige talent hebt om zelf je tekeningen te maken kan je altijd de hulpmiddelen in PowerPoint gebruiken om toch tot een mooi resultaat te komen.

Baseer je daarvoor op een afbeelding. en gebruik die als basis voor een nieuwe tekening. Als voorbeeld wil ik een ouderwetse handzaag tekenen.

Hier zijn de stappen die je moet volgen om je eigen handzaag te tekenen.

Zoek een gepaste afbeelding op het internet en kopieer die naar je dia.

Via Invoegen - Vorm - Curve/Vrije vorm kan je de omtrek van de verschillende onderdelen van de zaag traceren. Je cursor krijgt de vorm van een plus teken, klik om een ankerpunt te plaatsen, verplaats de muis en klik opnieuw. Je herhaalt het proces en sluit af door op het beginpunt te klikken. Hou er rekening mee dat de omtrek niet voor 100% nauwkeurig moet gevolgd worden, je kan later nog de ankerpunten editeren indien nodig.

In ons voorbeeld heb je zeven vormen nodig, vorm 1 (handvat) en 2 (uitsparing) teken je met het curve gereedschap, voor vorm 3  en 4 gebruik je het cirkel gereedschap. Voor vorm 5 gebruik je de vrije vorm.

Eens alle vormen zijn getekend kan je de onderliggende afbeelding gewoon verwijderen.

Op zich heb je nu al een bruikbare tekening. In een volgende bijdrage gaan we het geheel nog perfectioneren en wat verfraaien.

14 oktober 2013

Add connector points to a circle

If you want to use a connector point to a circle you are limited to 8 connector points.

Adding a connector point is vitually impossible. Right-clicking on the circle and choosing Edit points, and add point, deforms the circle completely.

Here's a workaround (thanks to Rich007a from the Microsoft Answers newsgroup):

  1. Draw a 32 point star shape
  2. Use the yellow diamond adjuster and drag to become a perfect circle.
  3. Right-click the shape, choose Edit points
  4. Right-click one of the black points and choose Straight segment
  5. Now draw a connector line, all 32 points are available

1-2 : Draw 32-point shape and drag
3 : Edit points

4 : Straight segment


5 : Connect to the circle