Posts tonen met het label animation. Alle posts tonen

15 oktober 2024

Select the animations you want to view - PPT 2019

Slides can have many animations, so it can be annoying to test them if you have to start from the very beginning again.

Fortunately you can choose the starting point in the animation list just by clicking on the item and clicking on the Play from button at the top op the task pane.


You can also make a selection of consecutive animations by clicking on the first one and pressing shift+click on the last one. Then click Play selected at the top of the animation pane.

The same thing can be done with non consecutive animations. Just ctrl+click to select the animations and click Play selected.


26 september 2024

Loop a single animation in PTT 2019-2021

It is fairly easy to loop an animation in PPT.

Select your animation in the animation pane by double clicking on it.

In the dialog of your animation click the Timing tab.

Change the Duration, in most cases it is set to 0,5 seconds which is to fast.

Click the list arrow next to Repeat.

Now choose a pre-set number (2, 3, 4, 5, 10), or type the number of times you want the animation to loop and press Enter. This is an example how the animation pane looks for each item, the last item was typed in the box.

Or choose Until next click.

Or choose Until end of slide.


08 januari 2023

Watch/test your animation without leaving edit mode in PPT 2019

Do you often switch between Slide show view and Edit view to check the animations? If so consider using the quarter size slide show window

It is very easy to activate. Just press the Alt-key on your keyboard and click the Slide show icon on the status bar.

The quarter slide show window is on top of the editable slide. It behaves as in normal slide show mode. So you can click or use your keyboard to forward through the slideshow. You can even use the navigation buttons in the left hand bottom corner.


If you want to edit/change an animation or edit the text just click next to the quarter slide view on the underlying edit view and do your changes. Click in the quarter slide view if you want to check the change you made.

Be aware that the quarter view will seem to disappear when you click the edit view. Press F5, click the Slide show icon on the status bar, or click the PPT icon on the Windows taskbar to return to the quarter view.

If you want to make it even easier, resize the edit view so that it does no longer overlap with quarter view. That way you can easily switch between the two views.


In the following video I checked the animation of the slide and then changed the animation of the second level from Float to Wipe. By using the quarter slide show window I was able to edit the animation without leaving edit mode.


17 december 2022

Show animation in the slide sorter in PPT 2019-2021

If you want to see multiple slides at the same time you have to choose the slide sorter button in the status bar.


If you have slides that contain animations you can view them by clicking on the star icon in the bottom right corner of the thumbnail slide. If there is no star icon there is no animation on the slide.


Attention!
The icon will also appear when slide transition has been applied. Slide transitions are animations. If you applied both, both will be shown when you click the icon.

28 november 2022

Animate moving arrow next to bullet list in PPT 2019-2021

The intention is to have an arrow move along with each item dealt with during a bulleted list.

You can achieve this in different ways, the first method is to use an arrow next to each bullet point. 

With multiple arrows and start and end animations.

Here's the slide with all the arrows.


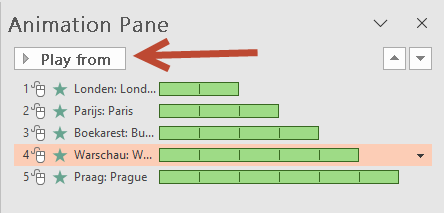
Below you can see the animation pane where all bullet points are immediately visible. The first arrow appears automatically. The others only need one entrance effect and one exit effect.


Here's the animation pane where each bullet point and  each arrow is animated individually. You apply two opening and one ending animation for each bullet point except for the first bullet point where you apply two opening effects.


Two illustrative videos:


With one arrow and using motion paths

That is a bit more difficult and requires some preparation. This time we will use only one arrow.

Draw your list arrow first and place it next to the first bullet point. 

Press the combination Alt+F9 to make the guides visible. Copy the horizontal guideline by pressing the Ctrl key and dragging with the double arrow (see Fig.).

Position the extra guideline exactly where you want it. Repeat for the other bullet points. Optionally, also draw a vertical guide to help position the motion path.


Select the arrow, choose the Animations tab and the Add animation button, choose More motion paths at the bottom. In the Lines and Curves section, select the Down animation.

Drag the red end point up to the height of the set guideline. Make use of the vertical guideline to position correctly.


Select the arrow again and add an animation down to it as described above. 

The animation starts at the height of the first bullet point and will therefore have to be moved. Drag the green circle (beginning of themotion path) to the end point of the first animation path. 

Drag the red circle (endpoint of the motion path) to the correct height of the third bullet point. 

Repeat for the next bullet points, possibly starting with the red end point if the start and end points are too close to each other. 

This is the end result:

And this is the animation pane:

Here's a video illustrating the procedure:


Using the Morphing Slide Transition

This method is by far the simplest. The only downside is that you need several slides for it. 

Create your first slide and place the arrow next to the first bullet point. 

Duplicate the slide 4 times by right clicking on it and choosing Duplicate slide from the quick menu.

On the copies you simply move the arrow to the next bullet point. The guides will facilitate the work.

Finally, select slides 2 through 5. Go to the Transitions tab and select the Morph transition.


31 mei 2020

New 3D animations in PPT 2016-2019

You can integrate real 3D-objects in PowerPoint 2016-2019. Together with this new function a few new animations have been added.

When you select a 3D-object you can see the new animations on the Animations tab.


Every 3D-model has a few options. You can change direction, set the Amount, the intensity and rotation axis.


Of course you can also right-click the 3D-object in the animation pane and choose Effect options. On the Effects tab you can apply the same options.

26 juli 2019

Animate several textboxes on the same spot using the Morph transition in PPT 2019

In my previous article  (Animate several text boxes on-same-spot) I discussed the animation of several text boxes on the same spot using animation.

Starting with PPT 2016 you can achieve this without using any animation. The new Morph transition will take care of this. I am using the same presentation as in my previous article.

Create your first slide with the four text boxes you need. Do not worry about the alignment we will do that later.

Copy the slide three times. Right-click the slide and choose Duplicate slide.


Repeat the process for the other slides (you can also use the F4 function key to repeat the last action).


Now delete the superfluous text boxes on the duplicate slides.


Select each text box on the slide and align it horizontally and vertically using the Arrange button on the Home tab. In the Position objects section select the Align option.


Considering that there is no transition for the first slide you will have to add animation. You could avoid this problem by adding a title slide so that the first newspaper title is no longer the first slide.

Select the text box and add the fade animation using the Animation tab. Double click the entry in the animation pane and on the effects tab provide a word by word animation with a delay of 30 % between words. Start with previous and a duration of 3 seconds. After starting the presentation the text box will automatically appear.


Select the remaining slides in the left hand pane and click the transition tab then choose Morph.


Click the Effect options button and choose Characters. Next to Duration increase to 3 seconds.


Start the presentation and click for every transition between the slides.

Here's the result in a video:


10 juli 2019

Animate several text boxes on the same spot in PPT 2019

Not all the animation effects are suitable to obtain what we are after. The basic and subtle effects give the best result. In the example below we want to animate four newspaper titles to animate one after the other in the middle of the slide.

Create your text boxes and place them beneath one another but centered on the slide. Under Drawing tools, choose Format tab, Align button and Align center. Make sure that the Align to slide option is active.


Select all the text boxes and add an entrance effect. Next to start choose after previous with the exception of the first animation which starts with previous.
With the entrance animations still selected apply a delay of two seconds for all the animations, you can do that in the timing group next to Delay. If necessary adjust the duration which is half a second by default. In the example below I used the fade animation with a duration of 1 second and a delay of 2 seconds.


Reselect all of the textboxes and add an exit animation. Next to start choose with previous except for the last animation which starts after previous. Next to duration apply the same timing as in the entrance effect.


Drag each exit animation under the next entrance animation.


Now drag the exit animations in the animation pane till they are positioned parallel to the entrance effect.

Drag the last exit animation till you reach a delay of 2 seconds.


Select all of the text boxes and align in the middle relative to each other. Go to Drawing tools, Format tab, choose Align button, select Align middle.


This is how it looks on screen:


Here's a video demonstrating the result. You can see the animations described in this article and two other animations as a bonus.


Start your presentation, all of the text boxes appear one after the other in the desired spot.

20 juni 2019

Reveal a picture step by step with animation - PPT 2013-2019

1) Reveal using an exit animation on shapes

Insert your picture on the slide.

Draw a shape (rectangle in the example) and copy the rectangle to cover the whole of the picture.


Select the shapes in the order you want them to appear (shift+click). Add the exit animation 'Disappear' using the Animation tab and the Add animation button.

In the animation pane all the rectangles (except the first one) have an animation that
starts with previous. Select the second animation and drag the bar in the advanced timeline to add a delay of x seconds. Repeat that process for the following animations.


To make this a little easier zoom out on the advanced timeline, click on the list arrow next to seconds and choose zoom out.

Or drag the animation pane to the bottom of the screen so that it appears in a horizontal position.


After the first click each rectangle disappears with a delay till all the rectangles have gone.


2) Reveal using an emphasis effect on shapes

The procedure is identical to the one described above.

Select the shapes in the order you want them to appear (shift+click). Add the emphasis animation 'Transparency' using the Animation tab and the Add animation button. Right click the selection and on the Effects tab of the dialog increase the default transparency percentage from 50% to 100%.

In the animation pane all the rectangles (except the first one) have an animation that
starts with previous. Select the second animation and drag the bar in the advanced timeline to add a delay of x seconds. Repeat that process for the following animations.


In the video you will see that there is no visible difference between the first video and this one.


3) Reveal temporarily by adding an exit animation followed by an entrance animation on shapes.

If you want to let people guess what/who the picture represents and make it a bit more difficult you can let the shapes disappear then reappear after a small delay.

Select the shapes in the order you want them to appear (shift+click). Add the exit animation 'Disappear' using the Animation tab and the Add animation button, choose On click next to the start option.

Leave the selection active, immediately apply the entrance effect 'Appear' and click the with previous option next to start.

Drag the entrance animation just beneath the correct exit animation.


Now select all the entrance animations (ctrl+klik) and increase the timing next to delay.


See the result in this video:


4) Reveal temporarily by adding an emphasis animation on shapes 

Select the shapes in the order you want them to appear (shift+click). Add the emphasis animation 'Transparency' using the Animation tab and the Add animation button. Right click the selection and choose Effect options, on the Effects tab increase the default transparency percentage from 50% to 100%.

Now click on the Timing tab in the dialog and next to start select On click. Next to Duration choose Until next click. No need to add a delay this time, the appearance and disappearance depends solely on you clicking.


5) Reveal step by step and yet show the entire picture before all the animations have finished.

You can add an extra bonus to method 3 and 4 by adding the possibility to show the entire picture at will during the slide show. To do so you need to apply and exit animation to all the rectangles activated by a trigger.

After dragging the entrance animations to reach the right position. Select all the rectangles again and add the exit animation 'disappear'. In the animation pane all the animations are animated with previous. Leave the selection active and click next to the Trigger button and select On click of then choose the shape you want to use as a trigger. In the example below I have chosen rectangle 1.