zondag 22 december 2019

Use an edit icons in PPT 2016-2019

One of the new features of PPT 2016-2019 is the possibility to add icons. Icons are vector files. You can also use svg files which are another vector type. In other words, these pictures can easily be scaled, rotated or colored without any loss of quality.

You can find the feature under the Insert tab, just click the Icons button.


You can choose between different categories.

Select the icon(s) you want to use and click the Insert button.

Below you can see an icon from the Analysis category. The bars have been altered to a different color.

What do you need to do?

After inserting the icon right-click the icon and choose Convert to shape.

PPT asks you if you want to convert the object to a Microsoft Office drawing object. Click Yes.


At first it seems nothing has changed, but click on a detail of the shape and you will see that you now can select individual parts of the icon.
Adjust colour

Click the contextual Format tab and choose the Shape fill button in the Shape styles group and apply a new colour.
Repeat the process for the other parts.

Add text

Once the icon is converted you can add text to the shape.

Here's an example of a shopping cart.
After converting the icon you can see that the wheels and the basket are individual shapes. I have adjusted the color of both in the example.
Now if you select the icon you can ungroup it and rescale if necessary. Select only the basket and
format the text further using the contextual Format Shape tab and the Text fill button in the WordArt Styles group.

Edit points

Right-click the shape and choose the Edit points option.


In the example I moved two points to create the impression of movement.


Apply 3-D formatting

You can take it one step further by applying 3-D formatting.

Right-click the icon and choose Edit shape.

In Format shape task pane click the Effects button. Here's an example where I changed the border/depth and 3-D rotation.

So, to conclude icons can be edited to make them look better.

The supply of Microsoft is limited. There is no search possibility (although this seems to have changed in the 365 version).

On the internet you can find a lot of sites who offer free icons. I found the following sport series on Iconfinder.com.


zaterdag 14 december 2019

Wrap text around a picture in PPT 2019 (review)

This is a rewrite of a previous article: Let text flow around object

Unfortunately there is still no possibility to wrap text around a picture in PPT 2019. You have to get the job done in Word and import the result to PPT.

In Word

Activate Word and type the text that has to wrap around the picture.

Add your picture to your document. Click Insert and choose Picture or Online picture and add it to the text. The picture is added at the cursor position, in line with the text.


Click the Layout options button next to your picture. Choose the Tight option. You can also do this by clicking on the See more option at the bottom and choose the Text wrapping tab. Click Tight and the radio button Right only.


Move the picture by dragging it so that the text is where you want it.


Click outside the picture.


You can follow the same procedure if you use a shape. Add your shape to the Word document using Insert - Shape, select the oval and drag a perfect circle by pressing the shift+key. By default the shape will be on top of the text.


Select the shape and click the Layout options button, choose Tight. You can also do this by clicking on the See more option at the bottom and choose the Text wrapping tab. Click Tight and the radio button Right only.

Move the shape by dragging it so that the text is where you want it.

In PowerPoint

Now select the text and the picture/shape and copy them. Switch to PPT and click the Paste button, select the Paste special option.

In the dialog click the Microsoft Word document object option.


Edit the text

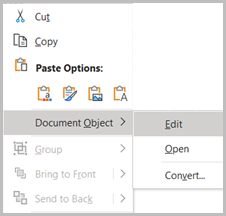
Double click the object to edit it. You can also right click and choose Document object and edit. You can do this with both the picture and shape object. You will get the Word ribbon inside PPT.


Click outside the object to place it on the slide.


Remarks

PPT files with inserted document objects may take more time to open.

If you do not have to edit the text afterwards then you should paste as a picture.

zondag 8 december 2019

Pictogrammen gebruiken en aanpassen in PPT 2019

Een van de nieuw functies in PPT 2019 is het toevoegen van pictogrammen. Daarnaast kan je ook svg bestanden invoegen. Met andere woorden vectorafbeeldingen die gemakkelijk kunnen geschaald gedraaid of gekleurd worden, zonder enig kwaliteitsverlies.

De functie vind je terug onder het tabblad Invoegen en de knop Pictogrammen.


Je kan kiezen tussen verschillende categorieën.

Dan rest er alleen nog het betreffende icoontje(s) te selecteren door erop te klikken en vervolgens de knop Invoegen te kiezen.


Hieronder zie je een pictogram uit de categorie 'Analyse' dat een staafdiagram voorstelt dat daarna is aangepast qua kleur.

Hoe ga je daarvoor tewerk?

Na het invoegen van het pictogram klik je er met de rechtermuisknop op en je kiest voor Converteren naar shape.

PPT vraag je daarna of je het object wil converteren naar een Microsoft Office tekenobject. Klik Ja.


Op het eerste gezicht lijkt er niets te veranderen, klik nu echter op een onderdeel van het pictogram en je kan het individueel selecteren.

Kleur aanpassen

Klik nu op het contextueel tabblad Vormindeling en kies de knop Vormopvulling in de groep Vormstijlen, pas een nieuwe vulkleur toe.

Herhaal voor de andere elementen van het pictogram.

Tekst toevoegen

Je kan ook tekst toevoegen aan een pictogram eens het omgezet is in tekenobjecten.

Hieronder zie je een pictogram van een shopping karretje.
Na het omzetten blijkt dat de korf van het karretje en de wielen afzonderlijk instelbaar zijn. Hier heb ik de kleur van beide aangepast.
Vervolgens kan je het object als groep opheffen. Pas eventueel de schaal aan door te slepen met de handgrepen. Selecteer dan de korf en je kan meteen tekst intypen.

Je kan dan verder de opmaak van de tekst verzorgen, dat kan via het contextueel tabblad Vormindeling en de knop Tekstopvulling uit de groep Stijlen voor WordArt.

Bewerken van punten

Eens het pictogram omgezet kan je ook de individuele punten bewerken. Klik met je rechter muisknop op het omgezette pictogram en kies voor Punten bewerken.


In onderstaand voorbeeld heb ik twee punten verplaatst zodat de indruk van beweging ontstaat.


3-D opmaak toepassen

Wil je nog een stapje verder gaan dan kan je de 3D-opmaak toepassen op het geconverteerde pictogram.

Klik met je rechtermuisknop op het pictogram en kies Vorm opmaken.


In het taakvenster Vorm opmaken kies je het knopje Effecten. Hieronder zie je een voorbeeld waar ik een rand/diepte/3-D draaiing heb toegepast.


Mogelijkheden te over dus om je pictogrammen nog aantrekkelijker te maken.

Het aanbod van Microsoft is natuurlijk beperkt, er is ook geen zoekmogelijkheid (alhoewel daarvoor in de versie 365 ondertussen een optie is toegevoegd).

Op het internet kan je veel sites vinden die pictogrammen ter beschikking stellen, de volgende gratis reeks van sporten heb ik bv. gevonden via Iconfinder.com.