maandag 29 februari 2016

Blog articles in a Word document, year 2015

It is always handy to have a printable copy of interesting articles. I have made a Word document containing all my blog articles over the year.

Some general articles or general announcements have been let out. Articles refering to previous blog years have also been let out.

Every article has its own page, and there is a table of contents to get quickly at it. You will see the versions of PPT that can be used to perform a task. Of course some articles only apply to a particular version of PowerPoint.

You can download the document using the following link:

Blog articles, year 2015

Blogartikelen in een Word document, jaar 2015

Het is altijd handig om een geprinte versie van artikels bij de hand te hebben.

Algemene artikelen of aankondigingen zijn niet opgenomen in het document. Dat is ook geldig voor de artikelen met verwijzing naar Word documenten van vorige blog jaren.

Ieder artikel krijgt zijn eigen pagina. Een inhoudstafel is beschikbaar en je kan zien welke versies van PPT geschikt zijn om een taak uit te voeren. Sommige artikelen zijn natuurlijk enkel bestemd voor een specifieke PPT versie.

Je kan het  document voor het jaar 2015 downloaden via onderstaande link.


Blogartikelen jaar 2015

woensdag 24 februari 2016

Gedeelte van foto gebruiken in PPT 2013 (4), achtergrond vorm bijgewerkt

In mijn vorige bijdrage had ik het over het gebruik van de dia-achtergrond als basis om een gedeelte van een foto te gebruiken.

Helaas kan je nu en dan wel op een probleem stuiten, als voorbeeld zie je hieronder een foto van een zitbank met zicht op zee. Wanneer je deze foto als achtergrond plaatst valt een gedeelte van de foto weg. En laat het nu juist de bank zijn die mij interesseert.


Gelukkig kan je daar iets aan doen. Klik met je rechtermuisknop op de dia, kies Achtergrond opmaken.


In het dialoogvenster kan je de achtergrond foto verschuiven, in dit geval mag de foto onderaan niet verschuiven. Dus zetten we het percentage Verschuiving onder op 0%.


Eens de foto is verschoven kan je de bank via een getekende vorm uitsnijden.


donderdag 18 februari 2016

Use part of a photo in PPT 2013 (4), adjusted background image

In my last article I explained how to use the background image of a slide to create a new image. Unfortunately you can run into problems with this method. Below you will find an example of a picture of a bench with seaview. When using this picture as a background part of the bench is just missing.

Luckily we can do something about that.


Right-click the picture and choose Format background.


In the dialog we need to move the photo upwards, so all we need to do is to set the Offset bottom
to 0%.


Now that we have the whole bench visible we can draw a shape and let it follow the background. 


vrijdag 12 februari 2016

Use part of a photo in PowerPoint 2013 (3), drawing tools

What if using shapes combine or crop just do not give the result you want when using part of a picture. (see articles: Use part of a picture (part 1); and Use part of a picture (part 2)

In those cases you can always draw a shape yourself to use what you want. For versions PPT 2003 and PPT 2007, see my article:
Use part of a picture as a new picture

In the photo below I only want to use the buildings, not the beach or the sky above.


Step 1

Place the picture you want to use in the background of the slide

Right-click on your slide, Choose Format background.


Activate the radio button Picture or texture fill, select your photo by clicking on the File button:

Step 2

Use the drawing tool Free form and draw a shape surrounding the part of the photo you want to use.

The cursor turns into a plus sign, move and click till you have completed the contours of part of the picture. This may require a lot of clicking as you can see in the below sample. To make things clear I changed the border width and colour so you can see. By default the border is blue and quite thin. That border will be removed later.


After closing the shape by clicking on the starting point you get the following result, the shape covers the background with a solid fill:

Step 3

Make the shape follow the background of the slide.

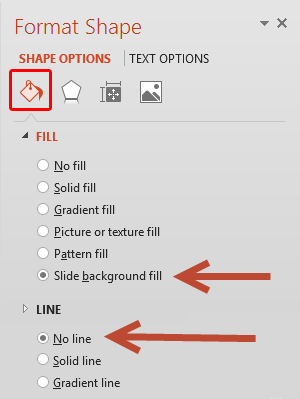
Right-click on the shape and choose Format Shape.


Select the radio button Slide background fill under Fill and No line under line:


The shape is now transparent and you can see the background picture coming through.


Remember on the example picture you can only see this cleary because the border is red and thicker.
Do not move the shape, or you will simply see another part of the picture which is not what you want.
Proceed to step 4

Step 4
Save the picture

Right click the shape, choose Save as picture, save it and you are done.


dinsdag 9 februari 2016

Gedeelte foto gebruiken in PowerPoint 2013 (3), tekenhulpmiddelen

Wat als het combineren van vormen of het gebruiken van Bijsnijden onvoldoende blijken om een specifiek gedeelte van een foto te gebruiken.
(zie mijn vorige blogartikelen, Gedeelte foto gebruiken (deel 1); en Gedeelte foto gebruiken (deel 2)

In dat geval kan je nog altijd via het tekenmateriaal het gedeelte afbakenen dat je wil gebruiken. Voor versies PPT 2003 en PPT 2007 kan je volgend artikel consulteren:
Gedeelte foto gebruiken in PPT 2003-2007

Van onderstaande foto wil ik alleen de gebouwen overhouden, strand en hemel moeten verdwijnen.


Stap 1

Plaats de afbeelding waarvan je een gedeelte wil gebruiken op de achtergrond van de dia

Rechtsklik op je dia, kies voor Achtergrond opmaken.


Selecteer het keuzerondje Opvulling met afbeelding of bitmappatroon, selecteer je foto via de knop Bestand:


Stap 2 Activeer het tekenmateriaal Vrije vorm en teken een vorm op de foto rond het gedeelte dat je wil gebruiken

Je cursor verandert in een + teken, beweeg en klik tot je het volledige stuk hebt afgelijnd. De omtrek van de getekende lijnen is standaard in een blauwe kleur, voor alle duidelijkheid heb ik de lijndikte en kleur wat aangepast zodat je goed kan zien wat het resultaat zal worden. De omtrek zal je op het einde ook laten verdwijnen.


Nadat je geklikt hebt op het beginpunt is de vorm gesloten en die bedekt het gewenste gedeelte.


Stap 3
De getekende vorm krijgt de achtergrondvulling van de dia.

Klik rechts op de getekende vorm en kies voor Vorm opmaken.
Selecteer het keuzerondje Achtergrondopvulling voor dia bij opvulling en bij lijn kies je Geen lijn:


De vorm is nu transparant en de achtergrond van de dia is zichtbaar door de vorm heen.


Denk eraan dit is op het voorbeeld enkel goed duidelijk omdat de rand dikker en rood is. Onder geen beding mag je de vorm verplaatsen, dat zal alleen tot gevolg hebben dat een ander gedeelte van de dia achtergrond er wordt in opgenomen.

Stap 4
Afbeelding opslaan

Klik met je rechtermuisknop op de vorm, kies Opslaan als afbeelding, bewaar de afbeelding en je bent klaar.


maandag 1 februari 2016

Move, enlarge a picture with a click, then return to original size and position (2)

In my previous blog I showed you how to move and enlarge a picture and then return to its original position and size.

One disadvantage was that you could not choose the order in which the pictures appeared.

You can work around this by using an animation trigger on the animations.

Open the animation pane and select all four animations for every picture.


Click the trigger button in the Advanced animation group, choose On click of and select the picture in the list.


Repeat this for all the pictures in the animation pane.


Now you can show an enlarged picture randomly by simply clicking on it, notice the little hand that appears when you hover over the picture.