Posts tonen met het label remove background. Alle posts tonen

12 maart 2016

Use part of a photo in PPT 2013 remove background (5)

The last method is the most difficult one. To use part of a photo you can use the Remove background feature.

In the photo below I would like to use only the performing artist and the musical instrument she is playing.


Select your photo and under Picture tools, Format tab, click the Remove background button.


PPT makes a suggestion, all the magenta parts within the frame will not be used.


Click the Keep changes button.


This is the result, as you can see there are some areas that we do not need:


First we will adjust the frame using the handles, which will limit corrections we will have to make.


A better result altogether. A few areas are still not alright. In the example below you have areas which still have to be removed and others that have to be added.


After clicking the Mark areas to keep button you can keep an area (by dragging the pencil to define the area). After clicking the Mark areas to remove button you can remove areas (by dragging the pencil to define the area).

When the area must be retained you get a dotted line with a plus sign in it. When the area must be removed you get a dotted line with a minus sign in it. See the example below:


Here are all the corrections that are needed:


This is the end result;


17 januari 2013

Remove background from clipart (part two)

Remove background from clipart (part two)


For the second method we will use the Remove background function.

Insert your clipart the usual way, select the clipart, copy it and paste back using Paste special. Select the Picture png option.

You will see that the Remove background button is no longer greyed out. Click on it and remove any part you want.

In this example I only want to remove the background so I can click the Keep changes button immediately.
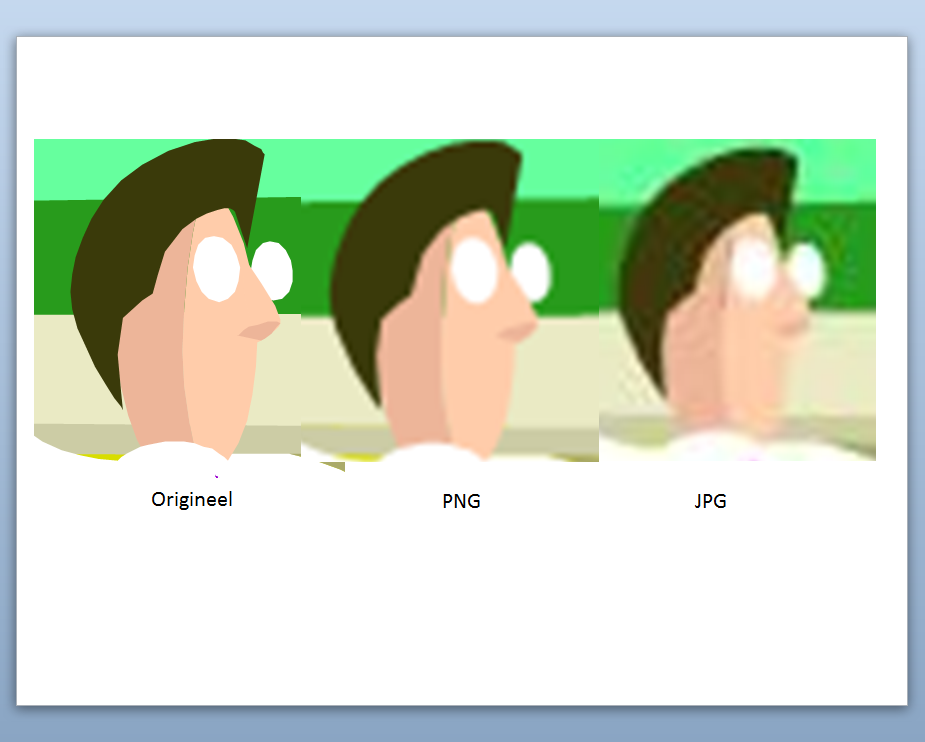
You will see a change of quality in the clipart. The clipart is slightly pixelated. You'll see that cleary when you zoom in on a part of the clipart. On your left is the original, in the middle the png version and on your right the jpg version. It is clear that png is the better option.


15 januari 2013

Achtergrond van illustratie verwijderen (deel 2)

Bij de tweede methode maken we gebruik van de functie Achtergrond verwijderen.

Je voegt de illustratie toe op de gebruikelijke manier. Vervolgens selecteer je de afbeelding, je kopieert ze en plakt ze vervolgens via Plakken speciaal terug in je presentatie als een png afbeelding.

Wanneer je nu de afbeelding selecteert zie je dat de knop Achtergrond verwijderen niet meer grijs staat. Klik erop, je kan nu delen verwijderen.

In dit voorbeeld wil je alleen de achtergrond verwijderen dus kan je meteen klikken op de knop Wijzigingen behouden.


Merk op dat de kwaliteit niet meer dezelfde is als bij het origineel. Dat merk je heel goed wanneer je de illustratie groter maakt. Om dit duidelijk te maken heb ik hieronder ingezoomd op een gedeelte van de afbeelding. Links staat het origineel, in het midden de png en rechts de jpg. Het bestandstype PNG lijkt mij dus de aangewezen keuze.

13 januari 2013

Achtergrond van illustratie verwijderen (deel 1)

Vanaf PowerPoint 2007 is het mogelijk om de achtergrond van foto's, illustraties te verwijderen via de functie Achtergrond verwijderen. Maar soms is het niet mogelijk de achtergrond van de illustratie te verwijderen, bijvoorbeeld afbeeldingen gemaakt met vector gestuurde programma's laten dit niet toe.

Je kan heel gemakkelijk clipart toevoegen aan je presentatie. Kies het tabblad Invoegen en selecteer de knop Illustraties. In het zoekvenster dat verschijnt typ je het gewenste trefwoord en je drukt enter. Maar soms voldoet de afbeelding niet 100 % aan je wensen. Wat als je bijvoorbeeld de achtergrond wil verwijderen.

Neem nu het volgende voorbeeld, de knop Achtergrond verwijderen blijft grijs, maar toch ben ik erin geslaagd de achtergrond te verwijderen.


Hoe ben ik  tewerk gegaan ?
Voeg de illustratie toe via het zoekvenster, klik erop met je rechtermuisknop en kies in het snelmenu voor Afbeelding bewerken.

Je krijgt meteen een dialoogvenster met de vraag of je de afbeelding wil converteren naar een Microsoft Office-tekenobject, klik op Ja.


Op het eerste gezicht lijkt er niet veel veranderd te zijn. Maar laat je niet misleiden, klik even op de afbeelding, je zal merken dat je verschillende onderdelen los kunt selecteren.
Zo kan je alle individuele onderdelen van de afbeeldingen editeren.

Na het converteren kan je gemakkelijk op de achtergrond klikken en deze verwijderen met de delete toets.
 
Het grote voordeel van deze methode is dat er geen kwaliteitsverlies optreedt wanneer je de illustratie converteert.
In een volgend artikel toon ik nog een andere methode om de achtergrond te verwijderen, en deze keer maak ik wel gebruik van de functie Achtergrond verwijderen.

12 januari 2013

Remove background of clipart (part 1)

Remove background of clipart (part 1)

PowerPoint has a remove background function starting with version 2007. Works great with pictures and clipart. But sometimes you will not be able to remove the background of a clipart, that is the case when a clipart has been drawn using a vector based program.

Clipart is available in PowerPoint, just go to Insert - click ClipArt button - type in an appropriate keyword in the search pane and your done. But sometimes the clipart is not 100 % what you were after. So can you edit it and remove an unwanted background for example?

Take this example:
When you select the clipart the remove background button stays grey. Yet I have managed to remove it.
How, well not all that difficult, just insert the clipart, then right-click on it. In the quick menu choose, Edit picture.

You will see a dialog asking you if you want to convert to a Microsoft Office drawing object, click Yes.


Nothing seems to have changed to the object at first. But don't be fooled, click in the clipart you will see that you'll be able to select different parts of the object.


Ungrouping should give the following result:
This allows you to edit all individual objects to your liking.

After converting to a Microsoft Office drawing object, just click on the background of the clipart en press delete.

Using this method will ensure there is no loss of quality in the clipart.

In a next blog entry I will give you a second way to remove the background and this time I will by using the Remove background button.