Posts tonen met het label background picture. Alle posts tonen

20 december 2023

Change the transparency of the background of online picture in PPT 2019

When you need a picture in your presentation and you haven't got a suitable one you can select an online picture. Suppose you need a picture of a mouse pointer. Go to:

Insert Pictures Online pictures - type your search word cursor and press enter.

If you don't want to risk copyright infringement put a check next to the Creative commons only (free available pictures). Select the picture you want and click Insert.


Unfortunately the inserted picture has no transparant background.


You can resolve this in two ways. 

Set one colour with transparency.

Select the picture, on the contextual tab Picture format in the Adjust group click on the Color button. Choose Set Transparent color. Click in the part you want to make transparent. 

In example below it worked on the second picture but not on the first one.


Remove the background of the picture

On the first picture we will have to remove the background. Use the Remove background button in the Adjust group of the contextual tab Picture format.


The pink areas will be removed if you click on the Keep changes button.


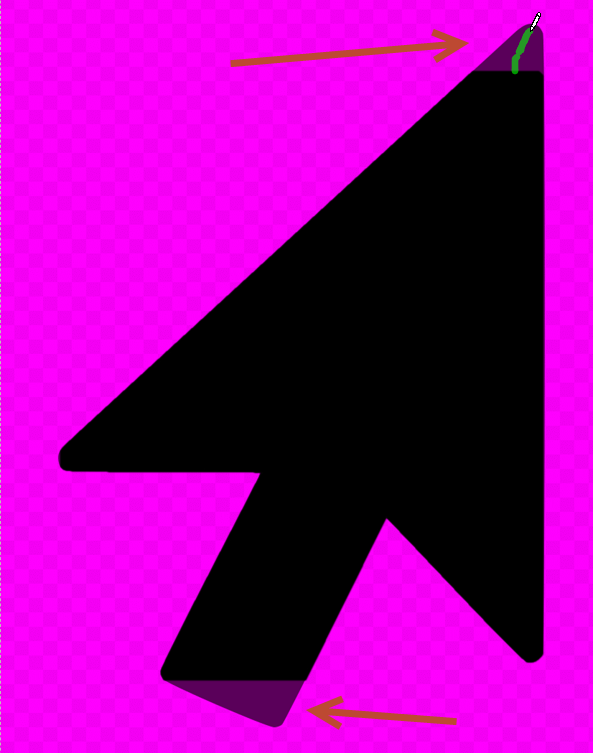
If you're in luck all will be perfect. If you are not you will see that some parts may have vanished as you can see in the below sample.


If you have a better and closer look you can notice some lighter coloured parts which should be kept.


Use the Mark areas to keep button and drag carefully in the missing parts.


You will see the colour change, finally click on the Keep changes button.


15 november 2016

Text over picture background

I'm sure you have run into the problem of titles/textboxes who are not legible against a complicated background image. There are some practical approaches to make the text stand out and readable.

Here's a sample of text on a dark background. As you can see it is not very legible.


Option 1: apply some text effects

Select your text and right click on it, choose Format Shape and in the task pane, at the top, choose Text options, followed by the Text effects button. Choose the Glow option, select the colour (white here) and use the sliders to adjust the size and the transparancy. You can also click on the Format tab under Drawing tools and click the Text effects button, Glow and finally Glow options.


Option 2: text color

Select your text and put it in a contrasting color, here in white.


Option 3: Text placeholder filled with transparent color

Select the placeholder, right click it and choose Format Shape, in the task pane at the top choose Shape options, select a color and use the slider to set the transparency. Of course this will limit the transparency to just the textbox.


Option 4: cover with a transparent rectangle

Draw your rectangle on top of the text placeholder. Follow the same steps as in option 3. In the example below I have chosen the theme color Gold with a suitable transparency.


07 november 2016

Tekst over een achtergrondafbeelding

Wanneer je een achtergrondafbeelding gebruikt, hetzij voor alle dia's, hetzij op een enkele dia en je wil er tekst overheen plaatsen dan ondervind je al vlug dat je bij een donkere achtergrond heel moeilijk de tekst kan lezen.

Hieronder zie je een voorbeeld van donkere tekst op een donkere achtergrond.


Gelukkig kan je één en ander proberen om de tekst toch wat beter leesbaar te maken.

Mogelijkheid één: teksteffecten toepassen

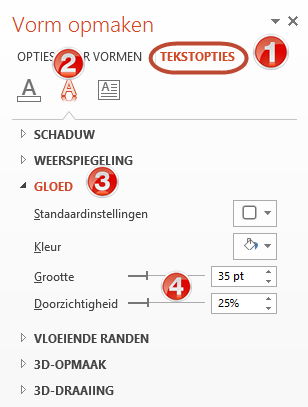
Selecteer je tekst en klik erop met je rechtermuisknop, kies voor Vorm opmaken, in het taakvenster kies je bovenaan Tekstopties en vervolgens de knop Teksteffecten. Kies de optie Gloed, selecteer de kleur en gebruik de schuifbalken om de grootte en de doorzichtigheid van de gloed te bepalen. Je kan natuurlijk ook onder Hulpmiddelen voor tekenen kiezen voor Opmaak en klikken op de knop Teksteffecten, Gloed en Opties voor gloed  De tekst is nu beter leesbaar.


Tweede mogelijkheid: tekstkleur

Selecteer je tekst en zet hem in een contrasterende kleur, hieronder in het wit.


Derde mogelijkheid: tekstvak opgevuld met transparante kleur

Selecteer het tekstvak, Klik erop met je rechtermuisknop kies voor Vorm opmaken, in het taakvenster kies je bovenaan Opties voor vormen, selecteer een kleur en gebruik de schuifbalk om de transparantie in te stellen. Dit heeft als nadeel dat de transparantie beperkt is tot het tekstvak.


Vierde mogelijkheid: bedekken met transparante rechthoek

Je volgt dezelfde stappen als in mogelijkheid drie. Hieronder is gekozen voor de themakleur Goud met een gepast transparantie.