16 maart 2013

Use navigation bar in your presentation (2)

Use navigation bar in your presentation (2)


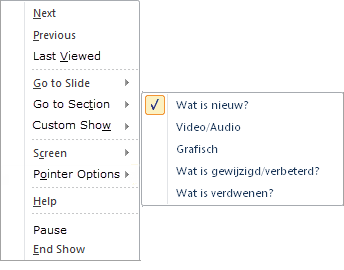
In my previous blog entry I discussed the possibilities of annotation. Next to that there are also some options you can reach using the third button on the navigation bar. You can also reach that menu by right clicking on your screen.


The next and previous options are obvious, with Last viewed you can return to the last viewed slide quickly, useful when you hyperlinked to another slide and want to return where you left off.

The Go to slide option lets you jump in your presentation making use of the Title placeholders you put on the slide.
Go to Section lets you jump to a different part of your presentation, providing you made the sections of course. You can find the section button on the Home tab.


Then there is custom show, that allows you to jump to a custom made show which contains only the slides you want to show in a chosen order suitable for a particular public. Again you must make the custom shows beforehand using the Custom Slide Show button on the Slide show tab.


11 maart 2013

Navigatiebalk gebruiken tijdens je presentatie in PPT 2010

Navigatiebalk gebruiken tijdens je presentatie (1)

Al ooit de navigatiebalk gebruikt tijdens een presentatie? De balk verschijnt in de linkerbenedenhoek van het presentatievenster als je er met je muis over beweegt. Veel mensen zijn er zich niet van bewust dat deze balk beschikbaar is.

Navigatiebalk

De navigatiebalk bestaat uit vier knoppen. De eerste laat je een dia terugkeren, de laatste een dia vooruitgaan. Met een klik op de Pen kan je aantekeningen maken op je scherm tijdens de presentatie.


Kies voor de Pen en begin met tekenen via je linkermuisknop, hou er rekening mee dat de aantekeningen er rudimentair zullen uitzien. Je kan bijvoorbeeld geen perfecte rechte lijn of cirkel aanmaken. Je kan de inktkleur aanpassen als je wil of de aantekeningen met de Gum terug verwijderen.

Als je tekst wil benadrukken maak je best gebruik van de Markeerstift. Hieronder zie je een voorbeeld van een dia waar de pen en markeerstift zijn gebruikt.


Stop je met presenteren dan krijg je een dialoogvenster dat je toelaat de aantekeningen te behouden of te verwijderen.


Kies je voor Behouden dan verschijnt er automatisch een contextueel tabblad dat je toelaat de aantekeningen qua opmaak aan te passen.


Als de pen actief is kan je notaties maken op verschillende dia's. Om naar de volgende dia over te gaan kan je gebruik maken van het toetsenbord (druk letter V, PageDown, pijltje naar beneden). Of je kan natuurlijk de knop Volgende gebruiken op je navigatiebalk onderaan het scherm.

Wil je stoppen met het maken van aantekeningen druk dan Escape of
klik op de pen en kies voor Pijl.


09 maart 2013

Use navigation bar in your presentation (1)

Use navigation bar in your presentation (1)

Ever noticed the navigation bar in bottom left corner of your screen during a presentation. Not many people know about it or use it for that matter. If you move your mouse to the bottom of the screen it will appear.

Navigation bar
There are four buttons there, the first brings you to the previous slide, the last to the next slide. The second one is used to make annotions on your slide during the show.


Choose the pen, and start drawing on your slide, be aware that it will look rather clumsy, there are no possibilities to restrain and make lines perfectly straight or to draw a perfect circle for instance. You can choose the Ink color and use the eraser tool if necessary.

If you want to emphasize an item use the highlighter. Here's a sample of a slide where the pen and highlighter have been used.


Once you stop the presentation you will be offered to keep or to delete the annotations.

If you decide to keep them there will be a contextual tab in the ribbon allowing you to edit your annotations.


Once you activate the pen, you can use it on several slides, to navigate to the next slide you can use your keyboard (press N, PageDown, down arrow), or use the next button on your navigation bar in the left corner.
To stop using the pen/highlighter, just press Escape.
Or click the pen button and choose Arrow.

06 maart 2013

Snel terug naar eerste dia tijdens presentatie

Snel terug naar eerste dia tijdens presentatie


Als je tijdens een presentatie heel snel terug naar de eerste dia wil gaan typ dan het cijfer 1 en druk Enter. Het volstaat dus het nummer van de dia in te typen om naar om het even welke dia te navigeren zonder daarbij de presentatie te verlaten.

Of hou de linker- en rechtermuisknop tegelijkertijd ingedrukt gedurende 2 seconden.

02 maart 2013

Return to first slide quickly

Return to first slide quickly


If you want to return to the first slide quickly during a presentation, just type 1 and press enter.

Or if you want to use your mouse, press down the left and right mouse button simultaneously for
2 seconds.

28 februari 2013

Blogartikelen in een Word document, jaar 2012

Het is altijd handig om een geprinte versie van artikels bij de hand te hebben. Ik heb voor alle artikelen per jaar een Word document aangemaakt.

Algemene artikelen of aankondigingen zijn niet opgenomen in de documenten.

Ieder artikel krijgt zijn eigen pagina. Een inhoudstafel is beschikbaar en je kan zien welke versies van PPT geschikt zijn om een taak uit te voeren. Sommige artikelen zijn natuurlijk enkel bestemd voor een specifieke PPT versie.

Je kan het  document voor het jaar 2012 downloaden via onderstaande link.


Blogartikelen jaar 2012

Blog articles in a Word document, year 2012

It is always handy to have a printable copy of interesting articles. I have made Word documents containing all my blog articles over the years.

Some general articles or general announcements have been let out.

Every article has its own page, and there is a table of contents to get quickly at it. You will see the versions of PPT that can be used to perform a task. Of course some articles only apply to a particular version of PowerPoint.

This is the document for the year 2012.


22 februari 2013

Selecteren tijdelijke aanduidingen

Selecteren tijdelijke aanduidingen


Om een tijdelijke aanduiding te selecteren klik je meestal op de rand van de aanduiding.

Je kan ook de tabulatortoets gebruiken die objecten één voor één selecteert, maar dan moet je geregeld meerdere keren drukken vooraleer je aanduiding geselecteerd is.


Maar je kan ook gebruik maken van de functietoets F2, handig als je cursor zich al in de tijdelijke aanduiding bevindt.

Selecting placeholders

Selecting placeholders


To select a placeholder and its contents one usually clicks on the surrounding border.

Another alternative is to press the tab key on your keyboard which selects one object at a time, but that may take several keystrokes.

To select a placeholder one can also press F2, quite handy when your cursor is already in the placeholder.

16 februari 2013

Verdwijnende muisaanwijzer

Verdwijnende muisaanwijzer


In PowerPoint verdwijnt de muisaanwijzer automatisch na enkele seconden. Door even met de muis te bewegen komt die wel terug.

Om te vermijden dat de muisaanwijzer verdwijnt druk je de combinatie CTRL+A.

Opgelet, dit is éénmalig, voor de volgende presentatie moet je opnieuw de combinatie indrukken. 

14 februari 2013

Disappearing mouse pointer

Disappearing mouse pointer


In PowerPoint you have certainly observed that the mouse pointer vanishes after a few seconds during a presentation. Moving your mouse brings it back. This can be annoying especially if you have to click triggered objects and such.

To prevent the mouse pointer from vanishing, press Ctrl+A.

Be aware that this a presentation only setting. You will have to use the combination with each new presentation.

01 februari 2013

Toon de klok tijdens presentatie

Er zijn omstandigheden waar het tonen van een klok tijdens een presentatie gerechtvaardigd is. Persoonlijk ben ik tegen, het tonen van de klok kan (onnodig) extra druk leggen op de presentator.

Als je een lopende digitale klok nodig hebt bekijk dan deze add-in op de volgende link:

http://www.tushar-mehta.com/powerpoint/ppt_timer/index.htm

Als je een analoge klok nodig hebt dat kan je dit truukje toepassen (dat ik heb geleerd van John Wilson - MVP).

Gebruik de gadget met de analoge klok in Windows Vista, Windows 7.

Opmerking!
Vanaf Windows 8 heeft Microsoft de gadgets verwijderd, wegens veiligheidsoverwegingen.
Als je de procedure hieronder toch wil volgen voor Windows 8, 8.1 of Windows 10 kan je altijd beroep doen op een desktop gadgets installeerprogramma. Eens je dat hebt gedaan krijg je de oude gadgets van Windows 7 terug.

Op je bureaublad rechts klikken op de gadget met de klok, kies voor Altijd op de voorgrond. Sleep de klok op de gewenste plaats.


Eventueel kan je de doorzichtigheid ook aanpassen zodat de klok niet zo opvallend in beeld komt.


Tijdens je presentatie kan je met de muis over de klok navigeren om deze zichtbaar te maken.