24 april 2015

Aangepast opsomteken gebruiken voor tijdelijke aanduidingen in meerdere dia's (2)

In mijn vorig artikel heb ik jullie getoond hoe je een aangepast opsomteken ook kunt gebruiken in andere dia's.

Wil je een meer permanente oplossing dan kan je het diamodel zelf aanpassen of een Nieuwe dia-indeling toevoegen aan je Diamodel. Op deze manier zal je bij iedere nieuwe dia kunnen kiezen voor een dia met het gewenste opsomteken.

Ga naar het diamodel via Beeld - Diamodel
Selecteer ofwel het diamodel en pas op het eerste niveau een aangepast opsomteken toe. Dit opsomteken wordt nu toegepast in om het even welke dia-indeling.


of

Localiseer de dia-indeling waar je een aangepast opsomteken wil gebruiken, klik erop met je rechtermuisknop en kies voor Indeling dupliceren.


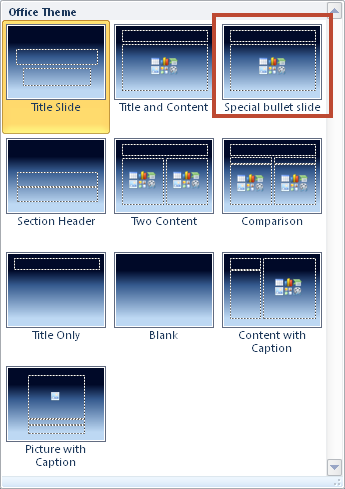
Verander nu het opsomteken van het eerste niveau. Geef de dia-indeling een gepaste naam bv. Aangepast opsomteken, dat doe je door rechts te klikken op je dia-indeling en te kiezen voor Naam van indeling wijzigen.


Verlaat vervolgens terug het diamodel en klik op het pijltje onder de knop Nieuwe dia, je zelfgemaakte dia-indeling zal met zijn gekozen naam verschijnen tussen de andere dia-indelingen. Het staat je nu vrij te kiezen voor het klassieke opsomteken of het zelf gekozen opsomteken.


14 april 2015

Aangepast opsomteken gebruiken voor tijdelijke aanduidingen in meerdere dia's (1)

Al ooit in een dia een aangepast opsomteken ingesteld en dat meteen ook weer kwijtgeraakt in de volgende dia's?

Bij het aanmaken van de nieuwe dia is het aangepast opsomteken verdwenen uit de lijst met opsomtekens.


De voor de hand liggende oplossing is de bewuste dia kopiƫren. Klik met je rechtermuisknop op de dia en kies voor Dia dupliceren, of druk gewoon de toetsencombinatie CTRL+D met de bewuste dia actief in het diaoverzichtsvenster.


Resultaat:


Je kan enkel het eerste niveau aanpassen, niet de andere niveaus. De andere dia-indelingen met een opsomteken zijn natuurlijk niet aangepast. Heb je wat verder in je presentatie opnieuw dezelfde indeling nodig dan zal je de dia gewoon moeten kopiƫren. Voor meer flexibiliteit en gebruiksgemak kan je het diamodel aanpassen, dat leg ik uit in een volgende bijdrage.


10 april 2015

Use customized bullet style for placeholders in different slides (2)

In my previous article I explained how to use a custom bullet style by duplicating the sample slide.

If you want a more permanent solution you will have to change the master slide or add a custom slide layout to your master. That way you will be able to choose a new slide layout with the correct bullet immediately.

Go to the master by pressing View - Master.
Either select the master slide and change the first level bullet, which will have an effect on all the slide layouts at once.

or
Locate the slide layout, right click it and choose Duplicate layout.


Now change the bullet style of the first level.


Give an appropriate name to the new layout. Something like 'Special bullet slide'. You can do that by selecting the layout and clicking on the Rename button in the Slide master group.

Leave the master and choose the new slide button, your new layout will be present in the available layouts. Now you can choose between the normal bullet layout or the customized one.


01 april 2015

Use customized bullet style for placeholders in different slides (1)

Ever made use of a custom bullet in a slide and noticed that it is no longer available in the next slide?


Very annoying.

To get around this the obvious workaround is to copy the slide as a whole.

Right click the slide with the bullet style and choose duplicate slide. Or just press Ctrl+D with the example slide active in the slide and outline pane.


Result:


You can only change the first level not the other levels. The new setting will apply only to the chosen slide layout. When you need the same setting further on in your presentation you will have to copy and paste it.

To change all levels or to change all slide layouts you will have to edit your master. This will ensure you will always have the correct bullet style for all your slides. We will explain this in a next entry.


09 maart 2015

PowerPoint voorstelling tonen zonder ingestelde animatie

Wanneer je een presentatie aanmaakt met veel animaties en je wilt ze even uittesten zonder de animaties en de timings te gebruiken dan kan je het volgende doen.

Lint Diavoorstelling - Diavoorstelling instellen - onder Afspeelopties kies je voor Voorstelling zonder animatie en bij naar volgende dia kies je voor Handmatig.

Op deze manier geraak je de animaties niet kwijt en kan je de volgende keer de presentatie gemakkelijk terug gebruiken met de toegepaste animatie.

PPT 2010
PPT 2013
Opgelet, als je de presentatie opslaat worden deze instellingen mee opgeslagen!

01 maart 2015

Show your presentation without the animations

If you have a presentation with lots of animations on the slides and want to test the overall look it is a painstaking job. Every click gives you the next animation.

To avoid this you can set your presentation to have no animation (without losing them) or no timings.

Here's how.

Go to Slide Show - click Set up show - under Show options check the box Show without animation, and under Advance slides make sure the radio button Manually is checked.


PPT 2010

PPT 2013

Be aware that if you save the presentation the settings will be saved with it.

28 februari 2015

Blog articles in a word document, year 2014

It is always handy to have a printable copy of interesting articles. I have made Word documents containing all my blog articles over the years.

Some general articles or general announcements have been let out.

Every article has its own page, and there is a table of contents to get quickly at it. You will see the versions of PPT that can be used to perform a task. Of course some articles only apply to a particular version of PowerPoint.

This is the document for the year 2014.


Blogartikelen in een Word document, jaar 2014

Het is altijd handig om een geprinte versie van artikels bij de hand te hebben. Ik heb voor alle artikelen per jaar een Word document aangemaakt.
Algemene artikelen of aankondigingen zijn niet opgenomen in de documenten.

Ieder artikel krijgt zijn eigen pagina. Een inhoudstafel is beschikbaar en je kan zien welke versies van PPT geschikt zijn om een taak uit te voeren. Sommige artikelen zijn natuurlijk enkel bestemd voor een specifieke PPT versie.

Je kan het  document voor het jaar 2014 downloaden via onderstaande link.


Blogartikelen jaar 2014

10 februari 2015

New keyboard shortcuts in PPT 2013

There are some new shortcuts in PPT 2013

Ctrl+shift+H
Show or hide the notes pane

Ctrl+<
Add a new section

Ctrl+ - -
Zoom out of a slide, see all slides in slide show view

Ctrl+ ++
Zoom in on a slide in slide show view

Alt+F5
Show presenter view

01 februari 2015

Nieuwe sneltoetscombinaties in PPT 2013

Er zijn enkele nieuwe sneltoetscombinaties in PPT 2013


Ctrl+shift+H
Tonen/verbergen notitievenster

Ctrl+<
Nieuwe sectie toevoegen

Ctrl+ - -
uitzoomen op dia, alle dia's bekijken in diavoorstelling

Ctrl+ ++
Inzoomen op dia in diavoorstelling

Alt+F5
Presentator weergave activeren

13 januari 2015

Show an embedded file during slide show with a mouse-over

In my previous article I showed you a way to embed a document in your presentation.

If you want to show an embedded document during slide show with a mouse-over here is what you have to do:


Select the embedded document icon.

On the Insert tab, Links group, click on the Action button.

2010

2013
In the Action settings dialogue, click on the Mouse over tab, choose the radio button Object action, select the open option and click OK.


During your slide show just move the mouse cursor above the icon and your document will open. When finished, click the close button of the program and you will be back in your presentation.

06 januari 2015

Een ingesloten bestand via mouse-over tonen tijdens een presentatie

In mijn vorig artikel heb je gezien hoe een extern bestand bij je presentatie in te sluiten.

Wat als je tijdens de presentatie dat bestand ook wil tonen aan je publiek. Gewoon door er met je muis overheen te bewegen.


Selecteer het ingevoegde object.

In het lint Invoegen, groep Koppelingen, klik op de knop Actie.

2010

2013
In het dialoogvenster Actie-instellingen kies je voor het tabblad Muisaanwijzer op object. Zet het keuzerondje Actie bij object actief, selecteer vervolgens Openen en klik OK.


Tijdens je presentatie volstaat het om de muiscursor over het pictogram te bewegen en je document wordt geopend. Wanneer je het programma vervolgens sluit kom je naadloos terug in je presentatie.