28 april 2018

Copy text from image in PPT 2013

If you need to use a text that is part of a picture in PPT you can use OneNote to extract the text.

Open OneNote, go to the section or page where the picture resides or copy and paste it to OneNote.

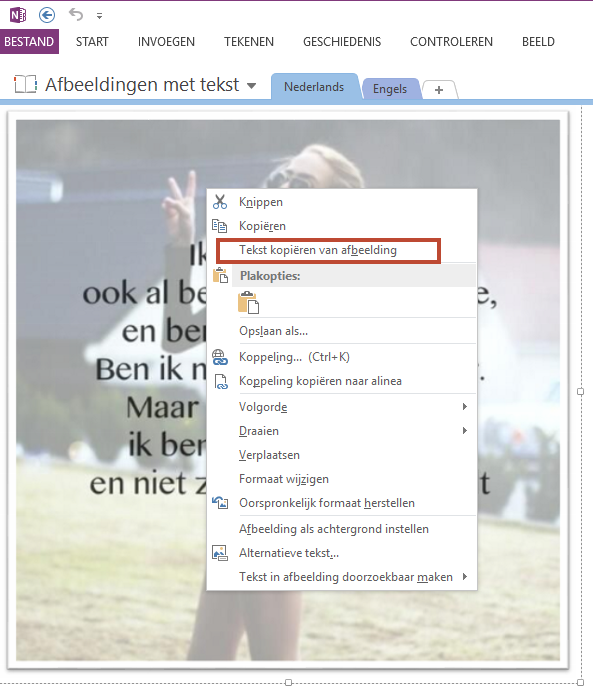
Right-click the picture and choose Copy text from picture in the quick menu. It is in the Windows
clipboard.

Do keep in mind that OneNote will have difficulties in recognizing special fonts, especially those resembling handwritten text.


You can now paste it in PPT or any other program if you like.

17 april 2018

Tekst uit een afbeelding gebruiken in PPT 2013

Wanneer je een tekst wil gebruiken die in een afbeelding is geplaatst kan je gebruik maken van OneNote.

Open OneNote, ga naar de sectie of pagina waar de afbeelding zich bevindt of kopieer en plak ze in OneNote.

Klik erop met je rechtermuisknop en kies uit het snelmenu de optie Tekst kopiëren van afbeelding.

In PowerPoint kan je nu de tekst plakken in een tijdelijke aanduiding of tekstvak. Hou er wel rekening mee dat OneNote het heel lastig heeft met speciale lettertypes, vooral deze die op handschrift lijken.

05 april 2018

Create half a circle shape in PPT 2013-2019

There is no half circle shape in PPT 2013. Actually there is a three quarter circle shape, which can be adapted using the adjustment handle.


Unfortunately the shape still has its former dimensions if you select it. So, it is not really a demi circle. For example, when you add text to it - that is centered (default) or aligned at the top - the text does not follow the shape.


To avoid this, you can make your own shape.

To do this you have to draw two shapes a circle and a rectangle. Position them above each other and then use the merge shapes tool to make one shape.


Click on the rectangle first then select the circle using shift+click.

Under Drawing Tools, click the Format tab, in the Insert Shapes group click the Merge Shapes button. Choose Intersect now you have a perfect demi circle. Any text you type in the shape will be positioned correctly.


31 maart 2018

Halve cirkel vorm aanmaken in PPT 2013

Onder de tekenvormen zal je in PPT geen halve cirkel terugvinden. Er is wel een driekwartcirkel vorm die je met behulp van de bijstellingsgreep kan omvormen tot een halve cirkel.


Als je de vorm selecteert blijft het wel zo dat de vorm zijn oorspronkelijke vorm feitelijk behoudt. Wanneer je nu tekst intypt terwijl de vorm geselecteerd is dan wordt die (standaard) in het midden geplaatst. Dat is nog duidelijker wanneer je de tekst uitlijnt met de bovenkant van de vorm.


Om dit te vermijden kan je zelf een halve cirkel vorm creëren.

Om dit te realiseren moet je twee aparte vormen tekenen een cirkel en een rechthoek. Beide moeten boven elkaar gepositioneerd worden, vervolgens kan je met de Shapes samenvoegen functie een vorm maken.


Klik eerst op de rechthoek en selecteer dan met shift+klik de cirkel.

Onder hulpmiddelen voor tekenen klik je op de Opmaak tab, in de groep Vormen invoegen kies je voor Shapes samenvoegen. Selecteer Snijden, je krijgt een perfecte halve cirkel. Alle tekst die je intypt komt nu op de juiste plaats.


16 maart 2018

Comprimeren van foto's uitschakelen in PPT 2013

Standaard worden in Powerpoint foto"s bij het invoegen gecomprimeerd. Gelukkig kan je dit voor de huidige presentatie uitschakelen. Als je dit altijd wenst dan zal je moeten ingrijpen in het Windows register.

Om compressie eenmalig uit te schakelen ga je als volgt tewerk:
Klik Bestand - Opties - Geavanceerd - onder grootte en kwaliteit van de afbeelding zet je een vinkje bij Afbeeldingen in het bestand niet comprimeren. 


Als je dit voor alle presentaties wil doen zal je moeten ingrijpen in het Windows register. Wees hier wel voorzichtig.
Druk de Windows-toets in combinatie met de R op je klavier.
In het dialoogvenster typ je regedit in en klik OK.


Zoek de sleutel HKEY_CURRENT_USER\Software\Microsoft\Office\15.0\PowerPoint\Options.
Klik in het rechtse gedeelte met je rechtermuisknop en kies Nieuw en vervolgens Dword (32-bits waarde). Geef als naam AutomaticPicturesCompressionDefault. Rechtsklik op de nieuwe sleutel en kies Aanpassen. Bij waardegegevens moet een 0 staan. Verlaat de registereditor. Controleer of bij een nieuwe presentatie de compressie is uitgeschakeld.

06 maart 2018

Switch off picture compression - PPT 2013

If you want to change the default picture compression for the current presentation, click File -  Options - Advanced - under image size and quality, check the option Do not compress images in file. 


If you want all files to not compress you will have to edit the registry.
Press the Windows key on your keyboard in combination with the letter R. In the dialog, type regedit en click OK.


Navigate to the key
HKEY_CURRENT_USER\Software\Microsoft\Office\15.0\PowerPoint\Options.
Right click and choose New, add a new DWORD value. Give it the name AutomaticPicturesCompressionDefault. Check it, it has the value of 0 to disable the automatic compression, or 1 to enable compression. Finally close the registry editor.

26 februari 2018

Animate separate word in a paragraph - PPT 2013 (method 3)

And finally the last method.

This time I am just using an animation. More specifically an emphasis animation. It takes some effort but has the advantage that you do not need separate textboxes. This method is more difficult if you apply a gradient background to your slide. But even then you can work around it.

Select the word(s) you want to animate separately and apply the background colour of the theme. Click on the Text color button in the Font group and choose the white background 1 color box.

Result:
Now click in the textbox, choose the Animations tab, click the Add animation button, choose the Font color button in the Emphasis section. 


Double click the item in the animation task pane. Choose the list arrow next to Text color and select the black box. 


Next to Animate text choose By word and lower the percentage to 5%. On the Timing tab next to duration choose 3 seconds (slow).


Click during the presentation and the words will appear one by one with a suitable delay between them. There is no obligation to animate word by word but if you do not all words will appear simultaneously and very quickly.

If you want the words to vanish after being animated, just click the box Rewind when done playing on the Timing tab of the dialog.


What if you choose a colored gradient background, e.g. from one of the in-built themes?

In the example below I have used the Slice theme.


Select the word(s) you want to animate separately and click the Format tab under Drawing tools. Click on the Text fill button in the WordArt styles group and finally select Eyedropper.


Move the eyedropper next to or close to the animated word and click. The color now follows the background.


Repeat the process for the other words. Finally apply the animation discussed above. The colors you choose using the eyedropper will be available under the recent category.


12 februari 2018

Animeren van aparte woorden in een paragraaf - PPT 2013 (methode 3)

Ten slotte de derde en laatste mogelijkheid.

Deze keer ga ik louter gebruik maken van een nadrukeffect. Het vraagt wel wat moeite maar heeft als voordeel dat je geen aparte tekstvakken nodig hebt. De methode wordt ietsje moeilijker als je in je dia een achtergrond met opvulling met kleurovergang toepast, maar ook daar valt een mouw aan te passen.

Selecteer het woord(en) dat je apart wil animeren en pas via de knop Tekstkleur in de groep Lettertype de kleur van de achtergrond toe van het thema.


Klik nu in het tekstvak, kies tabblad Animaties, klik op de knop Animatie toevoegen en kies onder de rubriek nadruk voor de knop Tekstkleur. 


Dubbelklik op het item in het animatievenster. Kies bij tekstkleur het lijstpijltje en kies voor het zwarte kleurvakje. 

Kies onderaan bij tekst van animatie voorzien voor Per woord en verlaag het percentage naar 5 %. Bij het tabblad Tijdsinstelling kies je bij duur voor 3 seconden.


Bij een klik zullen de woorden één voor één verschijnen. Je bent natuurlijk niet verplicht om de animatie per woord toe te passen. Maar als je dit niet doet dan verschijnen de woorden quasi tegelijkertijd en heel snel na de klik.

Wil je dat de woorden, na te zijn geanimeerd, terug verdwijnen dan volstaat het van het vakje Terugspoelen na afspelen op het tabblad Tijdsinstelling aan te vinken.


Wat als je een gekleurde achtergrond met kleurovergang toepast, zoals bij sommige ingebouwde thema's?

Bij onderstaand voorbeeld heb ik gebruik gemaakt van het thema segment. Dit thema heeft een blauwe achtergrond met kleurovergang zoals hieronder te zien is.


Selecteer het woord(en) dat je apart wil animeren en pas via het tabblad Opmaak onder Hulpmiddelen voor tekenen voor de knop Tekstopvulling in de groep Stijlen voor WordArt. Je kiest voor de optie Pipet. 

Beweeg en klik met je pipet dichtbij of naast het te animeren woord. De kleur is nu aangepast en het woord verdwijnt.


Herhaal dit proces voor de andere woorden en pas dan de nodige animatie toe. De gekozen kleur(en) van het pipet vind je terug onder recente kleuren.


05 februari 2018

Animate separate word in a paragraph in PPT 2013 (method 2)

In my previous article I used white space and a separate textbox to animate a single word in a paragraph.

Let's try a different approach.

Format the word you want to animate to be 100% transparent (1)
Select the word, right click it and choose Format shape. In the task pane click Text options and use the slider next to Transparency, slide till you reach 100 %.


As you can see the selected word is still in place.
Copy the entire text box and make it 100 % transparent (2). Now select only the animated word and set it back to 0% (3)

As a last step align the two text boxes on top of each other. To do so use the alignment tools on the Format tab of the 
contextual tab Drawing tools.

Now animate the second text box and you are done.

31 januari 2018

Animeren van aparte woorden in een paragraaf in PPT 2013 (methode 2)

In PowerPoint kan je enkel volledige tekstparagrafen animeren.  Alle woorden afzonderlijk animeren na elkaar is geen enkel probleem. Een enkel woord binnenin een paragraaf animeren daarentegen kan niet.

In mijn vorige bijdrage maakte ik gebruik van witruimte en een apart tekstvak. Deze keer ga ik het anders aanpakken.

Selecteer in het tekstvak het woord dat je wil animeren, formatteer de tekst zodat die 100% transparant wordt. (1)
Selecteer het woord, klik er met je rechtermuisknop op en kies voor Vorm opmaken, in het taakvenster rechts klik je op Tekstopties en bij kleur verschuif je tot 100 % transparant.


Zoals je ziet is het woord wel degelijk aanwezig na selectie.
Kopieer het volledige tekstvak en maak het volledig transparant (2).

Selecteer in het gekopieerde vak het woord dat moet geanimeerd worden en plaats het terug op 0% doorzichtigheid (3).
Als laatste stap plaats je nu beide tekstvakken bovenop elkaar. Daarvoor kan je gebruik maken van de uitlijnmogelijkheden uit het lint. Of sleep met de Alt-toets ingedrukt het tekstvak bovenop het originele tekstvak.


Nu nog het tekstvak animeren en je bent klaar.

Ook deze methode kan je gebruiken om verschillende woorden na elkaar te animeren.