27 februari 2019

Deel van achtergrond van foto vervagen in PPT 2013

Om de achtergrond van een foto wazig te maken moet je een omweg gebruiken in PPT.

Daarvoor moet je twee foto's boven elkaar plaatsen, de onderliggende foto maak je volledig wazig en de bovenliggende foto editeer je met de functie achtergrond verwijderen zodat enkel het focuspunt nog overblijft.

Dit is de originele foto.


Kopieer de foto bovenop de originele foto. Ga naar Hulpmiddelen voor afbeeldingen, tabblad Opmaak en kies de knop Achtergrond verwijderen.


Doe de nodige bewerkingen en klik ten slotte op de knop Wijzigingen behouden. 


Wil je meer info over de functie bekijk dan mijn vorig artikel: Achtergrond verwijderen


Selecteer nu de onderliggende originele foto en ga naar Hulpmiddelen voor afbeeldingen, tabblad Opmaak en kies de knop Artistieke effecten, selecteer Vervagen.


Standaard krijg je 10% vervagen, om dat wat te verhogen klik je rechts op de afbeelding en je kiest voor Afbeelding opmaken. In het taakvenster verhoog je de radius naar het gewenste percentage.


Dit is dan het eindresultaat:


Je kan dit natuurlijk ook doen met andere artistieke effecten:


15 februari 2019

Blur part of the background of a picture in PPT 2013

To blur the background of a picture in PPT you need to use a workaround.

To do that you have to put two photos on top of each other. Blur the first photo completely, then  remove the background of the photo on top so that only the focus point remains.

This is the original photo.


Now copy that photo and put it on top of the original. Go to Picture tools, Format tab, click the Remove background button.


Make the necessary changes and finally click the Keeps changes button.


If you want more information on how to remove a background click the following link: Remove background of a picture


Now select the original photo and go to Picture tools, Format tab and choose the Artistic effects button, select the fade option.


By default you will get a 10% blur, to increase the percentage right-click the photo and choose Format picture. In the task pane increase the radius.


This is the end result:


Of course you can use other artistic effects:


08 februari 2019

Blogartikelen in Word document, jaar 2018

Het is altijd handig om een geprinte versie van artikels bij de hand te hebben.

Algemene artikelen of aankondigingen zijn niet opgenomen in het document. Dat is ook geldig voor de artikelen met verwijzing naar Word documenten van vorige blog jaren.

Ieder artikel krijgt zijn eigen pagina. Een inhoudstafel is beschikbaar en je kan zien welke versies van PPT geschikt zijn om een taak uit te voeren. Sommige artikelen zijn natuurlijk enkel bestemd voor een specifieke PPT versie.

Je kan het document voor het jaar 2018 downloaden via onderstaande link.

01 februari 2019

Blog articles in a Word document, year 2018

It is always handy to have a printable copy of interesting articles. I have made a Word document containing all my blog articles over the past year.
Some general articles or general announcements have been left out. Articles referring to previous blog years have also been let out.

Every article has its own page, and there is a table of contents to get quickly to it. You will see the versions of PPT that can be used to perform a task. Of course some articles only apply to a particular version of PowerPoint.

You can download the document using the following link:

Blog articles, year 2018

21 januari 2019

Animate text paragraphs in SmartArt graphic in PPT 2013

In my previous article I explained how to animate text in placeholders and textboxes.

Using SmartArt I chose the List category, not all models are suitable to list text. Next to text a lot of models are also equipped to contain pictures.


You have two choices:

1 Use the effect options button on the ribbon


2 Double clicking the SmartArt object in the animation pane, SmartArt animation tab.


Next to Group graphic you have the same options as using the Effect options button.

Depending on the choice of model you made you will have a maximum of 5 options. Sometimes only the first three will be available.

As one object
All at once
One by one
Level at once
Level one by one

The first three are identical to the ones used with ordinary text boxes. See my previous article for more info.

You can download the example presentation from my OneDrive.
Example 1 of SmartArt text animation
Example 2 of SmartArt text animation

However, sometimes things are not that straight forward. For example, when you use the Vertical block list (see picture above) and choose the One by one option the paragraphs where you entered text at level 1 still get a separate animation of the underlying rectangle. So, you have to click twice to view the next text paragraph. You can solve this by selecting the rectangles in the animation pane (use ctrl+click) and apply the with previous option.

The last two options require some further explanation.

With Level at once one click animates all the level one paragraphs, a second click all the level two paragraphs.


With Level one by one you animate each level separately. You can only use two levels.


05 januari 2019

Animeren van tekstalinea's in SmartArt object in PPT 2013

In mijn vorig artikel had ik het over het animeren van tekst in alinea's.

Bij SmartArt heb ik gekozen voor de rubriek Lijst, niet alle modellen zijn geschikt om alleen tekst op te sommen. Veel modellen zijn ook uitgerust om naast tekst ook afbeeldingen op te nemen.


Nadat je het SmartArt object hebt geselecteerd en een animatie hebt toegevoegd heb je maar twee mogelijkheden:

1 Via het lint en de knop Effectopties


2 Via dubbelklik op SmartArt object in het animatiedeelvenster, tabblad SmartArt-Animatie.


Bij groepsafbeelding kan je kiezen voor dezelfde mogelijkheden als bij de knop Effectopties uit het lint.

Naargelang de keuze van model zal je kunnen kiezen tussen maximum 5 opties, soms zullen alleen de eerste drie beschikbaar zijn:
Als een object
Alles tegelijk
Een voor een
Tegelijk op niveau
Een voor een op niveau

Net als bij gewone tekstvakken zijn de eerste drie mogelijkheden identiek. Zie mijn vorig artikel voor meer uitleg daarover.

Je kan de voorbeeldpresentaties downloaden via mijn OneDrive.
Voorbeeld 1 animatie SmartArt tekst
Voorbeeld 2 animatie SmartArt tekst

Soms bots je wel op een probleem, bv. bij het model Vertikaal vak lijst (zie afbeelding hierboven) en de optie Een voor een krijg je bij het animeren van alinea's waar enkel tekst ingevuld werd op niveau 1 toch een aparte animatie voor de bijkomende vorm (rechthoek). Je moet dus twee keer klikken om een volgende tekstalinea te bekijken. Dit valt natuurlijk op te lossen door in het animatiedeelvenster de animaties van de rechthoeken te selecteren (gebruik ctrl-toets om ze allemaal in één bewerking te selecteren) en die met vorige in te stellen.

De laatste twee animatie mogelijkheden vergen wat uitleg.

Tegelijk op niveau zorgt ervoor dat bij een klik alle alinea's van het eerste niveau verschijnen en bij een tweede klik alle alinea's van het tweede niveau.


Een voor een op niveau zorgt ervoor dat je ieder niveau apart een per een kunt opbouwen. Heb je meer dan twee niveaus dan kan dat niet meer.


20 december 2018

Animate paragraphs in placeholders and text boxes in PPT 2013

If you want to animate text in a placeholder (or a text box you draw yourself) you can animate in three different ways. To distinguish between those possibilities you need to look at the animation pane.
You can download a sample presentation from my OneDrive here.

1 Use the effect options button on the ribbon

After adding your animation you can choose between three options As one object, All at once and One by one.

When launching your presentation it looks as if the two first options have the same effect. All the paragraphs are animated at the same time.

When you look at the animation in the animation pane you can see the difference. When you choose as one object there is only one animation, see the corresponding number next to the placeholder in your slide.


With the second option All at once there is one animation for every paragraph, but all animations except the first are formatted as with previous. Click the double arrow beneath the animation to make this visible. Next to every paragraph you see the same number.


But you can choose to apply a different effect to every paragraph or play with the animation timing and delay.

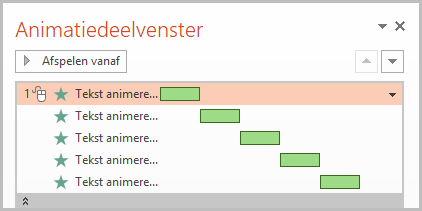
Below you can see an example using the float animation. The green boxes (advanced timeline) show that there is a delay between each paragraph.

The third option One by one is very clear, each paragraph is animated separately with a click of the mouse. See the numbers next to the placeholder in your slide.


2 Double click the animation in the animation pane, click the text animation tab

If you have several levels of text you can animate them by level.


Next to Group text you can choose between As one object, All paragraphs at once, or By 1st level, second and so on. These last choices can only be made by using this dialog. The Effect options button does not offer these possibilities.

Below is an example of a slide with a placeholder with two text levels.

The first screenshot is an example of 1st level animation. This means that both levels will appear when you click. See the numbers next to the placeholder.

The second screenshot is an example of 2nd level animation. Here you have to click once for every level.


When you use a text box you drew yourself the same options are available. The downside is that you need to format the text box before you can start animating it.

Attention!
If you want to animate different levels of text in a text box you drew yourself you need to choose the text level by clicking the increase level button in the paragraph section of the Home tab.


3 Double click the added animation in the animation pane, click the Effect tab in the dialog

Next to the animate text option you get three choices.


By default the whole paragraph is animated. But you can animate per letter or word. Personally I seldom use these possibilities. This article is dedicated to animating paragraphs so I will not discuss them here.

14 december 2018

Animeren van alinea's in tijdelijke aanduidingen en tekstvakken in PPT 2013

Als je tekst wil animeren in een tijdelijke aanduiding  (of zelf getekend tekstvak) heb je drie mogelijkheden. Om het onderscheid te kunnen maken tussen de drie mogelijkheden bekijk je best na het toevoegen van de animatie het animatiedeelvenster.
Je kan de voorbeeldpresentatie  hier downloaden via mijn OneDrive.

1  Via het lint Animaties en de knop Effectopties.


Daar krijg je drie opties, Als één object, Alles tegelijk en Per alinea.

Op het eerste gezicht lijken de eerste twee mogelijkheden op hetzelfde neer te komen, alle alinea's worden tegelijk geanimeerd.

Als je echter kijkt in het animatiedeelvenster zie je duidelijk het onderscheid. Bij de mogelijkheid Als één object zie je dat alle alinea's maar één animatie meekrijgen. Bij het tekstvak staat dus maar één nummer.


Bij de tweede optie Alles tegelijk is er wel degelijk één animatie per alinea, klik op de dubbele pijl onder de animatie om die zichtbaar te maken. Alle animaties behalve de eerste zijn met vorige ingesteld. Bij iedere alinea staat dus hetzelfde cijfer. Als je de presentatie afspeelt lijkt het dus alsof dit identiek is aan het effect Als één object.


Maar hier kan je gerust kiezen voor een ander effect per alinea of eventueel wat spelen met de duur van de animatie en de vertraging. Het begrip alles tegelijk is dus relatief.

Hieronder een voorbeeld met de animatie Binnenzweven. Aan de groene blokjes (tijdschema) kan je zien dat de ene animatie wacht tot de volgende gestopt is. Klik rechts op een animatie en kies voor Geavanceerd tijdsschema weergeven om dit beter te kunnen bekijken.


De derde optie Per alinea is de duidelijkste, iedere alinea wordt apart geanimeerd met een klik van de muis. De nummers bij de alinea's spreken voor zich.


2 Via dubbelklik op animatie in animatiedeelvenster en het tabblad Tekstanimatie

Als je meerdere tekstniveaus hebt bij de alinea's kan je die per niveau animeren.


Bij Tekst groeperen kan je kiezen voor Als één object, Alle alinea's tegelijk, of Per alinea van een gekozen niveau. De laatste keuzes kunnen alleen via dit dialoogvenster en zijn dus niet beschikbaar als je voor de knop Effectopties in het lint kiest.

Hieronder een voorbeeld van een dia met tekstalinea's op twee niveaus.

Het eerste voorbeeld is geanimeerd per alinea van het eerste niveau. Dit betekent dat de tekst van zowel niveau 1 als 2 tegelijkertijd verschijnt bij een klik. Kan je duidelijk zien aan de nummervolgorde die verschijnt naast de alinea's. 


In het tweede voorbeeld is geanimeerd per alinea van het 2de niveau daar moet je dus een keer klikken per niveau.


Gebruik je een zelfgetekend tekstvak dan zijn dezelfde mogelijkheden aanwezig. Nadeel is dat een standaard tekstvak nog moet voorzien worden van de nodige teken- en alinea-opmaak vooraleer je kan starten met de animatie.

Opgelet!
Als je meerdere niveaus wil animeren in een zelfgetekend tekstvak moet je de niveaus kiezen met de knop lijstniveau verhogen uit de groep alinea. Gebruik dus niet de tabulator toets zoals in een tijdelijke aanduiding.


3 Via een dubbelklik op de toegepaste animatie in het animatiedeelvenster en het tabblad Effect. 

Bij de rubriek Tekst van animatie voorzien heb je drie opties.


Standaard wordt de volledige alinea geanimeerd (alles tegelijk), maar je kan ook per woord of per letter animeren. Persoonlijk maak ik daar geen gebruik van. Het nadeel ervan is dat iedere letter en ieder woord afzonderlijk animatie krijgt wat van het goede teveel is. Aangezien dit artikel over alinea's gaat ga ik deze mogelijkheden niet bespreken.

01 december 2018

Set the default shape properties for every new presentation in PPT 2013

When you draw a shape in PowerPoint you always get an outline. In almost all cases you do not really need it. To save time and effort you can alter your custom theme in such a way you no longer need to remove the outline of your shapes.

You can change the default shape on a presentation basis. In that case it suffices to remove the outline of a shape, right-click it and choose set as default shape. See my previous article Set default shape in PPT 2007 which is still valid for the current versions of PPT.

To do this for all your presentations you need to set the default in your custom theme (this does not work for the built-in themes!)

Create a new presentation based on your custom theme.

Draw your shape and remove the outline, if necessary change other properties.


Right-click the shape and choose Set as default shape.


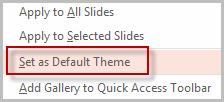
Now right click the custom theme you used in the Themes group. In the quick menu click Set as default theme.


The shape you drew will not be saved with the theme just its properties.