06 augustus 2018

Crop a picture to a circle shape

If you want to crop a picture to a circle shape seems only the oval shape is available.
You can adjust the format though.

Insert your picture and crop using the Crop button in the Size group on the Format tab.


After cropping click the dialog starter button in the bottom right corner of the Size group.

Click the picture button and the crop option.

Under Crop position, enter the same size next to width and height.


30 juli 2018

Stop an audio clip and start another by clicking on a trigger - PPT 2013

The idea is to (randomly) start each audio clip via a trigger and be able to click on another trigger to stop the previous audio from running.


Insert all the necessary audio using Insert - Audio - Audio on my PC. Replace the loudspeaker icon (if you want to) by right clicking the loudspeaker icon and choosing Change picture or click the Format tab under Audio tools and click Change picture icon. Browse using Bing to insert the picture.


Add the textboxes that will act as trigger to play the audio. You can give them an appropriate name by pressing Alt+F10 to activate the Selection task pane. Here I just choose the name of the song.
After inserting the audio clips the animation pane looks like this:


You can click the sound clip to play it. Clicking another will not stop the previous one. To change this we will add a trigger to each text box. Select the audio clip, Animation tab, Trigger button, next to On click of choose the name of the trigger (=name of the text box).
Repeat the process for the other audio clips.

In the animation pane the name of the trigger appears next to the title of the audio clip.


To stop each audio clip and start another we will have to add a stop animation to all the other audio clips.
Select the audio clip and click the Add animation button on the Animation tab. Select the Stop icon and drag the animation below the desired audio clip.


Next to the item Start in the Timings group choose with previous.


Repeat the process for the other clips.


Start your presentation and click a random trigger (text box), wait a few seconds then click another trigger (text box), the previous audio clip will stop. You can repeat the same operation several times on the same slide.

17 juli 2018

Stop een lopend audiofragment door te klikken op een trigger - PPT 2013

De bedoeling is dat je ieder audiofragment willekeurig kunt laten starten via een trigger en wanneer je klikt op een andere trigger het vorige audiobestand stopt. De trigger is gekoppeld aan het tekstvak dat ernaast staat.


Voeg alle geluidsfragmenten toe aan je dia via Invoegen - knop Audio - Audio op mijn PC. Pas indien nodig de afbeelding aan door rechts op het audiofragment te klikken en te kiezen voor Wijzig de afbeelding. Zoek via Bing je afbeelding, selecteer ze en klik op Invoegen.


Na het invoegen van de audionummers ziet mijn animatiedeelvenster er zo uit.


Voeg de nodige tekstvakken toe die zullen dienen als trigger om het audiofragment af te spelen. Via het taakvenster Selectie (Alt+F10) geef je ze een gepaste naam, in mijn voorbeeld heb ik gewoon de titel van het nummer als naam genomen.

Voorlopig moet je op het audiobestand klikken om het afgespeeld te krijgen. Dit ga ik veranderen door ieder tekstvak te selecteren en dat als trigger te gebruiken. Selecteer het audiofragment, tabblad Animaties, knop Trigger, 'Bij klikken op' selecteer je de titel van je tekstvak. Herhaal voor de andere fragmenten.


In het animatiedeelvenster verschijnt nu de naam van de trigger naast de naam van het audiofragment.

Om ieder audiofragment te kunnen stopzetten en een ander te starten ga ik nu een stopanimatie voor alle andere fragmenten toevoegen.

Selecteer het audiofragment en klik op de knop Animatie toevoegen op het tabblad Animaties, kies bovenaan voor de knop stoppen, sleep de animatie in het animatiedeelvenster onder het gewenste fragment. Herhaal dit voor de andere fragmenten.


Kies naast start in de groep Tijdsinstellingen voor Met vorige.


Ieder audiofragment krijgt dus een stop animatie mee voor de andere fragmenten.


Start de presentatie en klik op een willekeurig tekstvak (trigger), laat eventjes afspelen en klik dan op een ander tekstvak, meteen stopt het huidige audiofragment. Dit proces kan je herhalen zoveel als je wenst.

02 juli 2018

Online YouTube video automatisch afspelen in PPT 2013

Wanneer je een video van YouTube invoegt dan kan je die niet automatisch laten afspelen ook al heb je onder Hulpmiddelen voor video op het tabblad Afspelen naast starten gekozen voor Automatisch. Om dat toch te realiseren zal je moeten werken met de insluitcode en daar een kleine wijziging aan toevoegen. Dit werkt voor zowel PPT 2013 als PPT 2016.

Zoek je YouTube video op en klik op de knop Delen.

Klik op de optie Insluiten.

Selecteer de volledige code en klik op de knop Kopiƫren.


Ga nu naar tabblad Invoegen en klik op de knop Video, kies voor Onlinevideo.


Kies voor de optie 'Via de insluitcode van een video' door in het vak te klikken en de gekopieerde code erin te plakken (Ctrl+V).


Klik in het vak van de insluitcode en navigeer met de cursorpijltjes tot op het einde van de videolink die start met https://, maar blijf binnen de sluitende " staan, typ een ? en autoplay=1, druk enter of klik op het pijltje naast het veld. Hieronder een voorbeeld:

<iframe width="560" height="315" src="https://www.youtube.com/embed/NpqmGx7meQw?autoplay=1" frameborder="0" allow="autoplay; encrypted-media" allowfullscreen></iframe>

Start je presentatie, de video zou nu automatisch moeten starten.

18 juni 2018

Start a YouTube video automatically in PPT 2013

When you insert a YouTube video you cannot let it play automatically, even when you choose Automatically next to Start under Video Tools, Play tab. If you want to play the video automatically you will have to use the embed code and modify it slightly.

Open your video in YouTube and click on the Share option.

Click on Embed.


Select the entire code and click on the Copy button.


Choose the Insert tab click the Video button and select the Online Video option.


Select the From a Video Embed Code option by clicking in the box and paste the code (ctrl+v).


Then click in the embed code and position the cursor using the keyboard arrows at the end of the video path (starting with https://.., make sure though that you stay within the quotes. Then type ?autoplay=1, press enter or click the arrow next to the box.

<iframe width="560" height="315" src="https://www.youtube.com/embed/NpqmGx7meQw?autoplay=1" frameborder="0" allow="autoplay; encrypted-media" allowfullscreen></iframe>

Start the presentation, the video should start automatically.

04 juni 2018

Roteren vorm met afbeelding op achtergrond - PPT 2013

Bij het roteren van een vorm kom je voor een probleem te staan. Wanneer je een vorm roteert die met een afbeelding gevuld is dan roteert die mee met de vorm.

Hieronder een voorbeeld van een ingevoegde vijfhoek gevuld met een afbeelding. De vorm werd 90° gedraaid naar rechts.


Als je dit niet wenst kan je dat eenvoudig oplossen. Rechtsklik op de vorm en kies Opmaak van afbeelding, klik op het pictogram Opvulling en lijn in het taakvenster Afbeelding opmaken verwijder het vinkje naast Draaien met vorm.


30 mei 2018

Rotate shape with picture background - PPT 2013

When you rotate a shape there can be a problem. For example you rotate a shape with a background picture. The picture rotates with the shape. That is not always what you want to happen.

See the pentagon below, it is filled with a picture that rotates with the shape. In this case I rotated the shape 90° to the right.


If you do not want this to happen you can easily fix this. Right-click the shape, click Format picture, choose the Fill and line button in the Format picture task pane. Then remove the check next to Rotate with shape.


18 mei 2018

Turn a dingbat character into editable shapes in PPT 2013

Often I need certain clipart that is not available in PPT. Or I need some picture that I can't draw myself because it is too difficult. My drawing talents are limited.

In that case we can use the Merge Shapes function to get what we want.

Say I want to insert an old-fashioned Red Cross ambulance in my presentation. Not so easy, so we will work around it by converting a dingbat from the Webdings font in PPT.

Here are the steps:
  1. Insert a textbox and click Insert - Symbol - select the Webdings font - and add the ambulance character.
  2. Increase the font size of the character so that it reaches the right size.
  3. Draw a rectangle on top of the ambulance.
  4. Put the rectangle in the background using the Send backward button on the Format tab of the Drawing tools.
  5. Now select the rectangle and then the textbox. On the Format tab, in the Insert Shapes group click the Merge Shapes button and select Fragment.
  6. Put the cursor on the edge of the shape and drag it away. All of the shapes are selectable.
  7. Add an appropriate fill to the different shapes.


Second example, I want to insert an umbrella in my presentation.

Here are the steps:
  1. Insert a textbox and click Insert Symbol - select the Segoe El Emoji font - and add the umbrella character.
  2. Increase the font size of the character so that it reaches the right size.
  3. Draw a rectangle above the umbrella.
  4. Put the rectangle in the background using the Send backward button on the Format tab of the Drawing tools.
  5. Now select the rectangle and then the textbox. On the Format tab, in the Insert Shapes group click the Merge Shapes button and select Intersect.
  6. Draw a white rectangle above the umbrella and put it in the background using the Send backward button.
  7. Now select the rectangle and then the textbox. On the Format tab, in the Insert Shapes group click the Merge Shapes button and select Fragment.
  8. Remove the white rectangle.
  9. Put the cursor on the edge of the shape and drag it away. You are left with a simple umbrella, all of the shapes are editable.
  10. Add an appropriate fill to the different shapes. Group if necessary.

04 mei 2018

Een symbool (dingbat) omvormen tot editeerbare vormen in PPT 2013

Het gebeurt heel vaak dat ik in PPT een vorm nodig heb die simpelweg niet bestaat in PPT. Of ik heb een afbeelding nodig die ik niet zelf kan tekenen omdat het te moeilijk is. Mijn tekentalenten zijn heel beperkt.

In zo'n gevallen kan je de Shapes samenvoegen functie gebruiken om te verkrijgen wat je wenst.

Veronderstel dat ik een ouderwetse Rode Kruis ambulance zou willen gebruiken in mijn presentatie. Niet zo gemakkelijk om zelf te tekenen dus ga ik een omweg gebruiken. Met name een dingbat karakter uit een bijgevoegd lettertype in PPT converteren naar editeerbare vormen.

Hierna volgen de benodigde stappen:
  1. Voeg een tekstvak in en klik op Invoegen - Symbool, selecteer het lettertype Webdings in de lijst en voeg het karakter met de ambulance toe.
  2. Verhoog de tekengrootte van het karakter tot je de juiste omvang hebt bereikt.
  3. Teken een rechthoek bovenop het tekstvak.
  4. Plaats de rechthoek op de achtergrond door gebruik te maken van de knop Naar achter uit het tabblad Opmaak van de contextuele tab Hulpmiddelen voor tekenen.
  5. Selecteer nu de rechthoek en het tekstvak. Klik op tabblad Opmaak en kies in de groep Vormen invoegen voor de knop Shapes samenvoegen, klik op Fragmenteren.
  6. Plaats de cursor op de buitenrand van het object en sleep het weg. Alle vormen zijn nu apart editeerbaar.
  7. Voeg een geschikte vulling toe via de knop Opvullen van vorm. Groepeer indien nodig.


Een tweede voorbeeld, stel dat je een paraplu wil gebruiken in je presentatie.

Hier volgen de benodigde stappen:
  1. Voeg een teksvak toe en klik op Invoegen - Symbool, selecteer het lettertype Segoe El Emoji in de lijst en voeg het karakter met de paraplu toe.
  2. Verhoog de tekengrootte van het karakter tot je de juiste omvang hebt bereikt.
  3. Teken een rechthoek bovenop het tekstvak.
  4. Plaats de rechthoek op de achtergrond door gebruik te maken van de knop Naar achter uit het tabblad Opmaak van de contextuele tab Hulpmiddelen voor tekenen.
  5. Selecteer nu de rechthoek en het tekstvak. Klik op tabblad Opmaak en kies in de groep Vormen invoegen voor de knop Shapes samenvoegen, klik op Snijden.
  6. Teken een witte rechthoek bovenop de vorm en zet hem in de achtergrond via de knop Naar achter.
  7. Selecteer nu de rechthoek en het tekstvak. Klik op tabblad Opmaak en kies in de groep Vormen invoegen voor de knop Shapes samenvoegen, klik op Fragmenteren..
  8. Verwijder de witte rechthoek.
  9. Plaats de cursor op de buitenrand van het object en sleep het weg. Er rest nu alleen nog een simpele paraplu; alle vormen zijn apart editeerbaar.
  10. Voeg een geschikte vulling toe via de knop Opvullen van vorm. Groepeer de vormen als dat noodzakelijk is.


28 april 2018

Copy text from image in PPT 2013

If you need to use a text that is part of a picture in PPT you can use OneNote to extract the text.

Open OneNote, go to the section or page where the picture resides or copy and paste it to OneNote.

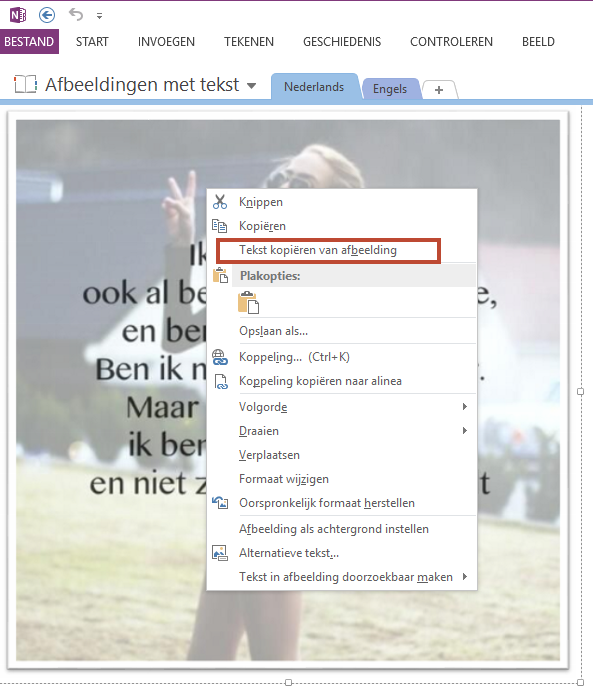
Right-click the picture and choose Copy text from picture in the quick menu. It is in the Windows
clipboard.

Do keep in mind that OneNote will have difficulties in recognizing special fonts, especially those resembling handwritten text.


You can now paste it in PPT or any other program if you like.

17 april 2018

Tekst uit een afbeelding gebruiken in PPT 2013

Wanneer je een tekst wil gebruiken die in een afbeelding is geplaatst kan je gebruik maken van OneNote.

Open OneNote, ga naar de sectie of pagina waar de afbeelding zich bevindt of kopieer en plak ze in OneNote.

Klik erop met je rechtermuisknop en kies uit het snelmenu de optie Tekst kopiƫren van afbeelding.

In PowerPoint kan je nu de tekst plakken in een tijdelijke aanduiding of tekstvak. Hou er wel rekening mee dat OneNote het heel lastig heeft met speciale lettertypes, vooral deze die op handschrift lijken.

05 april 2018

Create half a circle shape in PPT 2013-2019

There is no half circle shape in PPT 2013. Actually there is a three quarter circle shape, which can be adapted using the adjustment handle.


Unfortunately the shape still has its former dimensions if you select it. So, it is not really a demi circle. For example, when you add text to it - that is centered (default) or aligned at the top - the text does not follow the shape.


To avoid this, you can make your own shape.

To do this you have to draw two shapes a circle and a rectangle. Position them above each other and then use the merge shapes tool to make one shape.


Click on the rectangle first then select the circle using shift+click.

Under Drawing Tools, click the Format tab, in the Insert Shapes group click the Merge Shapes button. Choose Intersect now you have a perfect demi circle. Any text you type in the shape will be positioned correctly.