29 april 2020

New shape styles presets in PPT 2016-2019

Starting with version PPT 2016 there are new shapes styles presets available.

Select the shape and under Drawing tools click the Format tab, then click the More button in the Shape styles group.


The new styles are at the bottom:


There are 5 different styles:


The colors are bases on the template color scheme, that is Accents 1-6 and the dark or light background style. See the example below of the Semi-transparent style.


When one selects another color theme colors automatically change to the accent colors of the new theme.
Below an example of the same series of rectangles with the blue green color theme.


22 april 2020

Nieuwe voorinstellingen bij vormstijlen in PPT 2016-2019

Vanaf versie PPT 2016 zijn er een aantal nieuwe vooringestelde vormstijlen beschikbaar.

Selecteer een vorm en ga onder Hulpmiddelen voor tekenen naar het tabblad Opmaak en klik op de knop Meer in de groep Vormstijlen.


Onderaan zie je de nieuwe vooringestelde vormstijlen.


Er zijn 5 verschillende stijlen.


De kleuren zijn gebaseerd op het kleurenthema. Accentkleuren 1 tot en met 6 en donkere of lichte achtergrond. Hieronder een voorbeeld met de semi-transparante stijl.


Wanneer je een ander kleurenthema kiest veranderen de kleuren automatisch naar de accentkleuren van het nieuwe thema.

Hieronder dezelfde semi-transparante stijl maar deze keer in de themakleuren blauwgroen.


16 april 2020

Morphing with text - PPT 2019

When using the Morph transition you also can choose to morph text. Here also you can add, move text, increase/decrease size or change colour. There are two options, morph with words and morph with characters. If you want to try it yourself download this file from my OneDrive.
Climate change

How do you handle it?

  1. First you add the text to the slide.
  2. Then copy the original slide as many times as you need.
  3. On the copies move, increase/decrease size, add, change colour of the text
  4. Finally apply the Morph transition using the Transition tab.

Morph with text

In this presentation the first slide (blank layout) has text and a picture which is placed outside the visible slide.


Copy the first slide three times. You can do that quickly by right clicking the slide and choosing Duplicate slide. Or you can use the keyboard shortcut Alt+Shift+D.

On the copies you add text boxes, move existing text, or change the size and colour. All the text items are in a text box. The picture is moved onto the slide.


Finally click the Transition tab, select slides 2-4 and apply the Morph transition. Then click the Effect options button and choose Words or Characters.


In the video below you can watch an eight-slide presentation.The first four slides use the Words morph effect the last four the Characters morph effect.


Here's a second example:


11 april 2020

Morphing met tekst - PPT 2019

Een tweede mogelijkheid bij Morphing bestaat erin tekst te verplaatsen of te benadrukken. Hier kan je het effect toepassen door te kiezen voor woorden of letters. Als je het zelf wil uitproberen download dan het volgende bestand.
Klimaatverandering

Hoe pak je het aan?
  1. Eerst plaats je de tekst op je dia.
  2. Dan kopieer je de originele dia zoveel keer als nodig is.
  3. Op de kopies verplaats je de tekst, of vergrootroteer of  verander je hem van kleur.
  4. Als laatste stap pas je de Morph diaovergang toe via het tabblad Overgangen.
Morph met tekst

Hieronder zie je de eerste dia (dia-indeling: Leeg) van een presentatie waar morphing is toegepast. Let op de afbeelding die buiten de zichtbare dia is geplaatst.


Die dia kopieer je vervolgens drie keer. Dat kan het snelst via een rechtse klik op de dia en de optie Dia dupliceren. Je kan ook de toetsencombinatie Ctrl+shift+D drukken.

Op de kopies voeg je tekstvakken toe, verplaats je het tekstvak, of verander je de tekst van kleur en grootte. De afbeelding geef je een andere plaats.


Tenslotte ga je naar tabblad Overgangen, selecteer je de dia's 2-4 en klik je op de diaovergang Morphing. Klik dan op de knop Effectopties op het lint Overgangen en kies voor Woorden of Tekens.


In de video hieronder zie je een presentatie bestaande uit 8 dia's. De eerste vier met de effectoptie Woorden de volgende vier met de effectoptie Tekens.


Hieronder een tweede voorbeeld:


03 april 2020

Morphing with shapes - PPT 2019

One of the new functions in PPT 2016-2019 is the slide transition Morph.

This new slide transition lets you apply animations during the transition of one slide to another. With Morph it is possible to make objects, pictures, charts move. In fact you transition gradually from one object to the next.

You can also use Morph to create a zoom effect. See my previous article:
Move and enlarge a picture and return to the same size using morphing

How do you handle it?

  1. First add the content on your slide.
  2. Then copy the original slide as many times as necessary.
  3. On the copies move, enlarge, rotate or change your objects from colour.
  4. Finally apply the Morph transition using the Transition tab.
If you want to try it yourself you can find the original presentation here, I have added the original first slide and a second slide containing the pictures.
Morph with objects

Morph with shapes

Morph is easiest to use when you use the same shapes. You can morph one shape into another shape but then you need a workaround. Morphing a rectangle in a parallelogram is therefore more difficult but not impossible, more on that in a later article.

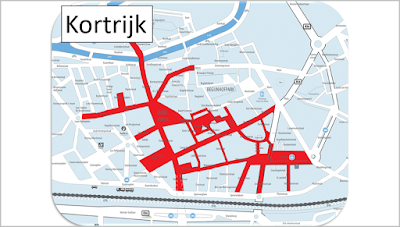
Below is an example of a city map where you want to show the places of interest by zooming in on them with an arrow pointing to a picture. Here is the first slide.


Next you copy the first slide three times. You can do that quickly by right clicking the slide and choosing Duplicate slide. Or you can apply the keyboard shortcut Alt+Shift+D. Remove the text box Kortrijk from slide 2-4.


We want the arrow and picture to appear gradually on slide two whilst changing size and position. So we need to put both objects on slide one in the background, increase the size of the arrow and decrease the size of the picture. That way Morph will have its full effect. To move them to the background under Picture Tools/Drawing tools use the Shape Format tab - button Send backward - Send to back.

Increased/decreased size of the objects slide 1
Objects in the background on slide 1

On slide two, put the two objects back in front. This time use Bring forward and Bring to front.
On slide 3 you need to change the picture using the Format tab under Picture tools, click on the Change picture button in the Adjust group, choose From a file and navigate to the folder where the picture resides and insert it. Move and  rotate the arrow. Repeat the same process for slide 4.


Finally go to the Transition tab and select slides 2-4. Click on the Morph transition icon. By default morph is applied on objects. You can see that when you click the Effect options button in the Transition group.


In the Timing group you can adjust the duration if you want.


Watch the result in this video:


As you can see the Morph effect is the clearest on slide two. The arrow and picture change size. On the other slides the effect is limited to the movement and rotation of the arrows. The pictures do not morph. If you want this to happen you will have to read one of my next articles where I explain how to morph pictures.


26 maart 2020

Morphing met vormen - PPT 2019

Een van de nieuwe functies in PPT 2016-2019 is de diaovergang Morphing.

Deze nieuwe diaovergang laat je toe animaties uit te voeren tijdens de transitie van de ene dia naar de andere. Met Morph is het mogelijk om objecten, afbeeldingen, grafieken, SmartArt enz... te laten bewegen. Eigenlijk ga je van het ene beeld/object geleidelijk over naar een ander beeld/object.

Je kan Morphing ook gebruiken om een zoom-effect te creëren. Voor een voorbeeld zie mijn vorig artikel:
Afbeelding vergroten/verplaatsen en terugkeren naar oorspronkelijk positie via Morphing

Hoe pak je het aan?
  1. Eerst plaats je de volledige inhoud op je dia.
  2. Dan kopieer je de originele dia zoveel keer als nodig is.
  3. Op de kopies verplaats je objecten, vergroot of roteer je ze of verander je ze van kleur.
  4. Als laatste stap pas je de Morph diaovergang toe via het tabblad Overgangen.
Als je dit zelf wil uittesten dan kan je gerust de originele presentatie downloaden van mijn OneDrive, Je zal de originele eerste dia terugvinden en een extra dia met de afbeeldingen.
Morphen met objecten.

Morph met vormen

Morph kan je het makkelijkst toepassen wanneer je dezelfde vorm gebruikt. Werken met andere vormen kan wel maar dan heb je wel een omweg nodig. Een rechthoek morphen in een parallellogram is dus moeilijker maar niet onmogelijk, later meer daarover in een volgend artikel.

Als voorbeeld zie je hieronder een plattegrond van een stad waar je de bezienswaardigheden aanwijst via een pijl en een afbeelding. Hieronder staat de eerste dia.

Dia 1
Als volgende stap kopieer je de eerste dia drie keer. Dat kan het snelst via een rechtse klik op de dia en de optie Dia dupliceren. Je kan ook de toetsencombinatie Ctrl+shift+D drukken. Op dia's 2-4 verwijder je het tekstvak met de naam Kortrijk.


De bedoeling is dat de pijl en de afbeelding gradueel op dia 2 verschijnen terwijl ze van plaats en grootte veranderen. Het Morph effect gebeurt bij de transitie, dia 1 kan dus niet opgenomen worden in de Morph de objecten moeten dus onzichtbaar zijn.

Beide objecten plaats je in de achtergrond op dia 1 en je verandert die ook van grootte en positie. Op deze manier zal Morph volledig tot zijn recht komen.

Selecteer de objecten, klik onder Hulpmiddelen voor Afbeelding/Tekenen op het tabblad Opmaak, groep Rangschikken voor de knop Naar achteren, kies Naar achtergrond. Pas de grootte van beide aan.
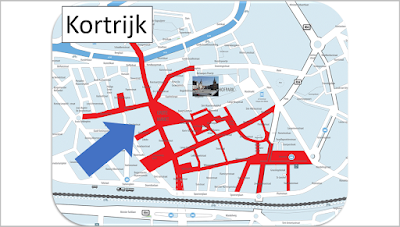


Aangepaste grootte en positie objecten dia 1
Objecten op de achtergrond dia 1

Op dia twee haal je de objecten terug op de voorgrond. Selecteer de pijl en afbeelding via de tabtoets en klik in het tabblad Opmaak op de optie Naar voren en kies Op voorgrond. De grootte dien je niet aan te passen maar de positie en rotatie misschien wel.

Op dia drie moet je de afbeelding vervangen, klik na selectie daarvoor op het tabblad Opmaak en kies de knop Afbeelding wijzigen in de groep Aanpassen. Kies voor Uit een bestand, navigeer naar de folder en klik op Invoegen. Pas de positie en de rotatie van de pijl aan.
Herhaal dezelfde handelingen voor dia 4.


Tenslotte ga je naar het tabblad Overgangen, selecteer dia's 2-4 en klik op de diaovergang Morphing. Standaard wordt er gekozen voor objecten. Klik daarvoor op de knop Effectopties op het lint Overgangen.


In de groep Tijdsinstellingen stel je eventueel de duurtijd van de transitie opnieuw in als dat gewenst is.


Het resultaat kan je hieronder zien in de volgende video:


Zoals je kan zien is het Morph effect het duidelijkst op dia 2. De pijl en afbeelding zijn dan ook qua grootte aangepast.

Op de andere dia's is het effect gelimiteerd tot het roteren en verplaatsen van de pijlen. De afbeeldingen Morphen niet. Als je dat ook wil realiseren lees dan een van mijn volgende artikels.

20 maart 2020

Google map invoegen in PPT 2019

Het kan handig zijn om gebruik te maken van Google maps om een locatie of adres in je PPT presentatie op te nemen. Daarvoor ga je een invoegtoepassing moeten downloaden en installeren in je PowerPoint programma. Gelukkig is dat helemaal niet moeilijk.

Ga naar tabblad Ontwikkelaars, klik op de knop Invoegtoepassingen, klik op de link Store.


Kies een rubriek aan de linkerkant, hier kiezen we voor Afbeeldingen invoegen. Gebruik de verticale scrollbalk en klik op de knop Toevoegen naast de invoegtoepassing OfficeMaps.


Na installatie verschijnt een taakvenster.


Je kan nu in het vak location een locatie invullen, in onderstaand voorbeeld heb ik gekozen voor de Grote markt van mijn geboortestad Kortrijk.


Klik bij de resultaten op het gewenste resultaat. Zoom in of uit met de + en de - knoppen. Klik tenslotte op Insert map.


Met de knop Settings kan je nog enkele instellingen aanpassen. In onderstaand voorbeeld heb ik het formaat aangepast naar 16:9.

Op het lint Invoegen kan je de nieuwe invoegtoepassing terugvinden.


16 maart 2020

Use multilevel outline numbering in PowerPoint 2016-2019

Numbering capabilities in PowerPoint are very limited, especially compared to what is possible in Word. Some years ago I made this article discussing the subject in versions 2003-2007-2010.
Use multilevel outline numbering in PPT 2003-2010
It is time to post an update.

Well, unfortunately nothing has changed in the current versions of PPT, no multilevel numbering added. If you want the real multilevel numbering you still have to use a Microsoft Word object. Skip to item 3 below if that is the case. If you do not want to use automatic numbering and want to do it manually stick with item 1 or 2 below.

You can apply different bullets or numbers/letters to each individual level. You do that in the master of the presentation (Figure 1), go to View and click Master click in each level and choose the numbering button on the Home tab to apply the style you need. Below (Figure 2) I have adjusted the indents on the ruler to have the letter align perfectly with the previous level.
Figure 1: Master of the presentation

Click in the placeholder and use the tab key to choose a lower level or shift+tab for a higher level.
Figure 2: Example of a slide with the master applied

But you cannot create an outline like this one:


1.
1.1.
1.1.1.
2.
2.1.
2.2.
2.3.
3.
3.1.
3.2.

If you still want to use true multilevel numbering you will have to use Word as a workaround.

Here's what you do:
  • Type your outline in Microsoft Word 2016/2019 using the multilevel level numbering button on the Paragraph group of the Home tab and select the multilevel numbering style.

  • Give it the formatting you need.
  • Now select the complete list and click the copy button on the Home tab.
  • In PowerPoint paste the selected list in the Empty layout, you have three possibilities:
1 Paste as picture (non editable)
Click the down arrow under the Paste button and choose the Paste as picture icon


As you can see in the sample below (Figure 3) pasting as a picture is a true reproduction of the original list. You can only enlarge/shrink and move the picture. Editing of course is not possible.

2 Paste unformatted text (partially editable)
 Click the down arrow under the Paste button and choose the Paste as plain text icon.


Pasting as plain text, gives you a list with numbers and text flush aligned. PPT uses the default tabs which are an inch apart.

To make the list appear as the original in Word you have to select the complete list and add a tab stop in the ruler. Then click in front of every second level number and press the Tab key of your keyboard.

You can edit the list in a very limited way (Figure 4), adding a first level number is possible by positioning your cursor and pressing enter. Second level numbers will have to be added/changed manually. Not really a prospect to look out for, so avoid it if possible. See the example below.

Figure 3: different ways of pasting


Figure 4: edit the list

Pasting as plain text in a placeholder is also possible. For instance in the Title and object layout. This gives you the following result:
As you can see PPT pastes the text as expected but every paragraph is preceded with a bullet. That is the default in the master.

To get rid of the bullet click on the placeholders border and click on the numbering button in the paragraph group of the Home tab. To obtain the original look of the list you will have to use the same technique as described above, add tab stop(s)/indents and use your keyboard tab key to align the text. The formatting you applied in the Word outline is gone (bold numbers and text on level 1) which is to be expected as we pasted as unformatted text.

Life gets more complicated when text in the original outline has more than one line. This video shows you what to do after you paste as plain text.


3 Paste as Microsoft Word document (fully editable)
Click the down arrow under the Paste button and choose Paste special, Microsoft Word-document object.


You can edit the outline by double clicking the object in edit mode. This will open up a Word window inside PPT that allows you to make the necessary modifications. When finished click next to the object to place it on the slide again.