Posts tonen met het label merge. Alle posts tonen

05 januari 2022

Merge icons and shapes in PPT 2019

Merging icons and other shapes doesn't seem possible at first glance. This is apparent from the tables below where I have tried all the possibilities of merging. As in previous posts I worked with two objects. You can see the results when the icon (column 2) or the shape is selected first (column 3).


The results are not useful.

To successfully merge icons with other shapes, you must first convert the icon into separate shapes.

This can be done in two ways, the first is via the group function. Select the icon and under Graphics Tools click the Format tab and the Group button and choose Ungroup. A message will appear asking if you want to convert the object to a Microsoft drawing object, click Yes


If you try to merge now you will see that the Merge Shapes button remains gray. To split the icon permanently, Ungroup again. Now you will be able to merge.

Below you can see the selected objects after the first and second ungroup:

The second option is a bit simpler. Select your icon and under Graphics Tools, click the Format tab, then choose the Convert to Shapes button in the Modify group or right click the icon and choose the same.


However, you still have to ungroup again if you want to merge. Select the icon and under Graphics Tools click the Format tab, click the Group button and choose Ungroup.

As ungrouping splits the icon in many pieces you will have to drag around it with your mouse, being careful not to select the underlying object as well. See below for an example.

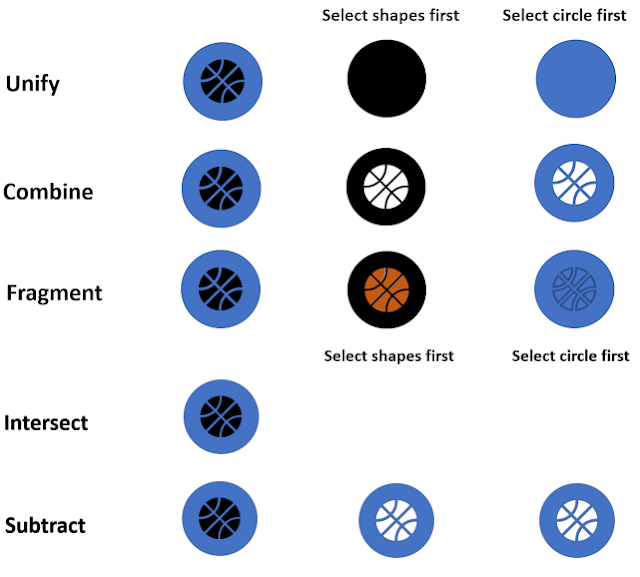
These are the results after the icon was split. Especially with fragmentation you have more options. There you can still adjust the different parts after merging. Below you observe the example of the basketball that has been given its familiar orange colour.


27 december 2021

Merge text and pictures in PPT 2019

You can merge text and a picture in PPT. The use of the different options is much more limited than merging with shapes. In the examples below I merged a picture and a text box.


You can merge in 5 different ways: unite, combine, fragment, intersect, subtract.

After selecting the overlapping objects, you can merge them by clicking on the Format tab under Drawing ToolsInsert Shapes group, Merge Shapes button.


If you select the picture first and merge with the text box unify, combine, intersect and subtract will result in one picture if you fragment several pictures. Text is no longer editable of course.

If you select the text box first then the picture all methods will result in one or several shapes.

In the example below, in the fragment column I used a colored outline with a suitable thickness so you can clearly see that every single letter is a picture. You can see this when you click on an individual letter, the context menu picture tools will be active in the ribbon. 

Merged objects get the colour of the object you select first. Only combine, fragment and intersect are useful.


If you select the picture first and you have a background on your slide other than white, combine and subtract will show that background through the letters. See the example below.


If you select the text box first and you have a background other than white combine will show that background through the letters. See the example below.


08 december 2021

Merge text and shapes in PPT 2019

Text can be merged with shapes.

You can merge in 5 different ways: unite, combine, fragment, intersect, subtract.

After selecting the overlapping shapes, you can merge them by clicking on the Format tab under Drawing Tools, Insert Shapes group, Merge Shapes button.

In the following two examples I used two objects a text box and a shape. You can of course use more objects.

All methods to merge have the same result, with unify, combine, intersect and subtract you get one freeform. Or multiple freeforms if you use fragment.
The merged shapes obtain the colour of the first selected shape.

The tables below show the result of overlapping or non overlapping shapes.

With overlapping objects only subtract gives a different outcome. With fragmenting I changed the colour and tickness of the outline and selected the fragments to show you get several freeform objects.

With non overlapping shapes only fragmenting makes any sense, the other options can be accomplished using the group function.

Overlapping shapes


Non overlapping shapes


18 november 2021

Merge shapes in PPT 2019

Over the years I have written many articles about merging shapes. If you want to see some practical applications of the function, look at the bottom of this post where you can find some links to previous posts.

You can merge in 5 different ways: unite, combine, fragment, section, subtract. After selecting the shapes (overlapping or not), click on the Format tab under Drawing tools, group Insert shapes, button Merge shapes.


The examples below have 2 shapes a rhombus and a circle, you can of course also use multiple objects. In the first row, the second object completely overlaps the first in the second row, only partially. In the second column the rhombus is selected first, in the third column it is the circle.

The formatting (colour, fill etc.) of the result is always that of the first selected object.

Unite

The two shapes are converted to a single freeform, both shapes define the area.


Combine

The two shapes are converted to a single freeform, it contains the area in each object, but not both.

Fragment

The two shapes are converted to several separate shapes, since this is not always clearly visible I made the outline of the shapes more visible and pulled the different objects a bit apart.

Intersect

The two shapes are converted to a single freeform that contains only the area that occurs in both shapes.

Subtract

The two shapes are converted to a single freeform that contains only the area that occurs in both shapes. The second shape selected will be subtracted from the fist shape.

Practical examples in previous blog articles