01 april 2017

Break links from Excel in PPT 2013

Excel data are often linked for internal use. That way you can always have the latest data available. But if you have to send the presentation to an external user it is necessary to break the links.

If you want to see how many links are included in your presentation go to File - Info - on the right hand side you will see all the properties of the presentation, at the bottom there is a link 'Edit links to files'. That link allows you to edit all of the linked files.


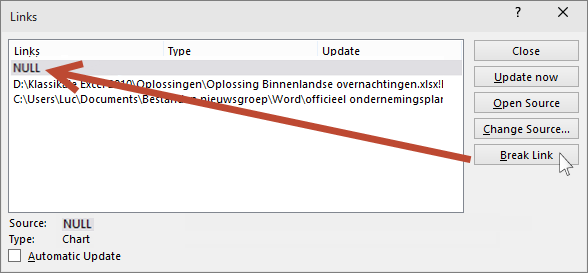
In the dialog box that follows you can see a list of all the linked files in the presentation. If you select a link the original path and type of object will be shown at the bottom of the dialog. In our case this was a chart from Excel.


Links from Excel can point to a complete workbook, graph or range of cells. Other links can be present in the example above there is a link to a Word document.

To break the link to any item just click on the Break Link button. The link to the chart will remain in the list but will get the NULL property. This is a term in computer language that refers to a missing or unknown value in the file.


Now, if you right click the chart in the presentation the Edit data item will be greyed. You can still format the chart in PowerPoint but the data are no longer available.

If you break the link to a workbook or range of cells the object will turn into a picture which can't be edited anymore. When you select the object you will see the contextual tab Picture tools appear.

Be sure to save your presentation under a different name if you still want to update to the latest data.

20 maart 2017

Koppelingen naar Excel verbreken in PPT 2013

Voor intern gebruik worden gegevens uit Excel vaak gekoppeld, bij het presenteren beschik je dan over de meest recente gegevens. Als je de presentatie moet doorsturen is het niet altijd aangewezen dat de bestemmeling over jou gegevens beschikt. Je kan de koppeling naar een bronbestand van Excel verbreken. 

Om te zien hoeveel en welke koppelingen er aanwezig zijn in je PPT presentatie ga je naar Bestand - Info - aan de rechterkant vind je de eigenschappen van het bestand. Daar staat een link Koppelingen naar bestanden bewerken die je toelaat de koppelingen te bewerken.


In het daaropvolgend dialoogvenster staat een lijst van alle gekoppelde bestanden. Onderaan kan je de bron terugvinden met het pad dat verwijst naar je bestand en het type van bestand dat gekoppeld werd, in dit geval was dat bij de eerste koppeling een grafiek.


De koppelingen in een Excel bestand kunnen verwijzen naar een volledig werkblad, een grafiek, of een bereik van cellen. Maar er kunnen natuurlijk ook koppelingen aanwezig zijn die verwijzen naar andere bestanden, in bovenstaand voorbeeld is dat bv. een Word document.

Je kan om het even welke koppeling verbreken door te klikken op de knop Koppeling verbreken. De koppeling naar een grafiek blijft in de lijst staan maar krijgt de eigenschap NULL. NULL is een term uit de informatica die wijst op het feit dat er een ontbrekende of onbekende waarde in het bestand voorkomt. 


Wanneer je met de rechtermuisknop klikt op je grafiek kan je niet meer kiezen voor Gegevens bewerken, de optie staat gegrijsd. De grafiek kan nog opgemaakt worden in PPT maar de gegevens zelf kan je niet meer veranderen.


Als de koppeling verwijst naar een bereik van cellen of een werkblad uit Excel dan verandert het object naar een afbeelding zodat niet meer kan geëditeerd worden. Dat kan je zien als je het object selecteert, automatisch komt bovenaan in het lint de contextuele tab Hulpmiddelen voor Afbeeldingen actief.

Sla de presentatie op onder een andere naam als je later de koppelingen in je presentatie nog wil actualiseren.

16 maart 2017

Ceate blurry text in PPT 2013 (method 2)

I have shown you how to create blurry text in my previous entry.

There is a second possibility, it does not give as good a result but it does the trick.

Make a textbox and format your text the way you want it, in the example below I have adjusted the size of the font and applied bold.

Select your textbox and copy it. Paste it back as a PNG picture use the Paste Special option.


Now select the copied textbox that has turned into a picture, choose Format tab under Picture tools, click the Picture effects button, choose Soft edges, click the number of points, 5 is a good one to begin with. You can increase or decrease afterwards if you click the soft edges options entry at the bottom of the dialog.


Result:


03 maart 2017

Creatie van wazige tekst in PPT 2013 (methode 2)

In mijn vorig artikel gaf ik een methode om tekst wazig te maken.

Hier is er een tweede. Geeft een ietsje minder resultaat maar toch zeker bruikbaar.

Maak tekstvak met tekst in de gewenste grootte. Pas de tekengrootte en de opmaak aan.

Kopieer het tekstvak. Plak terug via Plakken speciaal als een PNG afbeelding.


Selecteer het gekopieerde tekstvak dat nu een afbeelding is geworden, onder Hulpmiddelen voor afbeeldingen, klik op de knop Afbeeldingseffect, kies Vloeiende randen. Selecteer het gepasteaantal punten, 5 is een goed startpunt. Later kan je via de Opties voor vloeiende randen de puntwaarden bijstellen.


Hieronder zie je het resultaat:


24 februari 2017

Create blurry text in PPT 2013

Make a textbox and format your text the way you want it, in the example below I have adjusted the size of the font and applied bold.

Select your textbox and copy it. Paste it back as a Png picture use the Paste Special option.


Now select the copied textbox that has turned into a picture, under Picture Tools, click the Artistic effects button, choose blur.


Result:


17 februari 2017

Creatie van wazige tekst in PPT 2013

Maak een tekstvak met tekst in de gewenste grootte. Pas de tekengrootte en de opmaak aan.

Kopieer het tekstvak. Plak terug via Plakken speciaal als een PNG afbeelding.


Selecteer het gekopieerde tekstvak dat nu een afbeelding is geworden, onder Hulpmiddelen voor afbeeldingen, klik op de knop Artistieke effecten, kies Vervagen.


Hieronder zie je het resultaat:


14 februari 2017

Blog articles in a Word document, year 2016

It is always handy to have a printable copy of interesting articles. I have made a Word document containing all my blog articles over the past year.
Some general articles or general announcements have been left out. Articles referring to previous blog years have also been let out.

Every article has its own page, and there is a table of contents to get quickly tp it. You will see the versions of PPT that can be used to perform a task. Of course some articles only apply to a particular version of PowerPoint.

You can download the document using the following link:

Blog articles, year 2016

10 februari 2017

Blogartikelen in een Word document, jaar 2016

Het is altijd handig om een geprinte versie van artikels bij de hand te hebben.

Algemene artikelen of aankondigingen zijn niet opgenomen in het document. Dat is ook geldig voor de artikelen met verwijzing naar Word documenten van vorige blog jaren.

Ieder artikel krijgt zijn eigen pagina. Een inhoudstafel is beschikbaar en je kan zien welke versies van PPT geschikt zijn om een taak uit te voeren. Sommige artikelen zijn natuurlijk enkel bestemd voor een specifieke PPT versie.

Je kan het  document voor het jaar 2016 downloaden via onderstaande link.

Blogartikelen jaar 2016

30 januari 2017

Combineren van audio met animaties via bladwijzers - PPT 2013

Je kan tijdens een audio fragment ook animaties afspelen. Daarvoor heb je bladwijzers nodig die je op de gewenste plaats instelt.

Klik in de afspeelbalk op de gewenste plaats. Klik onder Hulpmiddelen voor Video op het tabblad Afspelen, klik op de knop Bladwijzer toevoegen uit het tabblad Afspelen. Herhaal dat voor alle bladwijzers.


Hieronder zie je een voorbeeld van een audio fragment met 6 bladwijzers.


In onderstaande dia zullen een aantal foto's via de toegevoegde bladwijzers worden geanimeerd.

De foto's verschijnen op het gekozen tijdstip en verdwijnen wanneer een volgende foto met trigger via bladwijzer wordt geactiveerd.

Selecteer de foto en voeg een animatie toe, terwijl de animatie geselecteerd is klik je op de knop Trigger en je kiest voor Bij bladwijzer, vervolgens selecteer je de gepaste bladwijzer in de lijst.


Herhaal dit voor alle afbeeldingen. In onderstaand voorbeeld heb ik gekozen voor het verdwijnen van de foto wanneer de volgende verschijnt. Daarvoor voeg je voor iedere afbeelding een eindeffect toe dat je in het deelvenster animatie sleept onder de beginanimatie van de daaropvolgende foto, het effect laat je starten met het vorige.


18 januari 2017

Use bookmarks to trigger animations during audio clip - PPT 2013

It is possible to use animation during playing audio or video. To do so you need bookmarks.

Click in the player control bar on the desired spot.
Under Video Tools click the Play tab, click the Add bookmark button.


See this example of an audio file with 6 added bookmarks.

In the slide below you can see some pictures which will be animated by means of the inserted bookmarks..

Pictures will appear at the chosen time and disappear when the next bookmarked picture appears.

Select your picture and add an entrance animation. With the animation still selected, click the Trigger button and choose On bookmark, then select the appropriate bookmark in the list.

Repeat these actions for all the pictures. In the example below I choose an end effect when the next picture appears. To do that add the effect and drag it under the start effect of the following picture. Format it to start with previous.


10 januari 2017

Type text on screen during your presentation - PPT 2013

A user asked me if it was possible to add text on screen during the presentation. Yes, it is possible, to do so you need add an active-x control on your slide.

Click on the Developer tab (if it is not visible go to File - Options - Customize ribbon - click the checkbox next to Developer).

In the controls group click the text button.


Drag a suitable rectangle on your slide where you can type your text. It will look like this:


In the controls group click the Properties button.


Change the properties, in this example I have given a border to the box (BorderStyle), added the possibility to add several lines (Multi lines), activated the Enter key (Enter key behavior), changed the text size/font (Font, click on the three dots at the end of the field), activated WordWrap, named the textbox (Name) and activated the vertical scrollbar (Scrollbars).

If you do not want the box to be visible during the slide show, click next to SpecialEffects and choose fmSpecialEffectflat. This way the box will be invisible, the disadvantage of course is you have to know it is there and its exact location.


If you typed text in the box during the presentation and leave or close the presentation you will be asked to save it, so text will not be lost.


02 januari 2017

Tekst intypen op het scherm tijdens je presentatie - PPT 2013

Kan je tijdens een presentatie nog tekst intypen op je dia? Ja, dat kan.

Daarvoor heb je een besturingselement nodig.

Activeer de tab Ontwikkelaars in het lint (Bestand - Opties - Lint aanpassen - vinkje zetten bij item Ontwikkelaars bij de hoofdtabbladen).

Klik op de knop Tekstvak uit de groep Besturingselementen.


Sleep op je dia een tekstvak in het gewenste formaat.


Klik op de knop Eigenschappen uit de groep Besturingselementen.

Pas de eigenschappen aan naar wens, bij wijze van voorbeeld heb ik hier het vak een rand gegeven, meerdere regels mogelijk gemaakt, de enter-toets actief gezet, de tekstomloop actief gezet, de tekengrootte aangepast, een naam gegeven aan het tekstvak, een verticale schuifbalk geactiveerd.


Voor het wijzigen van het lettertype en tekengrootte klik je in het vak Font en vervolgens op de drie kleine puntjes op het einde.

Wil je dat het vak tijdens de presentatie onzichtbaar is kies dan naast SpecialEffects voor fmSpecialEffectflat. Let wel dat werkt alleen als de achtergrond van de presentatie ingesteld is op wit. Op deze manier stoort het vak niet tijdens de presentatie, het nadeel is dat je moet weten waar je moet klikken om het te activeren.