18 juli 2016

Een afbeelding in achtergrond plaatsen van een tabelcel met bijschrift in PPT 2013

Wanneer je in een cel een afbeelding in de achtergrond plaatst wordt de cel helemaal gevuld. Je kan tekst typen, die komt er echter bovenop en hindert het bekijken van de afbeelding. Als je een bijschrift wil toevoegen kan je de volgende procedure volgen.

Klik met je rechtermuisknop in de cel en kies voor Vorm opmaken. In het taakvenster klik je, indien nodig, op Opvulling.
Bij verschuiven onder en boven geef je hetzelfde percentage op het ene positief (onder) het andere negatief (boven). Op deze manier treedt er geen vervorming op van je afbeelding. Hou er wel rekening mee dat een stukje van je afbeelding niet meer te zien zal zijn.


Onder Hulpmiddelen voor tabellen klik je op het tabblad Indeling. In de groep Uitlijning selecteer je achtereenvolgens de knop Centreren en de knop Onder Uitlijnen.


Nu alleen nog je tekst intypen en het bijschrift is klaar.


11 juli 2016

Een afbeelding in achtergrond van tabelcel plaatsen in PPT 2013-2

In het vorige artikel heb ik uitgelegd hoe je een afbeelding in de achtergrond van een cel plaatst.

Je kan daarbij ook een beroep doen op een Online afbeelding.

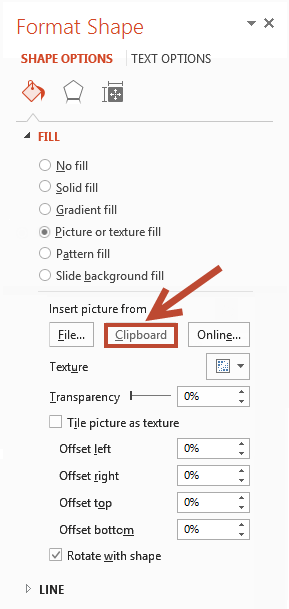
De procedure is nagenoeg dezelfde. Maar in plaats van te klikken op de knop Klembord klik je op de knop Online.


In het dialoogvenster vul je je trefwoord in en je drukt Enter.


Vervolgens selecteer je de afbeelding en je klikt op Invoegen.


01 juli 2016

Een afbeelding in achtergrond van tabelcel plaatsen in PPT 2013

Je kan in PPT gemakkelijk een volledige tabel een afbeelding als achtergrond geven. Zie daarvoor mijn artikel Gebruik een PowerPoint tabel met afbeelding in de achtergrond.

Dat kan ook voor individuele cellen.

Maak je tabel met om het even dewelke tabelstijl.
Voeg je afbeelding toe aan de dia.
Pas de cel aan waar je de afbeelding wil plaatsen. Respecteer daarbij de hoogte/breedte verhouding.


Selecteer de afbeelding en kopieer ze via het lint Start en de knop Kopiƫren.
Plaats de cursor in de cel, klik rechts en kies voor Vorm opmaken.

Klik op Opvulling
Activeer het keuzerondje Opvulling met afbeelding of bitmappatroon
Klik op Klembord

De afbeelding vult nu de cel. Verwijder de originele afbeelding en je bent klaar. Indien je dat wil kan je de tabel nog aanpassen, respecteer daarbij wel de hoogte/breedte verhouding.


23 juni 2016

Put a picture in a table cell background with caption in PPT 2013

It is always nice to have a caption with a picture. When you put a picture in a cell it fills the cell completely. You can type text in the cell but it will cover the picture. If you want a proper caption here is how to proceed.

Right click the cell and choose Format shape, click Fill, and offset the picture bottom and top with an equal percentage, positive and negative so to not to distort it.

Now on the contextual Format tab, click the Center text button and Align bottom buttons in the Alignment group.


 Finally type the text of your caption.


21 juni 2016

Put a picture in a table cell background in PPT 2013-2

In my previous article I explained how to add a picture to the background of the cell.

You can also use an online picture to obtain the same.

Steps are identical, only use the Online button in stead of the Clipboard button.


In the Insert pictures dialog type your keyword and press enter.

Select your picture and click Insert.


15 juni 2016

Put a picture in background of a table cell in PPT 2013

In PPT you can easily put a picture as the background for a complete table.
See my article Using PPT table with a picture background

But what if you only want to put a picture in a single table cell?

Well that is not difficult at all.

Make your table using whatever style you like.
Insert your picture on the slide.


Select your picture and click the copy button on the Home tab.
Size the cell you want to fill.
Right click in the cell, choose Format Shape
Click Fill and then the radio button Picture or texture fill.


Click the Clipboard button, the picture now fills the cell.


Finally remove the original picture.


You can adjust the width and height of the table respecting the aspect ratio, the picture will stay in the cell.

10 juni 2016

Een PowerPoint show met Windows Mediaplayer afspeellijst in achtergrond in PPT 2013 (herwerkt)

Een aantal jaren geleden maakte ik deze drie artikelen over het gebruiken van een Windows Media Player afspeellijst in PPT 2007.

Een PowerPoint show met Windows Media Player afspeellijst in de achtergrond - deel 1
Een PowerPoint show met Windows Media Player afspeellijst in achtergrond - deel 2
Een PowerPoint show met Windows Media Player afspeellijst in de achtergrond - deel 3

Dit is het aangepast artikel voor de versie PPT 2013.

Stap 1
Maak je afspeellijst in Windows Media Player

Hier is een voorbeeld hoe je een afspeellijst moet aanmaken:
Afspeellijst in Windows Media Player

Stap 2
Voeg de afspeellijst toe aan je presentatie

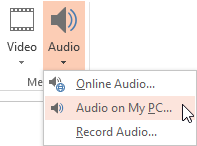
Kies tabblad Invoegen en klik op de Audio knop
Kies Audio op mijn PC
Zoek de map waar de afspeellijst zich bevindt
(meestal ziet dat er zo uit : C:\Gebruikers\Naam gebruiker\Muziek\Afspeellijsten
In de lijst van bestanden kies je Alle bestanden (*.*)
Selecteer je afspeellijst en klik op Invoegen.

Een zwarte rechthoek verschijnt in het midden van je dia. Je kan deze aanpassen of gewoon laten verdwijnen.
Sleep met de handvaten om de grootte aan te passen en sleep de rechthoek in de ruimte naast je dia. Probeer niet van een poster kader toe te voegen met een afbeelding, dat lukt wel maar de afbeelding verdwijnt als je de presentatie afspeelt. Niemand wil een lelijke rechthoek tijdens het afspelen.

Stap 3
De afspeellijst automatisch laten afspelen

Selecteer de zwarte rechthoek.
Onder Hulpmiddelen voor video, klik tabblad Afspelen. Om een of andere reden beschouwd PPT de afspeellijst als een video. Je zou dus net zo goed een afspeellijst kunnen invoegen via de knop Video en Video op mijn PC?
Onder de groep Video-opties naast Starten klik je op het lijstpijltje en je kiest voor Automatisch.


Stap 4
De muziek over meerdere dia's laten afspelen

Selecteer het tabblad Animaties en klik op de knop Deelvenster Animatie
Dubbelklik op de naam van de afspeellijst in het taakvenster.


Onder Afspelen starten selecteer je vanaf begin.
Onder Afspelen stoppen geef je het aantal dia's aan over dewelke de lijst moet spelen, klik OK


Tijdens het presenteren kan je klikken om van de ene naar de andere dia over te stappen terwijl de muziek blijft spelen. Of je kan een timing instellen zodat de presentatie volledig zelfstandig loopt, de keuze is aan jou.

PPT 2016 en later
Het lijkt erop dat de mogelijkheid om een afspeellijst te gebruiken in de achtergrond van een presentatie niet langer mogelijk is in de laatste versies van PPT.


01 juni 2016

Use a playlist from Windows Media player as background music in PPT 2013 (update)

I made these articles on using a windows media player playlist as background music for PPT 2007.
PowerPoint show with Windows Mediaplayer playlist in background - part 1
PowerPoint show with Windows Media Player playlist in background - part 2
PowerPoint show with Windows Media Player playlist in background - part 3


Here's the PPT 2013 update, with some additions and screenshots.

Step 1
Make your playlist in Windows Media Player

If you do not know how to make a playlist see this article:
Create playlist in WMP

Step 2
Insert the playlist in your presentation

Click the Insert tab on the ribbon, choose Audio button


Click on Audio on my PC
Locate the folder where your playlist resides
(usually something like : C:\Users\User Name\Music\Playlists
In the list of files choose All files (*.*)
Select your playlist and click Insert

A black box will appear in the middle of your slide. You can adjust this box or make it disappear.
If you do not want to see the black box, reduce the size with the handles and drag it in the surrounding area of the slide. I tried to add a Poster frame to the box to make it more attractive but the poster seems to disappear when the presentation is started and you are left with an ugly box.

Step 3
Make the playlist play automatically

Select the black box
Under Video tools, click Playback tab? For some reason PPT considers the music playlist as a video. So you could as easily use Insert Video from your PC to play the music.

Under the Video options group, next to Start click the arrow and choose Automatically.


Step 4
Make the music play across multiple slides

Select the Animations tab on the ribbon and click Animation pane
Double click the play item in the animation pane


Under Start playing choose from the beginning
Under Stop playing indicate the number of slides you want the playlist to play, click OK


When presenting you can click when you want to transition from one slide to another. Or you can apply an automatic timing to your slides so that the presentation will run by itself. The choice is yours.

PPT 2016 and later

It seems that it is no longer possible to add a playlist as background music in PPT 2016-2019.


23 mei 2016

Karakters gebruiken met een bovenliggend streepje PPT 2013

In PowerPoint kan je een karakter voorzien van een bovenliggend streepje. Daar zijn verschillende methoden voor.

Gebruik maken van een vergelijking

Kies uit het lint Invoegen in de groep Symbolen de knop Vergelijking, kies onderaan voor Vergelijking invoegen.

Onder Hulpmiddelen voor Vergelijkingen tabblad Ontwerpen kies je de knop Accent, vervolgens het accent Lengteteken.

Typ je karakter en klik buiten de vergelijking om ze te plaatsen op je dia.


Gebruik maken van Invoegen - Symbool


Typ je karakter, kies Invoegen - Symbool - kies in de lijst met lettertypes een geschikt lettertype - Kies onderaan voor Unicode Hex, kies naast Deelverzameling voor Gecombineerde diacritische tekens. Niet alle lettertypes bieden diacritische tekens aan. Courante lettertypes bieden ze aan met wisselende resultaten.  Selecteer bovenliggend streepje en klik Invoegen.

Hieronder het resultaat voor respectievelijk normale tekst, Arial, Calibri, Times New Roman, Tahoma.


Gebruik maken toetsenbordcombinatie


Typ je karakter, druk de combinatie Alt+0773 (gebruik daarvoor het numerieke toetsenbord) en geef een spatie.


Je kan natuurlijk ook andere tekens bovenop plaatsen, bv. 0770, 0771 of 0774


Gebruik maken van app Speciale tekens onder Windows 10 (werkt in iedere versie).


Activeer het programma door te klikken in de zoekbalk van de taakbalk van Windows 10 en typ speciale tekens, druk enter.

  1. Kies je lettertype
  2. typ je karakter
  3. Kies bij groeperen voor Unicode subbereik
  4. Kies deelverzameling Gecombineerde diacritische tekens
  5. Selecteer het teken
  6. Klik op knop Selecteren
  7. Klik op knop KopiĆ«ren
  8. Sluit de app

In PowerPoint plak je het gekopieerde symbool in je tijdelijke aanduiding of tekstvak.

16 mei 2016

Use a character with an overbar in PPT 2013

There are several methods to have a character with an overbar.

Use an equation

Choose Insert tab, click on the Equation button in the Symbols group.

Under Equation tools, Design tab, Structures group, click on Accent button, select the bar accent.


Click in the box and type your character, then click outside of the equation to place it on the slide.

Use Insert Symbol

Type your character, choose Insert - Symbol. Select the font in the list of fonts, at the bottom choose Unicode Hex, choose the subset Combined diacritical marks. Not all fonts offer such characters. Frequently used fonts do with varying results. Select the Combining macron or Combining overline character and click Insert.

See a few examples below, respectively Normal text, Arial, Calibri, Times New Roman, Tahoma.

Use a keyboard combination

Type your character, press Alt+0773 (numeric keyboard), release, press spacebar.


You can, of course add other ones e.g.. 0770, 0771 or 0774


Use the Character map app in Windows 10 (all versions of Windows have this app). 

Acces the app by clicking in the search bar on the Windows taskbar and typing CharMap.exe, then press enter.
  1. Choose your font
  2. Type your character
  3. Next to group by choose Unicode subrange
  4. Choose Combining diacritical marks
  5. Select the character
  6. Click the Select button
  7. Click the Copy button
  8. Close the app

In PowerPoint paste the copied symbol in your placeholder or textbox.

27 april 2016

The many variations for purchasing PPT for Windows/Mac

There are many ways in obtaining PPT. Microsoft seems to favour the subsciption version.

Anyway, it is difficult to keep track. Luckily for us Geetesh Bajaj from Indezine has made a slide with an overview of the still expanding list. He kindly shares it with everyone and will update it when necessary.

Thank you Geetesh, for sharing.

23 april 2016

Show a PowerPoint presentation from within Word 2013 (revisited)

The subject was already discussed for versions 2003-2007-2010. You can find the article by clicking on the following link.
Show PowerPoint presentation in Word

I have added screenshots and elaborated on the topic.


Prepare your presentation in PowerPoint

Open your PowerPoint presentation or make a copy and open it. Click Slide show tab, in the Set up group click the Set Up Slide Show button. 

In the Set Up Show dialog set the presentation to Browsed by an individual (window) and click OK.


Click the Transitions tab on the ribbon, in the Timing group check the After box and choose an appropriate transition time. Finally click Apply to all.


Or record your timings using the Rehearse timing button on the Slide Show tab. The Slide Sorter view will show you each individual timing for the slides.


The presentation will play automatically in Word and will end in a black slide.

Save your presentation and close PowerPoint.


In Word 2013

Click the Insert tab, in the Text group, click Object button. Select the Create from file tab and click Browse. Select your presentation and click OK.


To play your presentation in Word just double click the object. Or right-click the object and choose Presentation object, and click Play.


You can view the presentation in your Word document. Slides will transition automatically on the set timing. If the show ends on a black slide and you want to avoid that you will have to change a PowerPoint option.


Go to File - Options - Advanced - Under Slide show - untick End with black slideOf course you are not obliged to use a timing. If you have not applied an automatic transition you can just click on the slide to transition at your own pace. After the last click you will automatically return to your Word document.